Author Archives: tungle

Using Ansible to install WordPress

This is one of the interesting labs that I have done in the program.

Below are a couple of steps to automatically deploy WordPress via Ansible.

# /etc/ansible/hosts
[tunglamp]
host1 ansible_ssh_host=192.168.5.27

# Create a group_vars (/etc/ansible) and tunglamp file under this directory.
ansible_ssh_user: root

# Create a files (/etc/ansible) directory and index.html.j2 file.
<html>
<head>
	<title>{{ firstname}} - {{ lastname }}</title> 
</head>
<body>
	<h1>{{ firstname }} - {{ lastname }}</h1> 
	<h3>Welcome to Tung's Ansbile Test Page</h3>
	<img src="http://xyz.ca/wp-content/uploads/2015/08/BCIT-demands-LNG-lobby-drop-its-name-from-partner-list.gif">
</body>
</html>

# Create a tungwordpress.yml file.
---
- hosts: tunglamp
  become: root
  gather_facts: false
# we can put variables here too that work in addition to what is in group_vars
  ignore_errors: yes
  vars:
    firstname: "ABC"
    lastname: "XYZ"
    #auser: hellothere
    ansible_ssh_user: root
    wpdbname: tungdbname
    wpdbuser: tungdbuser
    wpdbpass: tungdbpass
    wpdbhost: localhost
    wppath: "/var/www/html"

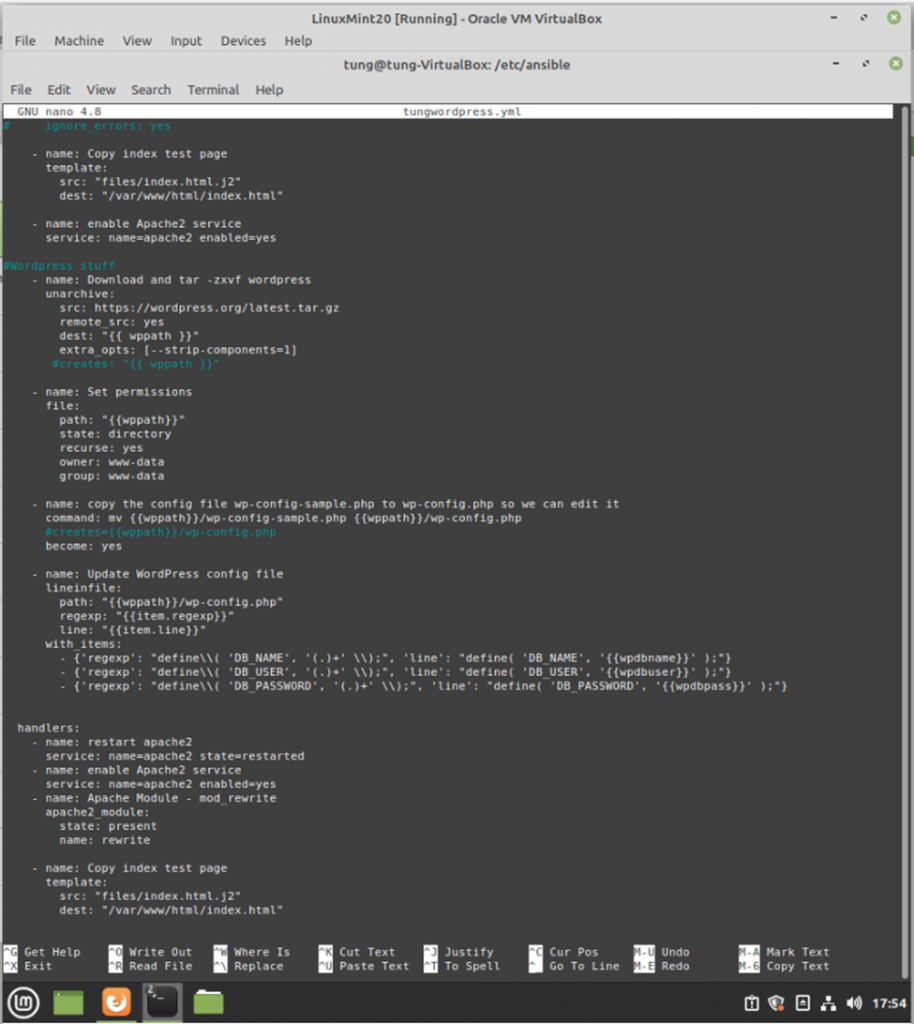
  tasks:
    - name: Install apache2
      apt: name=apache2 state=latest

    - name: Install MySQL (really MariaDB now)
      apt: name=mariadb-server state=latest

    - name: Install MySQL python module 
      apt: name=python-mysqldb state=latest

    - name: Install php
      apt: name=php state=latest
    - name: "Install php-cli"
      apt: name=php-cli state=latest
#    - name: "Install php-mcrypt"
#      apt: name=php-mcrypt state=latest
    - name: "Install php-gd"
      apt: name=php-gd state=latest
    - name: Install php-fpm
      apt: name=php-fpm state=latest
    - name: Install php-common
      apt: name=php-common state=latest
    - name: Install php-mbstring
      apt: name=php-mbstring state=latest
    - name: Install php-xmlrpc
      apt: name=php-xmlrpc state=latest
    - name: Install php-xml
      apt: name=php-xml state=latest
    - name: Install php zip
      apt: name=php-zip state=latest
    - name: Install php-curl
      apt: name=php-curl state=latest
    
    - name: Install apache2 php module
      apt: name=libapache2-mod-php state=latest

    - name: Install php-mysql

## your php installation appears to be missing the mysql extension if we have used ## apt: name=php-mysql state=latest
      apt: name=php7.3-mysql state=latest


#MySQL config
    - name: Create MySQL Database
      mysql_db:
        name: "{{wpdbname}}"
#     ignore_errors: yes

    - name: Create DB user/pass and give the user all privileges
      mysql_user:
        name: "{{wpdbuser}}"
        password: "{{wpdbpass}}"
        priv: '{{wpdbname}}.*:ALL'
        state: present
#     ignore_errors: yes

    - name: Copy index test page
      template:
        src: "files/index.html.j2"
        dest: "/var/www/html/index.html"

    - name: enable Apache2 service
      service: name=apache2 enabled=yes

#Wordpress stuff
    - name: Download and tar -zxvf wordpress
      unarchive:
        src: https://wordpress.org/latest.tar.gz
        remote_src: yes
        dest: "{{ wppath }}"
        extra_opts: [--strip-components=1]
       #creates: "{{ wppath }}"

    - name: Set permissions
      file:
        path: "{{wppath}}"
        state: directory
        recurse: yes
        owner: www-data
        group: www-data
 
    - name: copy the config file wp-config-sample.php to wp-config.php so we can edit it
      command: mv {{wppath}}/wp-config-sample.php {{wppath}}/wp-config.php 
      #creates={{wppath}}/wp-config.php
      become: yes
 
    - name: Update WordPress config file
      lineinfile:
        path: "{{wppath}}/wp-config.php"
        regexp: "{{item.regexp}}"
        line: "{{item.line}}"
      with_items:
        - {'regexp': "define\\( 'DB_NAME', '(.)+' \\);", 'line': "define( 'DB_NAME', '{{wpdbname}}' );"}
        - {'regexp': "define\\( 'DB_USER', '(.)+' \\);", 'line': "define( 'DB_USER', '{{wpdbuser}}' );"}
        - {'regexp': "define\\( 'DB_PASSWORD', '(.)+' \\);", 'line': "define( 'DB_PASSWORD', '{{wpdbpass}}' );"}
     

  handlers:
    - name: restart apache2 
      service: name=apache2 state=restarted
    - name: enable Apache2 service
      service: name=apache2 enabled=yes
    - name: Apache Module - mod_rewrite
      apache2_module:
        state: present
        name: rewrite
  
    - name: Copy index test page
      template:
        src: "files/index.html.j2"
        dest: "/var/www/html/index.html"  

The Debian server is running 192.168.5.27.

Make sure we can access SSH on the Debian server via public key authentication.

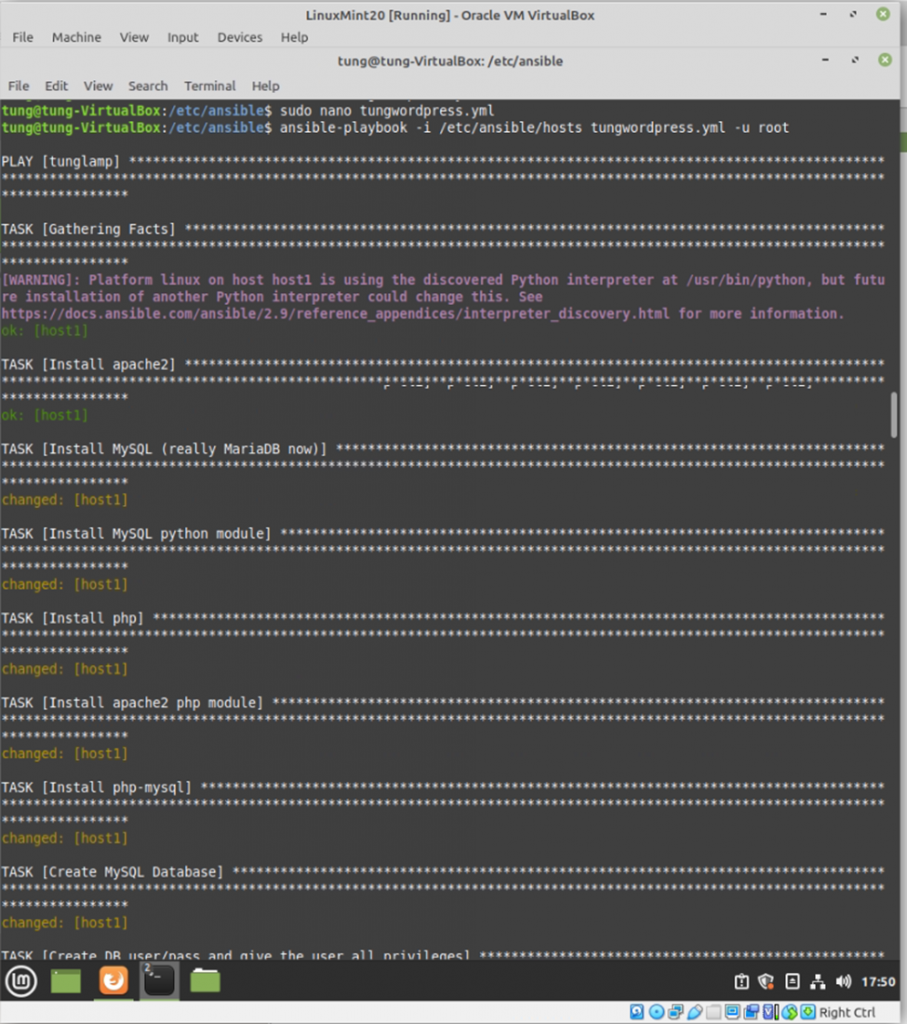
Run ansible-playbook

#/etc/ansible
ansible-playbook -i /etc/ansible/hosts tungwordpress.yml -u root
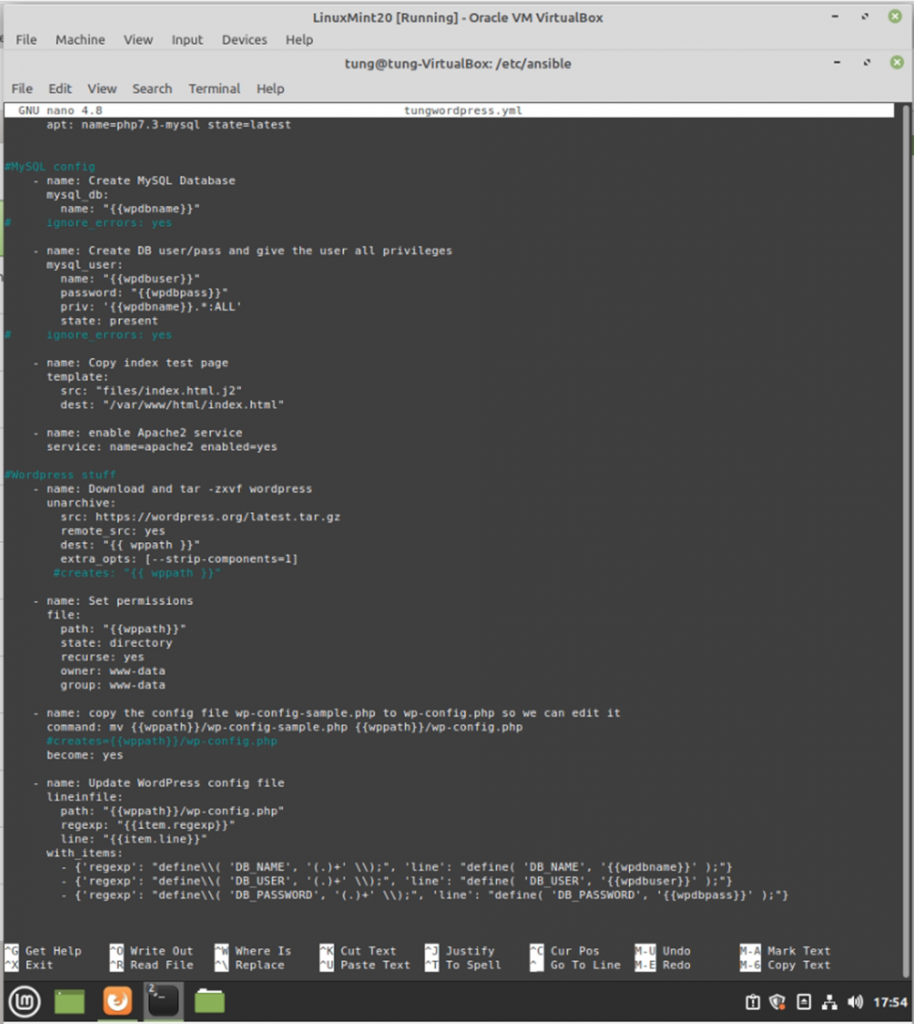
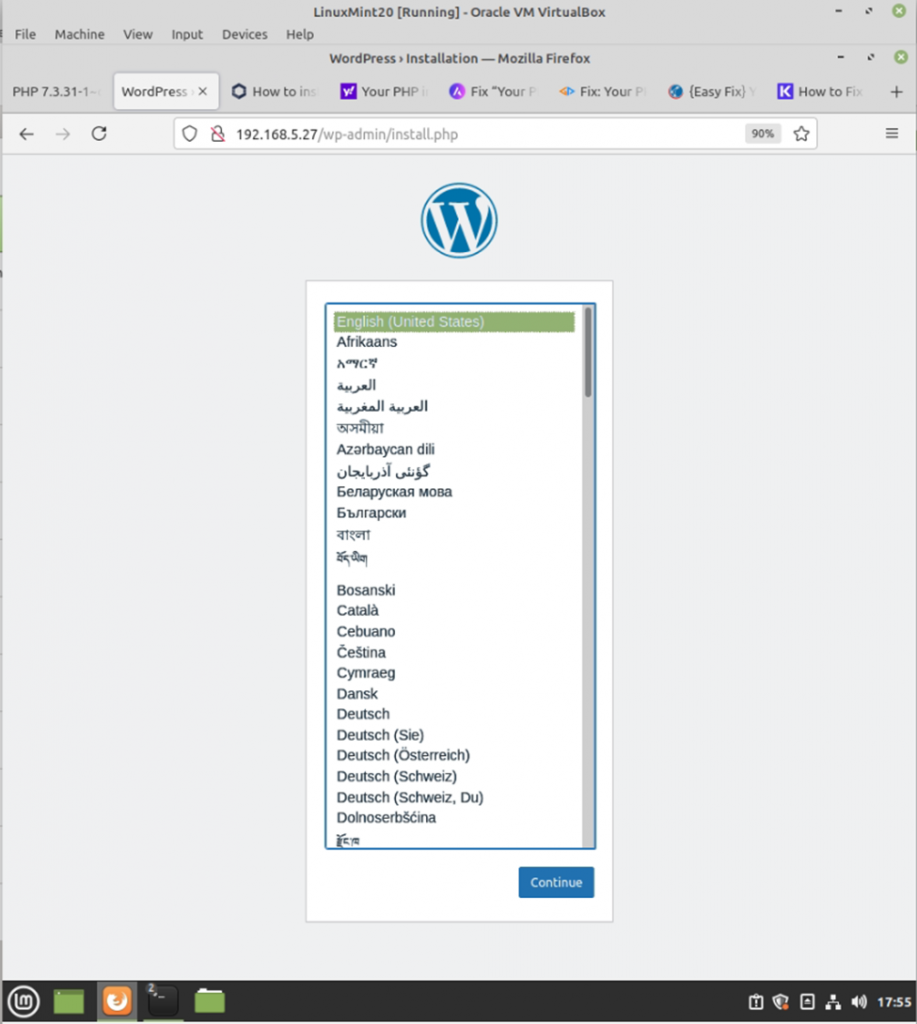
WordPress has been installed automatically via Ansible.
Install IIS Web server on Windows 2019 via Ansible

This is a lab topology that is used to deploy the IIS Web server via Ansible.
Configure WinRM service.

# Download a script to configure WinRM service on Windows Server 2019
# This script sets up both HTTP and HTTPS listeners with a self-signed certificate # and enables the Basic authentication option on the service # (https://docs.ansible.com/ansible/2.5/user_guide/windows_setup.html)
https://raw.githubusercontent.com/ansible/ansible/devel/examples/scripts/ConfigureRemotingForAnsible.ps1 -OutFile ConfigureRemotingForAnsible.ps1
# Run the PS file.
powershell -ExecutionPolicy RemoteSigned .\ConfigureRemotingForAnsible.ps1
.\ConfigureRemotingForAnsible.ps1

Check WinRM service is running and WinRM port status is listening.

Get-nettcpconnection -state listen
get-service | where-object {$_.name -like "*WInRM*"}

Check Windows Firewall to make sure only allow WinRM over SSL on 5986 port, instead of using 5985 port.

Get-NetFirewallRule | where {$_.enabled -eq 'True' -and $_.Direction -eq 'Inbound' -and $_.DisplayName -like "*Allow  WinRM*"}

Add Windows Server 2019 IP address into /etc/ansible/hosts.

[Windows2019]
192.168.5.4

Create a new WIndows2019 file under the group_vars directory. Ansible connects to Windows Server 2019 via WinRM over TLS with the listening port is 5986. The file name should be Windows2019.

Create a sample index.html file to copy to the IIS server directory on WIndows server 2019.

<html>
<head>
	<title>Tung Ansible</title> 
</head>
<body>
	<h1 style="background-color:DodgerBlue;"> Use Ansible to install and configure IIS on WIndows 2019</h1> 
	<h3 style="color:Tomato;"> Welcome to Tung's Ansbile Test Page</h3>
	<img src="http://imagefromtheinternet.jpg">
</body>
</html>

Run ansible to check to access Windows server 2019 machine.

ansible Windows2019 -m win_ping
ansible Windows2019 -m setup
Now, we are ready to create an Ansible playbook for automatically installing and configuring the IIS Web server on Windows server 2019. Also, using ansible to retrieve IP address and disable Windows update service on Windows server machine.
---
- name: Windows Feature
  hosts: Windows2019
  gather_facts: true
#  vars:
#    name:
#     - wuauserv

#  vars:
#    firstname: "ABC"
#    lastname: "XYZ"

  tasks:
    - name: Disable Windows Updates Service
      win_service:
        name: wuauserv
        state: stopped
        enabled: false

    - name: Run ipconfig and return IP address information.
      raw: ipconfig
      register: ipconfig
    - debug: var=ipconfig

#    - name: Reboot
#      win_reboot:
#      when: reboot.reboot_required

# Install and enable IIS on Windows server 2019
    - name: Install IIS
      win_feature:
        name: "Web-Server"
        state: present
        restart: yes
        include_sub_features: yes
        include_management_tools: yes
# Copy the index.html file and rename to ansible.html under C:\inetpub\wwwroot. Must use \\ instead of \ for accessing directory on Windows server.
    - name: Copy index text page
      win_copy:
        src: "files/index.html"
        dest: "C:\\inetpub\\wwwroot\\ansible.html"

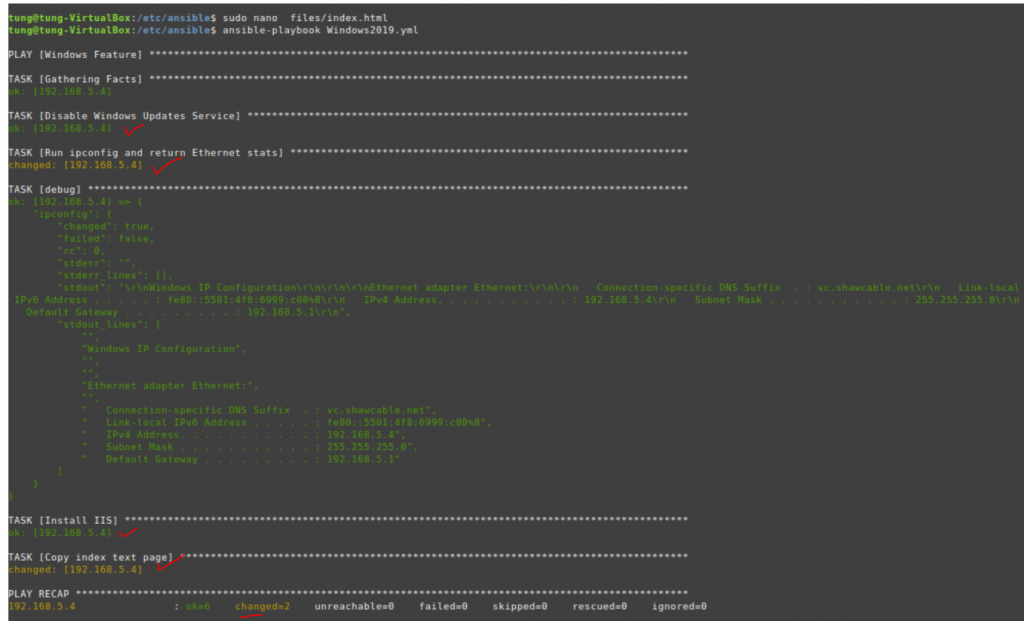
Run ansible-playbook with Windows2019 Yaml file.

ansible-playbook Windows2019.yml

Access the website on Windows server 2019.

On Window server 2019.

Check connections on Windows server 2019.

Install Apache Web server with Ansible

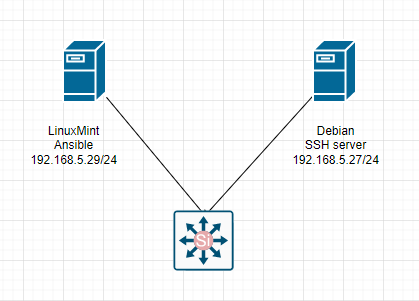
Below is the topology that I have used to install the Apache webserver via Ansible.

This image has an empty alt attribute; its file name is image-460.png

Make sure the Debian server allows Linuxmint to access by using Public key authentication.

On Linuxmint sever.

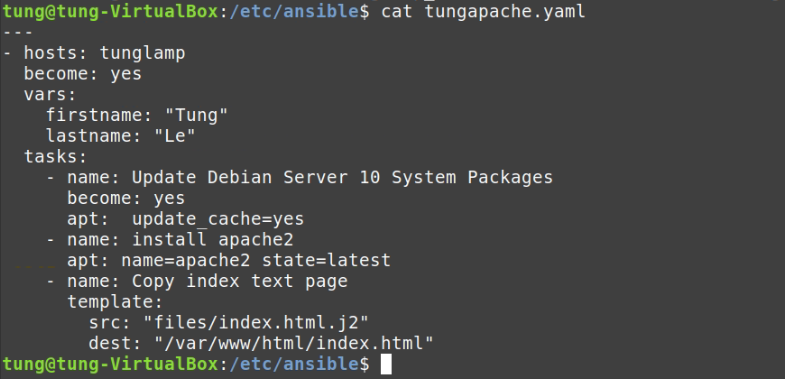
Create a new tungapache.yaml file

---
- hosts: tunglamp
  become: yes
  vars:
    firstname: "XXX"
    lastname: "YYY"
  tasks:
    - name: Update Debian Server 10 System packages
      become: yes
      apt:  update_cache=yes
    - name: install apache2
      apt: name=apache2 state=latest
    - name: Copy index text page
        template:
          src: "files/index.html.j2"
          dest: "/var/www/html/index.html"

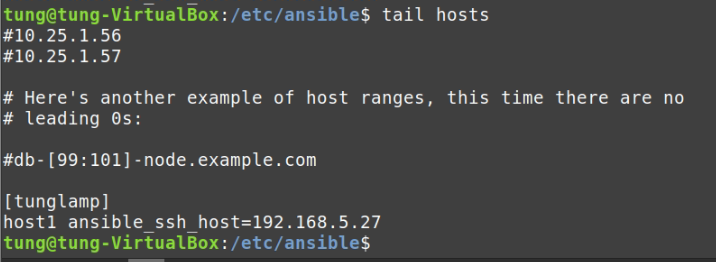
Add Debian server with corresponding IP address information on hosts file.

Go to /etc/ansible directory and create a new files directory.

#pwd /etc/ansible
sudo mkdir files
sudo touch index.html.j2 && sudo nano index.html.j2
<html>
<head>
	<title>{{ firstname}} - {{ lastname }}</title> 
</head>
<body>
	<h1>{{ firstname }} - {{ lastname }}</h1> 
	<h3>Welcome to Tung's Ansbile Test Page</h3>
	<img src="http://imagefromtheinternet.jpg">
</body>
</html>

Run ansible-playbook to install apache webserver on remote Debian Linux server.

ansible-playbook -i /etc/ansible/hosts tungapache.yaml -u root

Check web content on the Debian server.

http://192.168.5.27/index.html

Create an IPSEC site-to-site tunnel between Palo Alto And FortiGate.

This is the lab to use to set up the IPSEC site-to-site tunnel between both devices.

On Palo Alto.

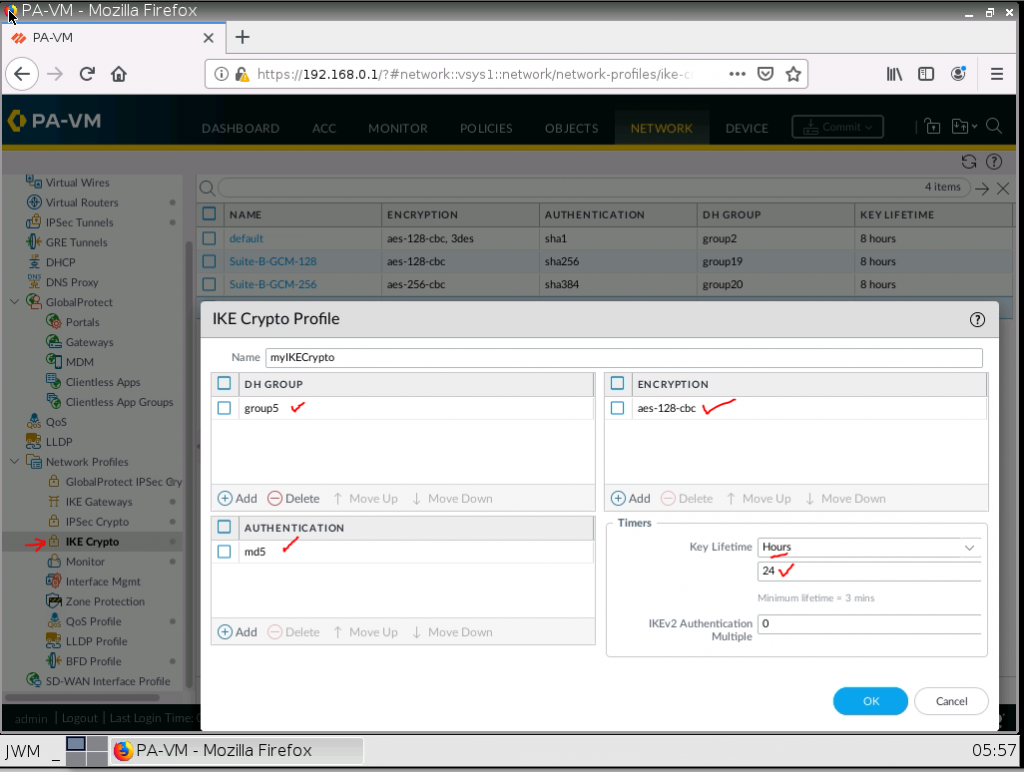
IKE Crypto.

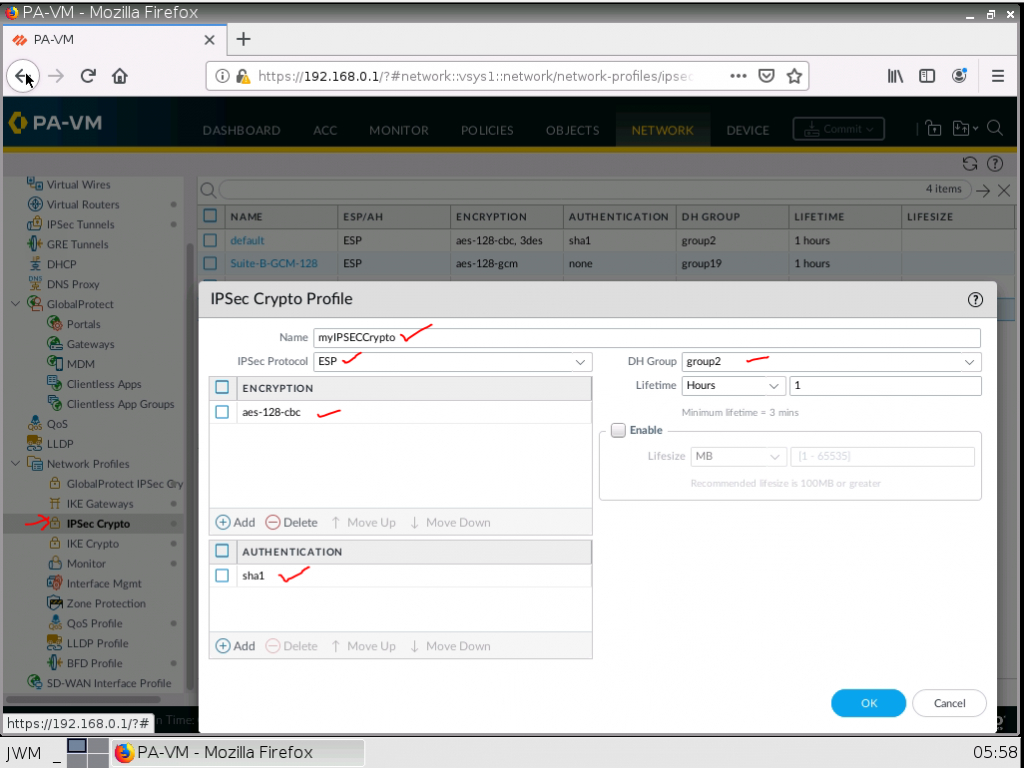
IPSEC Crypto.

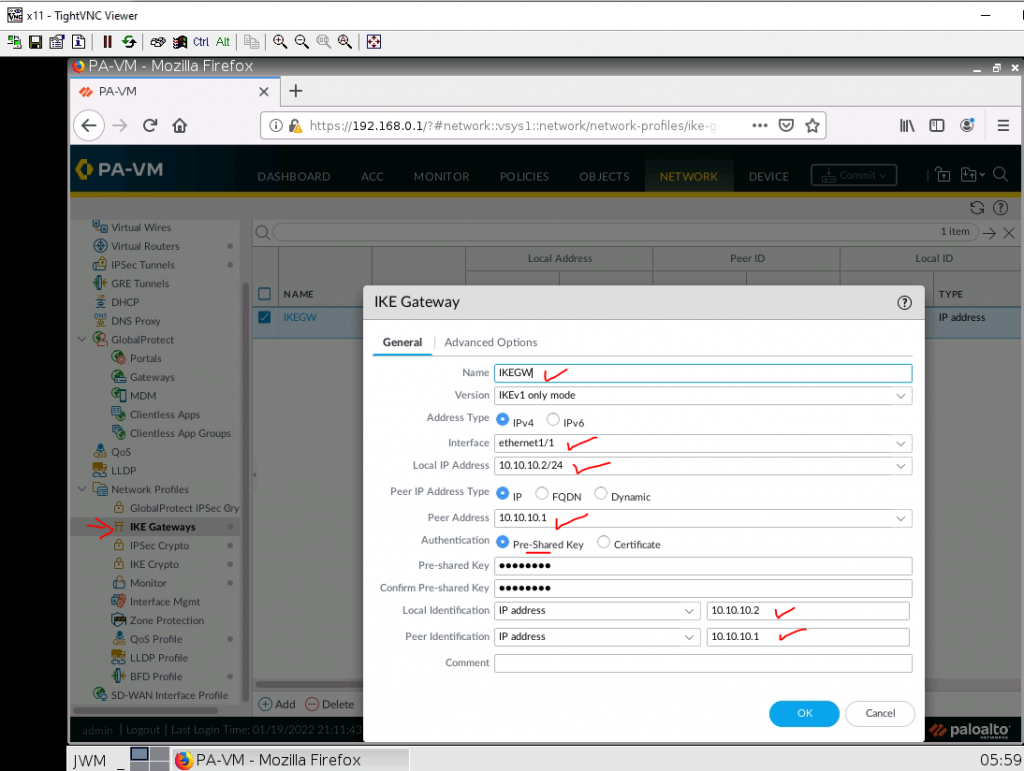
IKE Gateway.

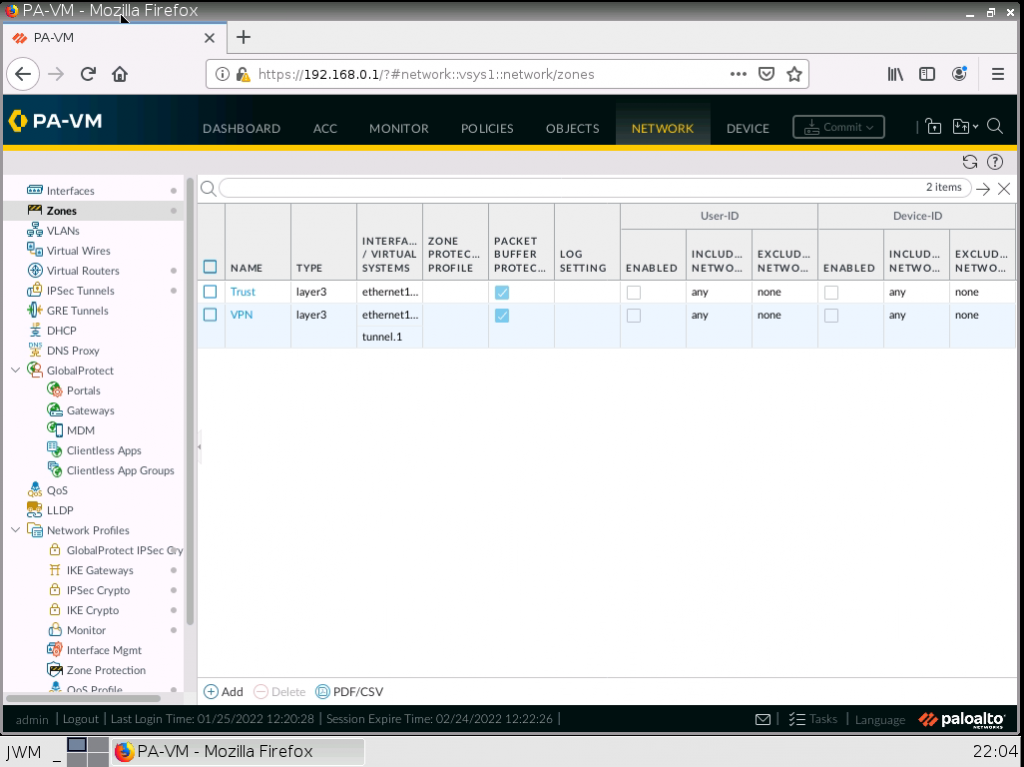
IPSec tunnel.

Create a virtual route from PA to Fortinet.

Create two Security Policies to allow traffic from the “Trusted Zone” of PA to the “Trusted Zone” of Fortinet.

Configure Fortinet.

config system interface
edit port1
set mode dhcp
set allowaccess ping httpd http fgfm
next
end
show system interface 
# show system interface to get IP Address from DHCP

Go to Webterm to configure Fortinet.

Configure a custom VPN Tunnel with the following information.

Configure a static route to allow traffic from Trusted Zone (192.168.20.0/24) on Fortinet to the Trusted Zone (192.168.10.0/24) on PA.

Create two Security policies to allow traffic from VPN to Trusted Zone and vice versa.

Ping and traceroute from a VM on Fortinet to another VM on Palo Alto.

Monitor IPSEC tunnel on Fortinet.

Monitor IPSEC tunnel on PA.

Create a VPN IPSEC site to site between Palo Alto and Cisco Router

This is a lab to set up a VPN site-to-site tunnel between both devices.

Configure interfaces and enable IPSEC VPN site to site on Cisco Router.

R1(config)#int g0/0
R1(config-if)#ip add 192.168.20.1 255.255.255.0
R1(config-if)#no shut


R1(config)#int g1/0
R1(config-if)#des "Connect to PA""
R1(config-if)#ip add 10.10.10.1 255.255.255.0
R1(config-if)#no shut

Create an ACL for VPN.
R1(config)#ip access-list extended ACL
R1(config-ext-nacl)#permit ip 192.168.20.0 0.0.0.255 192.168.10.0 0.0.0.255


Create ISAKMP phase 1 of the tunnel.


R1(config)#crypto isakmp policy 1
R1(config-isakmp)#encr aes
R1(config-isakmp)#hash md5
R1(config-isakmp)#authentication pre-share
R1(config-isakmp)#group 5
R1(config-isakmp)#lifetime 86400
# Assign authentication-key for remote peer.
R1(config)#crypto isakmp key cisco123 address 10.10.10.2


# Create IPSEC transfrom set for phase 2
R1(config)#crypto ipsec transform-set TSET esp-aes esp-sha-hmac

# Create cryoto map to apply the phase 2 settings to the interface
crypto map PA1 10 ipsec-isakmp
set peer 10.10.10.2
set transform-set TSET
match address ACL

# Applly crypto map to an interface.

R1(config-crypto-map)#int g1/0
R1(config-if)#crypto map PA1

# Create a static route to route traffic between both sites.
R1(config)#ip route 0.0.0.0 0.0.0.0 10.10.10.2

Access Palo Alto Web management.

Assign an IP address for interface e1/1 and e1/2.

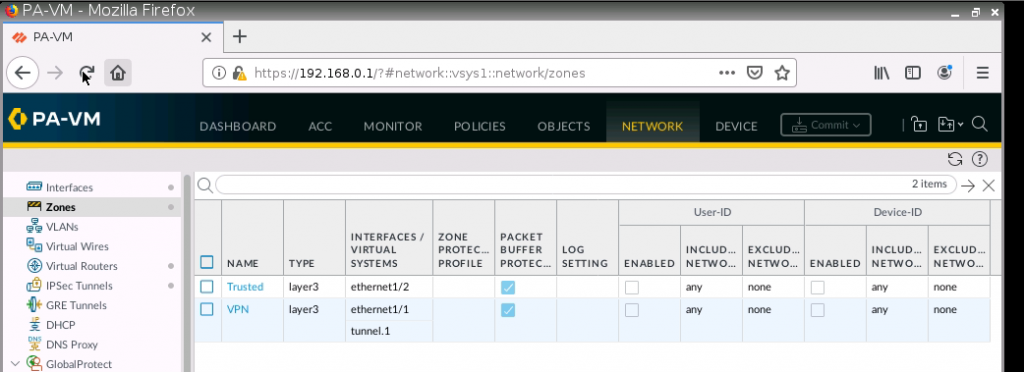
Create a new tunnel 1 on PA.

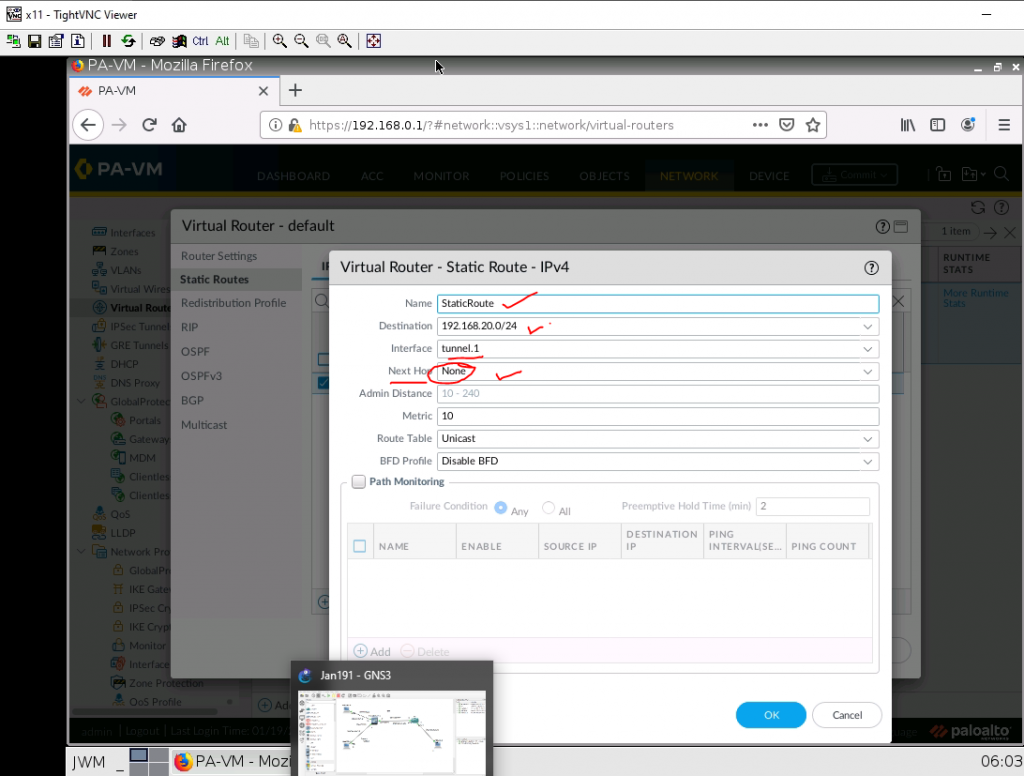
Configure a static route between PA and Cisco Router and set next hop is “None”.

Configure IKECrypto as on Cisco Router.

Configure IKE Gateway.

Configure IPSEC Tunnel.

Configure Proxy ID.

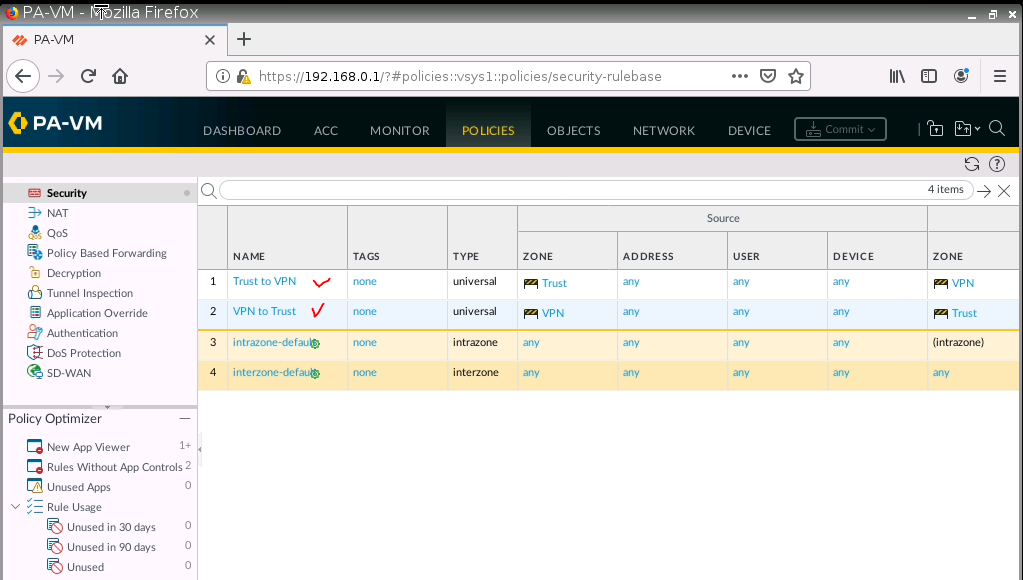
Create both Security policies to allow traffic from the Trusted zone to the VPN zone and vice versa.

From Webterm2 (192.168.10.2) pings Webterm 3 (192.168.20.2).

Check PA, the IPSEC tunnel is up.

Install Zabbix on Linux server

Zabbix is an open-source monitoring software tool for diverse IT components, including networks, servers, virtual machines (VMs), and cloud services. Zabbix is able to monitor a lot of things, also provides a single pane of glass view of your whole IT infrastructure.

Configure the Zabbix repository.

yum install -y centos-release-scl

Install the Zabbix repository configuration package.

rpm -Uvh https://repo.zabbix.com/zabbix/5.0/rhel/7/x86_64/zabbix-release-5.0-1.el7.noarch.rpm

Install Zabbix Server.

yum install -y zabbix-web-mysql-scl zabbix-apache-conf-scl zabbix-server-mysql zabbix-agent --enablerepo=zabbix-frontend

Change timezone.

vi /etc/opt/rh/rh-php72/php-fpm.d/zabbix.conf
php_value[date.timezone] = America/Vancouver

Install MySQL or MariaDB.

yum install -y mariadb-server mariadb

Start mariadb service.

systemctl start mariadb
systemctl status mariadb

Login to MariaDB and create the database and user for our Zabbix installation.

mysql -u root -p

Create a database with information eblow.

DBName:zabbixdb
DBUser: zabbixuser
DBPassword:123456

MariaDB [(none)]> create database zabbixdb character set utf8 collate utf8_bin;
MariaDB [(none)]> grant all privileges on zabbixdb.* to zabbixuser@localhost identified by '123456';
MariaDB [(none)]> flush privileges;
MariaDB [(none)]> exit

Import initial schema and database.

cd /usr/share/doc/zabbix-server-mysql*/
zcat create.sql.gz | mysql -u zabbixuser -p zabbixdb

Update Database Configuration

Edit the zabbix_server.conf file.

DBHost=localhost
DBName=zabbixdb
DBUser=zabbixuser
DBPassword=123456

Restart Zabbix service.

systemctl restart zabbix-server zabbix-agent httpd rh-php72-php-fpm

Enable the service to start automatically on system reboot.

systemctl enable zabbix-server zabbix-agent httpd rh-php72-php-fpm

Disable SELinux.

sudo setenforce 0

Allow Zabbix services on Firewall.

firewall-cmd --permanent --add-port=10050/tcp
firewall-cmd --permanent --add-port=10051/tcp
firewall-cmd --permanent --add-port=80/tcp
firewall-cmd –reload

Setup Zabbix via a web interface.

http://10.0.0.134/zabbix/

Enter zabbixdb, zabbixuser and password.

Zabbix Dashboard.

Username: Admin (Username is case sensitive.)

Passwordzabbix

Zabbix Dashboard.

Check ports are used on the Zabbix server.
netstat -antp | grep "LISTEN"

Install HTTPS web certificate on the Zabbix web interface.

Install mod security.

yum install mod_ssl -y

Copy web server certificate (used wildcard cert *.linuxlab.local) to Zabbix server.

Edit ssl.conf file.

vi /etc/httpd/conf.d/ssl.conf
#SSLCertificateFile /etc/pki/tls/certs/localhost.crt
SSLCertificateFile /etc/pki/tls/certs/wildcard.crt
#SSLCertificateKeyFile /etc/pki/tls/private/localhost.key
SSLCertificateKeyFile /etc/pki/tls/certs/wildcard-cert.key
#SSLCertificateChainFile /etc/pki/tls/certs/server-chain.crt
SSLCertificateChainFile /etc/pki/CA/certs/ourCA.crt

Restart Apache web service.

systemctl restart httpd
systemctl status httpd

Allow HTTPS on Firewall.

firewall-cmd --permanent --add-service=https
firewall-cmd --reload

Access Zabbix server from Windows machine.

https://zabbix.linuxlab.local/zabbix/

Redirect HTTP to HTTPS on Apache by using .htaccess file.

cd /etc/httpd/conf.modules.d/
cat 00-base.conf | grep rewrite
cd /usr/share/zabbix/
touch .htaccess
vi .htaccess
###---
RewriteEngine On
RewriteCond %{HTTPS}  !=on
#RewriteRule ^/?(.*) https://%{SERVER_NAME}/$1 [R,L]
RewriteRule ^/?(.*) https://zabbix.linuxlab.local/$1 [R,L]

Access Zabbix via HTTP. It will redirect the link to HTTPS.

Install Graylog open-source log management on Linux server

Graylog is an open-source log management system. Graylog centrally captures, collects, enhances, stores, and analyzes log data. It is an affordable alternative to Splunk.

Below are a couple of steps to install Graylog on CentOS 7.

Edit interface, change ONBOOT from “no” to “yes”, and restart network service.

Step #1: Update your system and install needed packages.

hostnamectl set-hostname graylog
yum update -y
yum install epel-release
yum install pwgen vim

Step #2: Install JAVA

yum install java-1.8.0-openjdk-headless.x86_64

Check the java version.

java -version

Create a repository file. Then add the content below to this repository.

vim /etc/yum.repos.d/mongodb-org.repo
--
[mongodb-org-4.2]
name=MongoDB Repository
baseurl=https://repo.mongodb.org/yum/redhat/$releasever/mongodb-org/4.2/x86_64/
gpgcheck=1
enabled=1
gpgkey=https://www.mongodb.org/static/pgp/server-4.2.asc

Install MongoDB

yum install mongodb-org

Enable and start mongoDB service on system.

sudo systemctl daemon-reload
sudo systemctl enable mongod.service
sudo systemctl start mongod.service
sudo systemctl --type=service --state=active | grep mongod

Check MongoDB service port.

netstat -antp | grep 27017

Step #4: Installing Elasticsearch

Graylog can be used with Elasticsearch 6x, 7.x, In this lab, I have used version 6x of Elasticsearch.

Install the Elastic GPG key.

rpm –import https://artifacts.elastic.co/GPG-KEY-elasticsearch

Create a repository, then add the following contents to the file.

vim /etc/yum.repos.d/elasticsearch.repo

[elasticsearch-6.x]
name=Elasticsearch repository for 6.x packages
baseurl=https://artifacts.elastic.co/packages/oss-6.x/yum
gpgcheck=1
gpgkey=https://artifacts.elastic.co/GPG-KEY-elasticsearch
enabled=1
autorefresh=1
type=rpm-md

Install the open-source version of Elasticsearch.

yum install elasticsearch-oss

Modify the Elasticsearch configuration file. Set the cluster name to graylog and add “action.auto_create_index: false” to the file.

vim /etc/elasticsearch/elasticsearch.yml

Save and exit the file.

Enable, start and check the status of elastic search on the system.

sudo systemctl daemon-reload
sudo systemctl enable elasticsearch.service
sudo systemctl restart elasticsearch.service
sudo systemctl --type=service --state=active | grep elasticsearch

Check elastic search health.

curl -XGET 'http://localhost:9200/_cluster/health?pretty=true'

Step #5: Installing the Graylog

Now install the Graylog repository configuration with the following commands:

rpm -Uvh https://packages.graylog2.org/repo/packages/graylog-4.2-repository_latest.rpm

Install Graylog-server.

yum install graylog-server

Configure Graylog:

Add “password_secret” and “root_password_sha2” to server.conf file.

Generate password_secret.

pwgen -N 1 -s 96

Generate root_password_sha2.

echo -n foss@dan123 | sha256sum | cut -d” ” -f1

Edit etc/graylog/server/server.conf file.

vim /etc/graylog/server/server.conf

Uncomment the following line.

http_bind_address = 127.0.0.1:9000

and add http_bind_address = 10.0.0.33:9000

Enable and Start service.

systemctl enable graylog-server.service
systemctl start graylog-server.service

Monitor server logs.

tail -f /var/log/graylog-server/server.log

Copy Geo-IP database to Graylog server.

Check log again.

Check Graylog Server listening port.

netstat -antp | grep 9000

Check the port is opened on a remote host.

Allow Graylog service on Firewall.

Access Graylog web interface on another machine.

PowerShell commands and notes

PowerShell commands and notes:

#Recursive file search using PowerShell
Get-ChildItem -Path C:\ -Filter *Graylog* -Recurse -ErrorAction SilentlyContinue -Force
#checkdate in the last 24 hours
$checkdate = (Get-Date).AddHours(-24)
#check all files have been modified in the last 24 hours and output file name, size and the time was last modified
Get-ChildItem -Path C:\Shared -file -Recurse | Where-Object {$_.LastWriteTime -ge $checkdate} | Select-Object -Property Fullname,Length,LastWriteTime
#checkdate in the last 90days
$checkdate = (Get-Date).AddDays(-90)
#check files on the  C:\users\Administrator\Downloads directory and at least 100MB in size and LastWriteTime is less than $checkdate. Then output the result to csv file.
$files = Get-ChildItem -Path C:\users\Administrator\Downloads -file -Recurse |
Where-Object {$_.length -ge 100MB -AND $_.LastWriteTime -le $checkdate} |
Select Fullname,Length,CreationTime,LastWriteTime |
Export-CSV -Path myfiles-90days_100MB.csv

Check WinRM service is running on a remote host.

Test-NetConnection -ComputerName WIN10NEW11 -Port 5985 -WarningAction SilentlyContinue
#shows the last computer name started, running.
get-CimInstance -ClassName win32_operatingsystem -ComputerName $env:computername | Select-Object -property PSComputerName, LastBootUpTime, {(Get-Date) - $_.lastbootuptime}

Get Antivirus Product is installed and its status with PowerShell.

Get-CimInstance -Namespace root/SecurityCenter2 -ClassName AntivirusProduct

List the user accounts in the local administrator group in a Windows machine.

Get-CimInstance win32_group -filter "name = 'administrators' AND LocalAccount = 'true'" | Get-CimAssociatedInstance -ResultClassName win32_useraccount

List all installed software that has a name defined in a Windows machine.

Get-CimInstance win32_product -filter "name like '%'" | Select-Object -property Name,Vendor,Version,Description,InstallDate

Check if Wordpad is running, kills the Wordpad process, and then creates a sample text file that includes the current date that kills the process.

(Get-Process wordpad -ea silentlycontinue) -and (stop-process -name wordpad) -and ("$(Get-Date) killed wordpad") | Out-file C:\Shared\wordpadlog.txt

Search any files that have file extension is .srt on D:\Shared folder, then remove them.

Check before removing.
PS D:\Get-Childitem -path "D:\Shared" -Filter *.srt -Recurse -ErrorAction SilentlyContinue -Force | Remove-Item -Force -Whatif


PS D:\Get-Childitem -path "D:\Shared" -Filter *.srt -Recurse -ErrorAction SilentlyContinue -Force | Remove-Item -Force

Install IIS Web server via PS.

Add-WindowsFeature Web-Server, Web-WebServer, Web-Common-Http, Web-Default-Doc, Web-Dir-Browsing, Web-Http-Errors, Web-Static-Content, Web-Health, Web-Http-Logging, Web-Log-Libraries, Web-Request-Monitor, Web-Performance, Web-Stat-Compression, Web-Security, Web-Filtering, Web-Windows-Auth, Web-App-Dev, Web-Net-Ext45, Web-Asp-Net45, Web-ISAPI-Ext, Web-ISAPI-Filter, Web-Mgmt-Tools, Web-Mgmt-Console, Web-Mgmt-Compat, Web-Metabase, NET-Framework-45-Features, NET-Framework-45-Core, NET-Framework-45-ASPNET, NET-WCF-Services45, NET-WCF-HTTP-Activation45, NET-WCF-TCP-PortSharing45, WAS, WAS-Process-Model, WAS-Config-APIs -restart

Install Active Directory module via PS.

Import-Module ServerManager
Add-WindowsFeature -Name "RSAT-AD-PowerShell" –IncludeAllSubFeature

# Check the installation status of a module
Get-WindowsFeature RSAT-AD-PowerShell

Shut down and Restart Windows machine.

# Stop-Computer -Force -WhatIf
Stop-Computer -Force
# Restart-Computer -Force -WhatIf
Restart-Computer -Force
# Delay restart on 5 seconds
Start-Sleep -Seconds 5 ; Restart-Computer -Force
# Restart machine remotely
Restart-Computer -ComputerName PC1 -Force
# Restart-Computer (Multiple Windows 10 domain joined clients)

(Get-ADComputer -Filter 'operatingsystem -notlike "*server*"').Name | Restart-Computer -Force -ErrorAction silentlycontinue

Get, stop and start Windows services.

Get-Service
# search Windows updates service.
Get-Service | where-object {$_.name -like "*wuauserv*"}
# Start Windows updates service.
Start-Service wuauserv -PassThru
# Stop Windows updates service.
Stop-Service wuauserv -PassThru
# Get Windows updates status
Get-Service -name wuauserv
# Change statustype 
Set-Service -name wuauserv -StartupType Disabled -Status Stopped

Deploy Ublock Origin Ad blocker via a GPO

According to (https://github.com/gorhill/uBlock), Ublock Origin is an efficient blocker add-on for various browsers. Fast, potent, and lean. uBlock Origin is NOT an “ad blocker”: it is a wide-spectrum blocker — which happens to be able to function as a mere “ad blocker”. The default behavior of uBlock Origin when newly installed is to block ads, trackers, and malware sites.

+ Create a central store for GPO

Copies Chrome, Firefox, MS Edge Policy templates under C:\Windows\SYSVOL\sysvol\cisalab.local\Policies\PolicyDefinitions (copy to C:\Windows\SYSVOL\sysvol rather than \\SERVER\SYSVOL folder)

Google Chrome:

https://support.google.com/chrome/a/answer/187202?hl=en#zippy=%2Cwindows

Firefox:

https://support.mozilla.org/en-US/kb/customizing-firefox-using-group-policy-windows

MS Edge:

https://www.microsoft.com/en-us/edge/business/download

+ Create a new Ublock Origin GPO.

+ Configure UBlock Origin GPO.

Google Chrome. Control which extensions are installed silently – Enabled cjpalhdlnbpafiamejdnhcphjbkeiagm;https://clients2.google.com/service/update2/crx

Firefox:

Extensions to Install – Enabled

https://addons.mozilla.org/firefox/downloads/file/3886236/ublock_origin-1.40.2-an+fx.xpi

MS Edge:

Control which extensions are installed silently – Enabled odfafepnkmbhccpbejgmiehpchacaeak;https://edge.microsoft.com/extensionwebstorebase/v1/crx

+ Link UBlock Origin GPO to Domain computers group.

+ Restart Windows 10 domain-joined client to test.

Ublock Origin has been installed automatically on Windows 10 domain clients.

Configure host-check for SSLVPN connections on FortiGate

This is a diagram to do a host-check SSLVPN connections lab.

Enable tunnel-mode SSLVPN

Enable host-check for Antivirus and Firewall enabled on Fortinet.

Windows machine is up to date and Windows Firewall is enabled.

Setup Forticlient on Windows machine.

Move to unpatched and disabled Windows firewall’s machine.

SSLVPN connection is failed.

Enabled Windows Firewall

Windows OS is not up to date.

Creating an SSLVPN connection again, it was failed.

Checking on Forticlient log and Fortinet Web management console.