Category Archives: Linux

Count the number of failed root login in Linux server by IP address via PowerShell

Using (e)grep, cut, awk, sed to extract specific information in Linux logs is one of the daily tasks of Linux system administrator.

grep "Failed" '/var/log/auth.log' | grep -v root | awk -F 'from ' '{ print $2} ' | awk '{print $1}' | sort | uniq -c | sort -nr | while read COUNT IP

However, in this article, I want to demonstrate how to use PowerShell to extract the number of failed root login in Linux server.

Download the /var/log/auth.log example file via github (https://github.com/elastic/examples/blob/master/Machine%20Learning/Security%20Analytics%20Recipes/suspicious_login_activity/data/auth.log)

Save it under Downloads directory. Querying the content of the file via Get-content command.

$inputpath = get-content "/Users/tungle/Downloads/auth.log"

Now, I want to explain how to use PowerShell to extract specific information in the log file. If the number of failed attempts is greater than the LIMIT, then it will display count number, IP address, and Geolocation of the IP address.

Firstly, we need to know a format of the IP address via PowerShell regex.

$regex = "\b\d{1,3}\.\d{1,3}\.\d{1,3}\.\d{1,3}\b"

Filtering all lines are matched the regex format of the IP address in auth.log file.

$output = $inputpath | Select-String -Pattern $regex -AllMatches

Selecting all lines are matched “failed password for root”.

$output = $inputpath | Select-String -Pattern $regex -AllMatches | Select-String "failed password for root" 

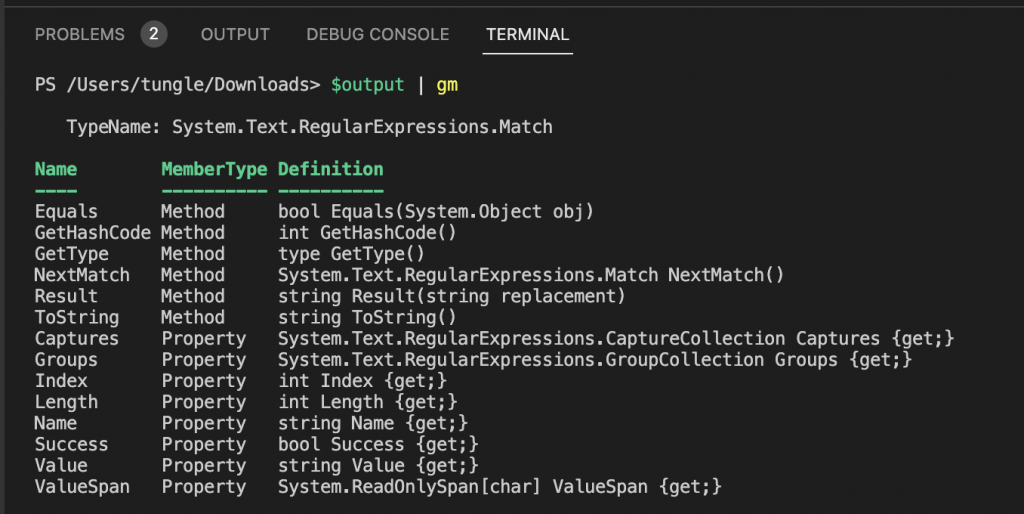
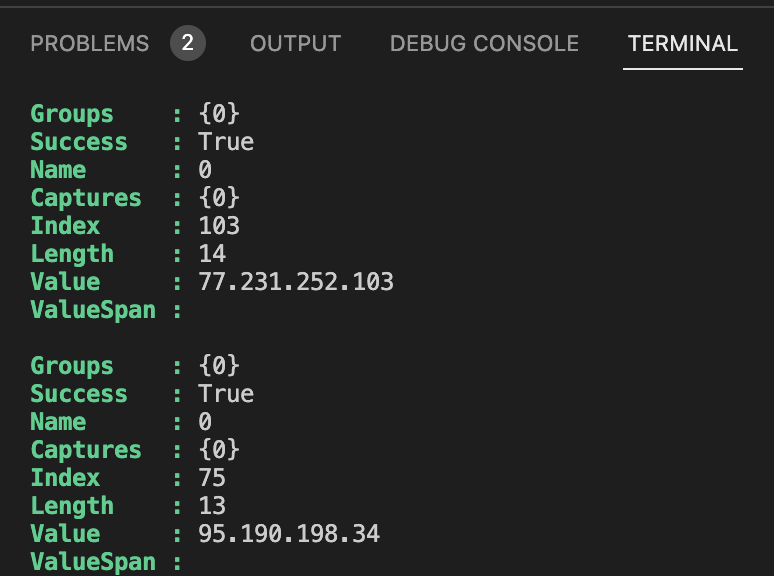
Following the MS link, I use matches method to populate the returned MatchCollection object (https://learn.microsoft.com/en-us/dotnet/api/system.text.regularexpressions.regex.matches?view=netframework-4.7.2). % is an alias of foreach-object.

$output = $inputpath | Select-String -Pattern $regex -AllMatches | Select-String "failed password for root" | % { $_.Matches }

Next, getting IP addresses of the failed login in the log file.

$output = $inputpath | Select-String -Pattern $regex -AllMatches | Select-String "failed password for root" | % { $_.Matches } | % { $_.Value }

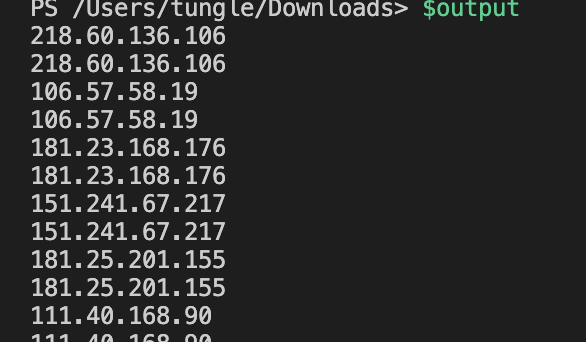
Group the IP address property together.

$output = $inputpath | Select-String -Pattern $regex -AllMatches | Select-String "failed password for root" | % { $_.Matches } | % { $_.Value } `
| Group-Object

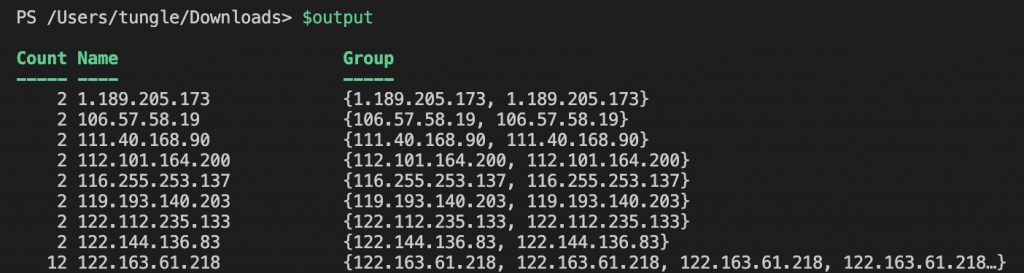
Check if the number of failed attempts is greater than the LIMIT (>10 failed login attempts).

$output = $inputpath | Select-String -Pattern $regex -AllMatches | Select-String "failed password for root" | % { $_.Matches } | % { $_.Value } `
                    | Group-Object |  Select-Object Name, Count | Where-Object { $_.Count -gt 10 }

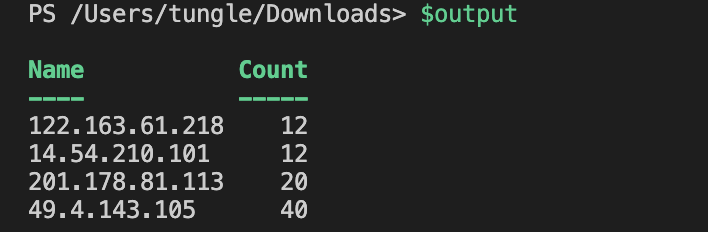
Using the PS script block below to detect attempted IP address, count, and country. Basically, the script will check all lines in the $output variable above and output the top IP address and county attempts.

ForEach($line in $output){
    $IP = $line.Name
    #$IP
    # Query Geolocaltion of the IP addresses via free API
    $result = Invoke-RestMethod -Method Get -Uri http://ip-api.com/json/$IP
    # Create a PSCustomObject to save Count, IP address and Country attempts 
    $myObject = [PSCustomObject]@{
                Count = $line.Count
                "IP Address" = $line.Name
                #IP = $result.query
                Country = $result.Country
}
$myObject
}

Below is a PS script block to check the failed root attempts.

$inputpath = get-content "/Users/tungle/Downloads/auth.log"
#$regex = ‘\b\d{1,3}.\d{1,3}.\d{1,3}.\d{1,3}\b’
$regex = "\b\d{1,3}\.\d{1,3}\.\d{1,3}\.\d{1,3}\b"
#$inputpath | Select-String -Pattern $regex -AllMatches | Select-String "failed password for root"
#$inputpath | Select-String -Pattern $regex -AllMatches | Select-String "failed password for root" | % { $_.Matches }
$output = $inputpath | Select-String -Pattern $regex -AllMatches | Select-String "failed password for root" | % { $_.Matches } | % { $_.Value } `
                    | Group-Object |  Select-Object Name, Count | Where-Object { $_.Count -gt 10 }
ForEach($line in $output){
    $IP = $line.Name
    #$IP
    $result = Invoke-RestMethod -Method Get -Uri http://ip-api.com/json/$IP
    # Create a PSCustomObject to save Count, IP address and Country attempts 
    $myObject = [PSCustomObject]@{
                Count = $line.Count
                "IP Address" = $line.Name
                #IP = $result.query
                Country = $result.Country
}
$myObject
}

This is a PS script (show-attacker.PS1) to run in a cloud-based Linux virtual machine.

$inputpath = get-content "/var/log/auth.log"
#$inputpath = get-content "/Users/tungle/Downloads/auth.log.txt"
$regex = "\b\d{1,3}\.\d{1,3}\.\d{1,3}\.\d{1,3}\b"
$output = $inputpath | Select-String -Pattern $regex -AllMatches | Select-String "failed password for root" | % { $_.Matches } | % { $_.Value } `
| Group-Object |  Select-Object Name, Count | Where-Object {$_.Count -gt 20}
ForEach($line in $output){
        $IP = $line.Name
        $result = Invoke-RestMethod -Method Get -Uri http://ip-api.com/json/$IP
        # Sleep a second 
        Start-Sleep 1
    	#Write-Output $_count
        $myObject = [PSCustomObject]@{
        	Count = $line.Count
		"IPAddress" = $line.Name
            	#IP = $result.query
            	Country = $result.Country
}
    $myObject
}

Run the script in Linux server.

./show-attacker.PS1 | Sort-Object Count -Descending

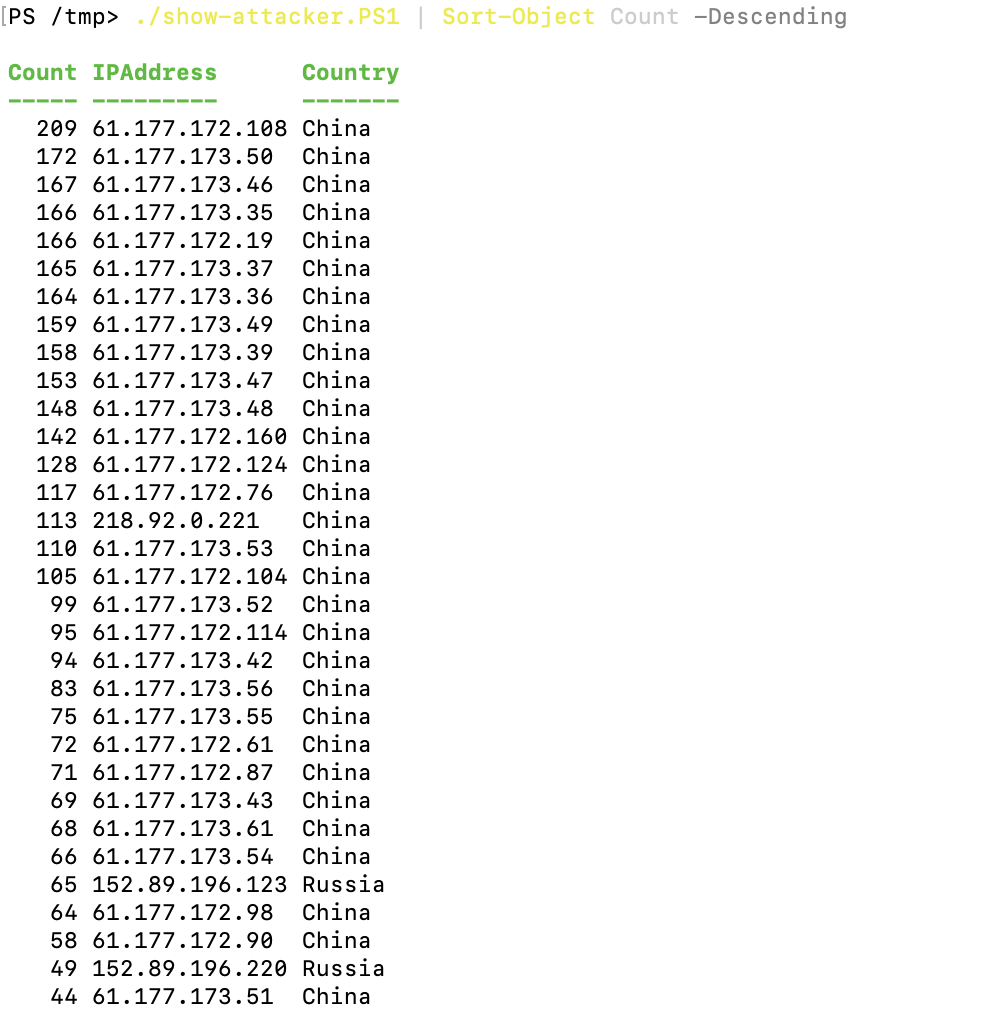
Finally, we can extract specific information of authentication logs in Linux server by using PowerShell.

Deploying WordPress and MySQL with Kubernetes on AWS

This is a diagram that I have used for this lab.

+ Create a Ubuntu Linux instance with 2GB RAM and 30GB storage for Kubernetes.

+ Create a MySQL deployment file.

#mysql-deployment.yaml

apiVersion: v1
kind: Service
metadata:
  name: wordpress-mysql
  labels:
    app: wordpress
spec:
  ports:
    - port: 3306
  selector:
    app: wordpress
    tier: mysql
  clusterIP: None
---
apiVersion: v1
kind: PersistentVolumeClaim
metadata:
  name: mysql-pv-claim
  labels:
    app: wordpress
spec:
  accessModes:
    - ReadWriteOnce
  resources:
    requests:
      storage: 20Gi
---
apiVersion: apps/v1
kind: Deployment
metadata:
  name: wordpress-mysql
  labels:
    app: wordpress
spec:
  selector:
    matchLabels:
      app: wordpress
      tier: mysql
  strategy:
    type: Recreate
  template:
    metadata:
      labels:
        app: wordpress
        tier: mysql
    spec:
      containers:
      - image: mysql:5.6
        name: mysql
        env:
        - name: MYSQL_ROOT_PASSWORD
          valueFrom:
            secretKeyRef:
              name: mysql-pass
              key: password
        ports:
        - containerPort: 3306
          name: mysql
        volumeMounts:
        - name: mysql-persistent-storage
          mountPath: /var/lib/mysql
      volumes:
      - name: mysql-persistent-storage
        persistentVolumeClaim:
          claimName: mysql-pv-claim

+ Create a WordPress deployment file

#wordpress-deployment.yaml

apiVersion: v1
kind: Service
metadata:
  name: wordpress
  labels:
    app: wordpress
spec:
  ports:
    - port: 80
  selector:
    app: wordpress
    tier: frontend
  type: LoadBalancer
---
apiVersion: v1
kind: PersistentVolumeClaim
metadata:
  name: wp-pv-claim
  labels:
    app: wordpress
spec:
  accessModes:
    - ReadWriteOnce
  resources:
    requests:
      storage: 20Gi
---
apiVersion: apps/v1
kind: Deployment
metadata:
  name: wordpress
  labels:
    app: wordpress
spec:
  selector:
    matchLabels:
      app: wordpress
      tier: frontend
  strategy:
    type: Recreate
  template:
    metadata:
      labels:
        app: wordpress
        tier: frontend
    spec:
      containers:
      - image: wordpress:4.8-apache
        name: wordpress
        env:
        - name: WORDPRESS_DB_HOST
          value: wordpress-mysql
        - name: WORDPRESS_DB_PASSWORD
          valueFrom:
            secretKeyRef:
              name: mysql-pass
              key: password
        ports:
        - containerPort: 80
          name: wordpress
        volumeMounts:
        - name: wordpress-persistent-storage
          mountPath: /var/www/html
      volumes:
      - name: wordpress-persistent-storage
        persistentVolumeClaim:
          claimName: wp-pv-claim

+ Download the MySQL deployment configuration file.

sudo curl -LO https://k8s.io/examples/application/wordpress/mysql-deployment.yaml

+ Download the WordPress configuration file.

sudo curl -LO https://k8s.io/examples/application/wordpress/wordpress-deployment.yaml

+ Create a kustomization.yaml.

secretGenerator:
- name: mysql-pass
  literals:
  - password=YOUR_PASSWORD
resources:
  - mysql-deployment.yaml
  - wordpress-deployment.yaml

+ Enable DNS dashboard storage.

microk8s enable dns dashboard storage

+ Apply and verify

microk8s kubectl apply -k ./

+ Verify a PersistentVolumeClaims (PVC) got dynamically provisioned.

microk8s kubectl get pvc

+ Verify the Pod is running.

microk8s kubectl get pods

+ Check Kubernetes is running.

microk8s kubectl get all --all-namespaces

+ Expose port 80 via External IP address (10.0.0.10) of Kubernetes instance on AWS. This allows accessing WordPress via the Internet.

microk8s kubectl patch svc wordpress -n default -p '{"spec": {"type": "LoadBalancer", "externalIPs":["10.0.0.10"]}}'

Check the port 80 is listening on the Kubernetes host.

+ Verify the WordPress service is running.

Access the WordPress on Kubernetes. (http://54.165.173.81)

Using Docker compose to deploy WordPress

I have demonstrated to use Ansible to deploy WordPress (https://tungle.ca/?p=1252). However, it is more efficient to use Docker compose to deploy WordPress.

+ Download the Latest Docker Version.

curl -L "https://github.com/docker/compose/releases/download/1.29.2/docker-compose-$(uname -s)-$(uname -m)" -o /usr/local/bin/docker-compose

+ Change file permission & check docker version.

chmod +x /usr/local/bin/docker-compose
docker–compose --version

+ Create a sample docker-compose.yml file.

Use the following link as a reference to create the docker-compose file.

https://docs.docker.com/samples/wordpress/

Port forwarding the destination port 5547 on the docker node to port 80 on a docker container.

Limit 2GB memory for running WordPress.

+ Deploy WordPress by using Docker compose.

docker-compose up -d

Check a TCP port 5547 is running on the docker node.

Access to WordPress.

Install Docker Swarm Cluster on Debian 10

This is diagram is used to deploy the 3 nodes Docker swarm.

On three nodes: docker01, docker02, and docker03.

apt-get update

Install Docker CE on Debian 10.

apt-get install apt-transport-https ca-certificates curl gnupg-agent software-properties-common

Add Docker GPG key and Docker repository.

curl -fsSL https://download.docker.com/linux/debian/gpg | apt-key add -
add-apt-repository "deb [arch=amd64] https://download.docker.com/linux/debian $(lsb_release -cs) stable"

Install Docker Engine

apt-get update
apt-get install docker-ce docker-ce-cli

Enable and start Docker daemon.

systemctl start docker
systemctl enable docker

+ Initialize Docker Swarm Cluster on node 1: docker01

docker swarm init --advertise-addr 192.168.5.46

Join docker02 and docker03 to the cluster.

Create a custom httpd image with the listening port is 8847.

We can check if the worker nodes have joined to cluster successfully using the command below:

docker node ls

+ Deploy Applications on Docker Swarm

Below is an example to deploy an Apache web service with the listening port is 8847 and service name is tunghttp

docker service create --name tunghttp -p 8847:80 httpd

+ Scale Applications on Docker Swarm to have high availability and high performance on 3 nodes.

docker service scale tunghttp=3
docker service ps tunghttp

Create a new index.html file on the docker host. Then, copy the file to the Apache webserver directory as a screenshot below.

<html>
<head>
<title>Tung A01</title> 
</head>
<body>
	<h1 Welcome to the web server that is deployed by Docker </h1>
	<img src="http://imagefromtheinternet.jpg">
</body>
</html>

Open the web browser and access the web server via port 8847 on three Docker IP addresses.

Check three nodes.

 docker node ls

Check the 8847 port is running on the Docker node.

netstat -ant | grep 8847

 Build Kubernetes cluster with MicroK8s

Below is a process to install the Kubernetes cluster on three nodes. with MicroK8s.

+ Deploying MicroK8s on node 1, node 2, and node 3

Install MicroK8s directly from the snap store.

sudo apt install snapd

To follow a specific upstream release series it’s possible to select a channel during installation, for example, v1.18 series.

sudo snap install microk8s --classic --channel=1.18/stable

Configure your firewall to allow pod-to-pod and pod-to-internet communication.

sudo ufw allow in on cni0 && sudo ufw allow out on cni0
sudo ufw default allow routed

Dashboard, core-dns, or local storage can be enabled by running the microk8s enable command:

microk8s enable dns dashboard storage
sudo usermod -a -G microk8s tung
sudo chown -f -R tung ~/.kube
newgrp microk8s

Get the output of the first node.

Get token.

Copy and paste the token on the following screenshot.

Kubernetes dashboard.

Get status of mircok8s service.

Do previous steps on node 2 and node 3. We do not need to install dashboard service on node 2 and node 3.

+ Create a MicroK8s multi-node cluster.

Now let’s focus on creating the Kubernetes cluster. On the first node run a command below.

microk8s add-node

This command will give you the following output:

On node 2, join the cluster.

Repeat this process (including generating a token, run it from the joining node) for the third node.

+ Deploy a sample containerized application

Let’s now create a microbot deployment with three pods via the kubectl cli. Run this on any of the control plane nodes:

microk8s kubectl create deployment microbot --image=dontrebootme/microbot:v1
microk8s kubectl scale deployment microbot --replicas=3

To expose our deployment we need to create a service:

microk8s kubectl expose deployment microbot --type=NodePort --port=80 --name=microbot-service

After a few minutes, check your cluster.

Check IP address of the K8S node.

Access micro-bot service via the port 30711.

Kubernetes dashboard.

Send Palo Alto, FortiGate, Cisco Router, and Linux Server logs to Splunk

This is a diagram that I have used to deploy this lab.

Log in to Splunk, and download Cisco Suite for Splunk, Fortigate, and Palo Alto app for Splunk.

Click Install app from file.

On Splunk.

+ Palo Alto

Go to Settings – Data inputs – New Local UDP.

Enter the port 5514 on the Port setting

Source type: pan_log

App Control: Palo Alto Networks

Method: IP

Index: Default

On Palo Alto, configure to send logs to Splunk server with destination port is 5514.

Commit, log off and log on to generate logs.

Back to Splunk.

Click Palo Alto App – Operations – Real-time Event Feed.

+ Cisco Router R1.

conf t
logging trap informational
logging host 142.232.197.8 transport udp port 5515 

On Splunk.

Port 5515

Source type: cisco:asa

App Context: Cisco Suite for Splunk

Method: IP

Index: default.

Back to Router, send sample logs to Splunk.

end
send log "Tung Le"
send log "Tung Le"

+ On Kali Linux.

sudo su
nano /etc/rsyslog.conf
##Add the following line to the end of the file. The listening port is 5516.
*.*                @142.232.198.8:5516

Restart rsyslog service.

systemctl restart rsyslog
systemctl status rsyslog

Back to Splunk, configure the listening port for the Linux server is 5516

source type: Syslog

app context: Apps Browser

Back to Kali, type the command below to generate logs to Splunk.

logger "Tung Le"

+ FortiGate:

Configure FortiGate to send logs to Splunk via the UDP port 5517.

config log syslogd setting
set status enable
set server 142.232.197.8
set port 5517
end 

Log into FortiGate, and enable the setting below to send logs to Splunk.

On Splunk, configure port is 5517.

Source type: fgt_log

App Context: FortiGate

Method: IP

Index: Default

Log off FortiGate, type w wrong password to generate logs.

Install Kubernetes on LinuxMint

Firstly, install Kubernetes and snapd package.

sudo apt install kubernetes snapd

Get an error as a screenshot below.

Enter “sudo rm /etc/apt/preferences.d/nosnap.pref”

sudo apt-get update
sudo apt-get install

Run the command above again.

Next, install Kurbenetes.

kubernetes install

+ Create our first app deployment using nginx.

microk8s.kubectl create deployment nginx --image nginx

+ Add your user to the microk8s admin group.

+ View all running services.

microk8s.kubectl get all

+ Enable Dashboard.

microk8s.enable dns dashboard

+ List all namespaces in microk8s. Take note of the IP address of the Kubernetes dashboard.

microk8s.kubectl get all –all-namespaces

Kubernetes has created a couple of new network interfaces.

+ View token.

token=$(microk8s kubectl -n kube-system get secret | grep default-token | cut -d " " -f1)
microk8s kubectl -n kube-system describe secret $token

+ Access to Kubernetes dashboard https://10.152.183.198, and enter the token on the previous step.

Implementing OpenVPN server on Debian 10

Below is a lab topology to use to implement the OpenVPN solution on Debian 10.

In this lab, we need to make sure clients on the Internet are able to create secure OpenVPN connections to the OpenVPN server. Also, the OpenVPN client is able to access inside the network beside the VPN tunnel (LAMP subnet: 192.168.131.0/24), and still access the Internet. Moreover, the Split tunneling feature should be used to make sure only traffic is related to accessing the LAMP subnet will be routed via the OpenVPN tunnel. All other traffic will use a public network adapter (Internet).

IP addresses of Debian OpenVPN server.

Access SSH from LinuxMint to easy to copy and paste commands.

Upgrade Debian’s machine.

apt-get update -y
apt-get upgrade -y

+ Enable IP Forwarding

Edit the file /etc/sysctl.conf and add the line below at the end of the file.

net.ipv4.ip_forward = 1

+ Enable proxy_arp for arp entry to appear on the OpenVPN server.

echo 1 > /proc/sys/net/ipv4/conf/all/proxy_arp

+ Add a line below into /etc/sysctl.conf to make it permanent.

net.ipv4.conf.all.proxy_arp=1

Run the following command to make the changes work.

sysctl -p

+ Install OpenVPN server.

apt-get install openvpn -y

Copy the easy-rsa directory from /usr/share directory to /etc/openvpn directory.for managing SSL certificates.

cp -r /usr/share/easy-rsa /etc/openvpn/

+ Set up Certificate Authority (CA)

cd /etc/openvpn/easy-rsa
nano vars
#Add information below to the file.
set_var EASYRSA                 "$PWD"
set_var EASYRSA_PKI             "$EASYRSA/pki"
set_var EASYRSA_DN              "cn_only"
set_var EASYRSA_REQ_COUNTRY     "CANADA"
set_var EASYRSA_REQ_PROVINCE    "BC"
set_var EASYRSA_REQ_CITY        "Vancouver"
set_var EASYRSA_REQ_ORG         "BCIT Student"
set_var EASYRSA_REQ_EMAIL	"admin@newhorizon.ca"
set_var EASYRSA_REQ_OU          "BCIT Student"
set_var EASYRSA_KEY_SIZE        2048
set_var EASYRSA_ALGO            rsa
set_var EASYRSA_CA_EXPIRE	7500
set_var EASYRSA_CERT_EXPIRE     365
set_var EASYRSA_NS_SUPPORT	"no"
set_var EASYRSA_NS_COMMENT	"BCIT Student CERTIFICATE AUTHORITY"
set_var EASYRSA_EXT_DIR         "$EASYRSA/x509-types"
set_var EASYRSA_SSL_CONF        "$EASYRSA/openssl-easyrsa.cnf"
set_var EASYRSA_DIGEST          "sha256"

 Run the following command to initiate your own PKI.

./easyrsa init-pki

Build the CA certificates.

./easyrsa build-ca

+ Generate Server Certificate Files.

./easyrsa gen-req tung-server nopass

+ Sign the public key of the Server Using Root CA.

./easyrsa sign-req server tung-server

Verify cert.

openssl verify -CAfile pki/ca.crt pki/issued/tung-server.crt 

+ Create a strong Diffie-Hellman key to use for the key exchange

./easyrsa gen-dh

After creating all certificate files, copy them to the /etc/openvpn/server/ directory.

cp pki/ca.crt /etc/openvpn/server/
cp pki/dh.pem /etc/openvpn/server/
cp pki/private/tung-server.key /etc/openvpn/server/
cp pki/issued/tung-server.crt /etc/openvpn/server/

+ Generate Client Certificate and Key File

./easyrsa gen-req client nopass

Next, sign the client key using your CA certificate.

./easyrsa sign-req client client

Next, copy all client certificate and key file to the /etc/openvpn/client/ directory

cp pki/ca.crt /etc/openvpn/client/
cp pki/issued/client.crt /etc/openvpn/client/
cp pki/private/client.key /etc/openvpn/client/

+ Configure OpenVPN Server

nano /etc/openvpn/server.conf
#---
root@debian10new:~# cat /etc/openvpn/server.conf 
port 1194
proto udp
# USE TCP
#port 4443
#proto tcp-server
dev tun
ca /etc/openvpn/server/ca.crt
cert /etc/openvpn/server/tung-server.crt
key /etc/openvpn/server/tung-server.key
dh /etc/openvpn/server/dh.pem
# OpenVPN tunnel IP address range
server 172.16.1.0 255.255.255.0
# server 192.168.131.0 255.255.255.0
# route all traffic via OpenVPN
push "redirect-gateway def1"
push "dhcp-option DNS 8.8.8.8"
duplicate-cn
cipher AES-256-CBC
tls-version-min 1.2
tls-cipher TLS-DHE-RSA-WITH-AES-256-GCM-SHA384:TLS-DHE-RSA-WITH-AES-256-CBC-SHA256:TLS-DHE-RSA-WITH-AES-128-GCM-SHA256:TLS-DHE-RSA-WITH-AES-128-CBC-SHA256
auth SHA512
auth-nocache
keepalive 20 60
persist-key
persist-tun
#disable compress lz4 because of error on OpenVPN client
#compress lz4
daemon
user nobody
group nogroup
log-append /var/log/openvpn.log
verb 3
root@debian10new:~# 
#---

+ Start OpenVPN service.

systemctl start openvpn@server
systemctl enable openvpn@server
systemctl status openvpn@server

Show OpenVPN tunnel.

ip a show tun0

+ Generate client configuration.

nano /etc/openvpn/client/client.ovpn
#---
client
dev tun
# USE UDP
proto udp
remote 10.0.0.52 1194

# USE TCP
#proto tcp-server
# Public IP address on OpenVPN is 10.0.0.52
#remote 10.0.0.52 4443
ca ca.crt
cert client.crt
key client.key
#remote-cert-tls server
cipher AES-256-CBC
# Below lines is important to allow OpenVPN is still accessing the Internet when making OpenVPN session.
# Split tunneling on OpenVPN
# https://forums.openvpn.net/viewtopic.php?t=8229
route-nopull
# the LAN subnet that you need to access via VPN tunnel
route 192.168.131.0 255.255.255.0 vpn_gateway
auth SHA512
auth-nocache
tls-version-min 1.2
tls-cipher TLS-DHE-RSA-WITH-AES-256-GCM-SHA384:TLS-DHE-RSA-WITH-AES-256-CBC-SHA256:TLS-DHE-RSA-WITH-AES-128-GCM-SHA256:TLS-DHE-RSA-WITH-AES-128-CBC-SHA256
resolv-retry infinite
#compress lz4
nobind
persist-key
persist-tun
mute-replay-warnings
verb 3
#---

+ Configure routing using UFW.

By default, the UFW firewall is not installed in Debian 10.

apt-get install ufw -y

Configure UFW to accept the forwarded packets.

nano /etc/default/ufw
# Change the following line:

DEFAULT_FORWARD_POLICY="ACCEPT"
nano /etc/ufw/before.rules

Note: Replace ens3 with the name of your public network interface in Debian OpenVPN server is ens35.

Allow the default OpenVPN port 1194 and OpenSSH. Then, reload the UFW firewall.

ufw allow 1194/udp
ufw allow OpenSSH
ufw disable
ufw enable

+ Connect OpenVPN from a client.

Install OpenVPN from the Kali machine.

apt-get install openvpn -y

On the client machine, run the command below to download all the client configuration files.

# public-vpn-server-ip: is 10.0.0.52
scp -r root@public-vpn-server-ip:/etc/openvpn/client .

Check OpenVPN tunnel.

On OpenVPN client.

ping 8.8.8.8 (Internet)

ping 192.168.131.134 (OpenVPN gw tunnel)

ping 192.168.131.128 (LAMP server behind OpenVPN server)

We can see split tunneling is working well on OpenVPN.

Access LAMP server.

On Debian OpenVPN server.

Check routing table on OpenVPN server.

Check OpenVPN logs on the OpenVPN server.

Monitor traffic on the OpenVPN server. OpenVPN traffic is using port 1194 UDP. OpenVPN traffic is encrypted using this tunnel.

Implementing open-source Wazuh SIEM

Wazuh is a free, open-source, and enterprise-ready security monitoring solution for threat detection, integrity monitoring, incident response, and compliance.

Below is a topology to implement Wazuh solution.

Below are a couple of steps in this lab.

  • Install Wazuh on LinuxMint
  • Configure Agentless on LAMP server
  • Install Agent on WordPress

+ Install Wazuh on LinuxMint 20.

Following Wazuh link below to install it into LinuxMint 20

https://documentation.wazuh.com/current/installation-guide/open-distro/distributed-deployment/step-by-step-installation/index.html

Login to Wazuh management interface.

+ Using a link below to Configure Agentless monitoring on Wazuh.

https://documentation.wazuh.com/current/user-manual/capabilities/agentless-monitoring/how-it-works.html

To set up that method of access, firstly you need to create ssh keys for the user ossec which is the account the agentless scripts run.

sudo -u ossec ssh-keygen

Copy SSH public key to Debian server that you want to monitor via agentless.

Using the add the option will specify a new device to be added to the manager. “NOPASS” may be entered as the password to use public-key authentication rather than using a password.

Back to Wazuh management interface and add the code below into ossec.conf file to monitor Linux servers with any changes on /bin / etc and /sbin directory.

<agentless>
  <type>ssh_integrity_check_linux</type>
  <frequency>3600</frequency>
  <host>root@192.168.5.41</host>
  <state>periodic</state>
  <arguments>/bin /etc/ /sbin</arguments>
</agentless>

Create a new file under /etc/tung and tung1 user. Security events have been generated on Wazuh from Debian server.

/var/ossec/bin/wazuh-control restart

Wazuh Security Dashboard.

+ Install Wazuh agent on Debian server.

Follow the link below to install Wazuh agent.

https://documentation.wazuh.com/current/installation-guide/wazuh-agent/wazuh-agent-package-linux.html

# Add the Wazuh repository
curl -s https://packages.wazuh.com/key/GPG-KEY-WAZUH | apt-key add -
# Add the repository:
echo "deb https://packages.wazuh.com/4.x/apt/ stable main" | tee -a /etc/apt/sources.list.d/wazuh.list
# Update the package information:
apt-get update
# Deploy a Wazuh agent
WAZUH_MANAGER="192.168.5.34" apt-get install wazuh-agent
# Enable and start Wazuh
systemctl daemon-reload
systemctl enable wazuh-agent
systemctl start wazuh-agent

Wazuh agent on Windows machine.

Using Ansible to install WordPress

This is one of the interesting labs that I have done in the program.

Below are a couple of steps to automatically deploy WordPress via Ansible.

# /etc/ansible/hosts
[tunglamp]
host1 ansible_ssh_host=192.168.5.27

# Create a group_vars (/etc/ansible) and tunglamp file under this directory.
ansible_ssh_user: root

# Create a files (/etc/ansible) directory and index.html.j2 file.
<html>
<head>
	<title>{{ firstname}} - {{ lastname }}</title> 
</head>
<body>
	<h1>{{ firstname }} - {{ lastname }}</h1> 
	<h3>Welcome to Tung's Ansbile Test Page</h3>
	<img src="http://xyz.ca/wp-content/uploads/2015/08/BCIT-demands-LNG-lobby-drop-its-name-from-partner-list.gif">
</body>
</html>

# Create a tungwordpress.yml file.
---
- hosts: tunglamp
  become: root
  gather_facts: false
# we can put variables here too that work in addition to what is in group_vars
  ignore_errors: yes
  vars:
    firstname: "ABC"
    lastname: "XYZ"
    #auser: hellothere
    ansible_ssh_user: root
    wpdbname: tungdbname
    wpdbuser: tungdbuser
    wpdbpass: tungdbpass
    wpdbhost: localhost
    wppath: "/var/www/html"

  tasks:
    - name: Install apache2
      apt: name=apache2 state=latest

    - name: Install MySQL (really MariaDB now)
      apt: name=mariadb-server state=latest

    - name: Install MySQL python module 
      apt: name=python-mysqldb state=latest

    - name: Install php
      apt: name=php state=latest
    - name: "Install php-cli"
      apt: name=php-cli state=latest
#    - name: "Install php-mcrypt"
#      apt: name=php-mcrypt state=latest
    - name: "Install php-gd"
      apt: name=php-gd state=latest
    - name: Install php-fpm
      apt: name=php-fpm state=latest
    - name: Install php-common
      apt: name=php-common state=latest
    - name: Install php-mbstring
      apt: name=php-mbstring state=latest
    - name: Install php-xmlrpc
      apt: name=php-xmlrpc state=latest
    - name: Install php-xml
      apt: name=php-xml state=latest
    - name: Install php zip
      apt: name=php-zip state=latest
    - name: Install php-curl
      apt: name=php-curl state=latest
    
    - name: Install apache2 php module
      apt: name=libapache2-mod-php state=latest

    - name: Install php-mysql

## your php installation appears to be missing the mysql extension if we have used ## apt: name=php-mysql state=latest
      apt: name=php7.3-mysql state=latest


#MySQL config
    - name: Create MySQL Database
      mysql_db:
        name: "{{wpdbname}}"
#     ignore_errors: yes

    - name: Create DB user/pass and give the user all privileges
      mysql_user:
        name: "{{wpdbuser}}"
        password: "{{wpdbpass}}"
        priv: '{{wpdbname}}.*:ALL'
        state: present
#     ignore_errors: yes

    - name: Copy index test page
      template:
        src: "files/index.html.j2"
        dest: "/var/www/html/index.html"

    - name: enable Apache2 service
      service: name=apache2 enabled=yes

#Wordpress stuff
    - name: Download and tar -zxvf wordpress
      unarchive:
        src: https://wordpress.org/latest.tar.gz
        remote_src: yes
        dest: "{{ wppath }}"
        extra_opts: [--strip-components=1]
       #creates: "{{ wppath }}"

    - name: Set permissions
      file:
        path: "{{wppath}}"
        state: directory
        recurse: yes
        owner: www-data
        group: www-data
 
    - name: copy the config file wp-config-sample.php to wp-config.php so we can edit it
      command: mv {{wppath}}/wp-config-sample.php {{wppath}}/wp-config.php 
      #creates={{wppath}}/wp-config.php
      become: yes
 
    - name: Update WordPress config file
      lineinfile:
        path: "{{wppath}}/wp-config.php"
        regexp: "{{item.regexp}}"
        line: "{{item.line}}"
      with_items:
        - {'regexp': "define\\( 'DB_NAME', '(.)+' \\);", 'line': "define( 'DB_NAME', '{{wpdbname}}' );"}
        - {'regexp': "define\\( 'DB_USER', '(.)+' \\);", 'line': "define( 'DB_USER', '{{wpdbuser}}' );"}
        - {'regexp': "define\\( 'DB_PASSWORD', '(.)+' \\);", 'line': "define( 'DB_PASSWORD', '{{wpdbpass}}' );"}
     

  handlers:
    - name: restart apache2 
      service: name=apache2 state=restarted
    - name: enable Apache2 service
      service: name=apache2 enabled=yes
    - name: Apache Module - mod_rewrite
      apache2_module:
        state: present
        name: rewrite
  
    - name: Copy index test page
      template:
        src: "files/index.html.j2"
        dest: "/var/www/html/index.html"  

The Debian server is running 192.168.5.27.

Make sure we can access SSH on the Debian server via public key authentication.

Run ansible-playbook

#/etc/ansible
ansible-playbook -i /etc/ansible/hosts tungwordpress.yml -u root

WordPress has been installed automatically via Ansible.