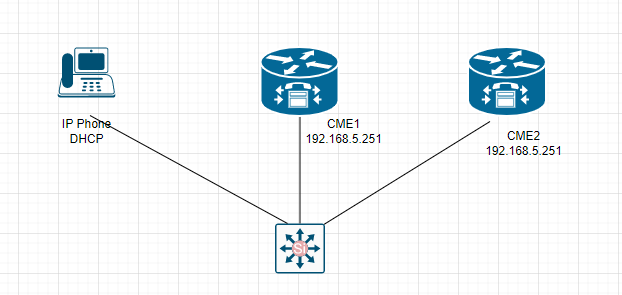
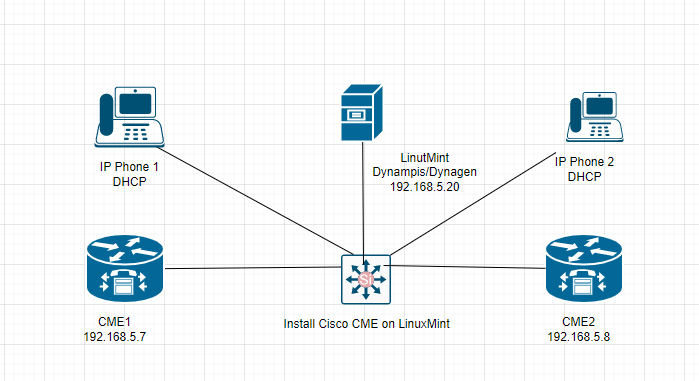
Below is a topology that is used for this lab.
On LinuxMint
+ Install Dynamips, Dynagen
sudo apt install dynagen dynamips bridge-utils uml-utilities
+ Backup network interface config file
sudo cp /etc/network/interfaces ~
Edit network config file to create a bridged network interface (br0) for physical interface (enp0s3).
sudo nano /etc/network/interfaces
auto lo enp0s3 br0
iface lo inet loopback
iface br0 inet static
bridge_ports enp0s3
address 192.168.5.20
netmask 255.255.255.0
gateway 192.168.5.1

Restart networking service. It failed. We need to restart Linuxmint to make it work after restarting the service.
sudo service networking restart

Check IP address configuration and ping google.ca.

+ Create a new dynagen for 2 CME Routers.
cd /home/tung
mkdir CME
cd CME
Drag cme.tar and c7200-adventerprisek9-mz.151-4.M.bin file to CME directory.

+ Create a dynagen CME config file.
sudo nano dynagen_cme.conf
f0/0 = nio_tap:tap1
x = 22.0
y = -351.0
autostart = False
[127.0.0.1:2000]
workingdir = /home/tung/CME
udp = 10100
[[7200]]
image = c7200-adventerprisek9-mz.151-4.M.bin
disk0 = 512
#idlepc = 0x6060b654
[[ROUTER r1]]
model = 7200
console = 2221
aux = 2119
#wic0/0 = WIC-1T
#wic0/1 = WIC-1T
#wic0/2 = WIC-1T
[[ROUTER r2]]
model = 7200
console = 2222
aux = 2119
#wic0/0 = WIC-1T
#wic0/1 = WIC-1T
#wic0/2 = WIC-1T
f0/0 = nio_tap:tap2
x = 22.0
y = -351.0

+ Run dynamips program and start both CME Routers
sudo dynamips -H 2000&

list
start /all

Check port 2000, 2221, 2222 are running on LinuxMint.

Open a new tab to console R1.
telnet localhost 2221

Open a new tab to console R2.
telnet localhost 2222

+ Install TFTP service on LinuxMint
Open new terminal
sudo apt install tftpd
sudo nano /etc/xinetd.d/tftp
service tftp
{
protocol =udp
socket_type =dgram
wait =yes
user =nobody
server =/usr/sbin/in.tftpd
server_args =/tftpboot
disable =no
}
sudo mkdir /tftpboot to contain CME image file
sudo cp cme.tar /tftpboot to copy the CME image to /tftpboot folder
Change permission on tftp folder
sudo chmod 777 -R /tftpboot/
Restart xinetd service
sudo systemctl restart xinetd
Check TFTP service is running
netstat -anup | grep 69

+ Configure CME Router
On R1:
enable
conf t
hostname R1
int fa0/0
ip address 192.168.5.7 255.255.255.0
no shut
end

On R2:
enable
conf t
hostname R2
int fa0/0
ip address 192.168.5.8 255.255.255.0
no shut
end

+ Now we need to configure LinuxMint network interface to communicate with both CME Routers
Open new tab
sudo brctl addif br0 tap1 tap2
sudo ifconfig tap1 up
sudo ifconfig tap2 up

Enter ip a command to see all interfaces are up. Test to ping from LinuxMint to R1 and R2.

+ Back to R1 and R2 to load CME image. This process will take time around 1 hour to finish flashing the Router CME image.
On R1:
R1#archive tar /xtract tftp://192.168.5.20/cme.tar disk0:

On R2:
R2#archive tar /xtract tftp://192.168.5.20/cme.tar disk0:

+ Enable telephone service on CME Routers.
On R1:
!!! enable CME GUI on CME Router
ip http server
ip http path disk0:/gui
ip http authentication local
!!! create user and password to manage CME
telephony-service
web admin system name admin password cisco
dn-webedit
time-webedit
sets max amount of phones
max-ephones 5
ip source-address 192.168.5.7 port 2000
!sets max amount of numbers
max-dn 25
system message TUNGLE VOIP
create cnf-files

On R2:
!!! enable CME GUI on CME Router
ip http server
ip http path disk0:/gui
ip http authentication local
!!! create user and password to manage CME
telephony-service
web admin system name admin password cisco
dn-webedit
time-webedit
sets max amount of phones
max-ephones 5
ip source-address 192.168.5.8 port 2000
!sets max amount of numbers
max-dn 25
system message TUNGLE VOIP
create cnf-files

Back to LinuxMinit, open Firefox to access both CMEs via web interface.
http://192.168.5.7/ccme.html
http://192.168.5.8/ccme.html

+ Open Windows VM1 and VM2, then install the Cisco IP communicator on VM1 and VM2.
+ Next, configure Cisco IP Communicator on VM1 point to CME on R1 and VM2 point to CME on R2. Wait for a few minutes, we can see IP phone has successfully registered on CME R1 and R2.


Using Firefox on LinuxMint to configure IP phones. Adding phone and extension number 7822 for R1, and 7922 for R2.


Assign ephone with button 2 for R1 and R2, then restart two Cisco IP phones via command restart on CME R1 and R2
ephone 1
button 2:1


Now configure dial-peer between two CMEs to allow both Cisco IP communicators to communicate together.
R1:
R1(config)#dial-peer voice 2 voip
R1(config-dial-peer)#destination-pattern 79..
R1(config-dial-peer)#session target ipv4:192.168.5.8

R2:
R2(config)#dial-peer voice 1 voip
R2(config-dial-peer)#destination-pattern 78..
R2(config-dial-peer)#session target ipv4:192.168.5.7

Back to Windows VM and test to call from DN 7822 to DN 7922. It works.