Category Archives: Kubernetes

Deploying WordPress and MySQL with Kubernetes on AWS

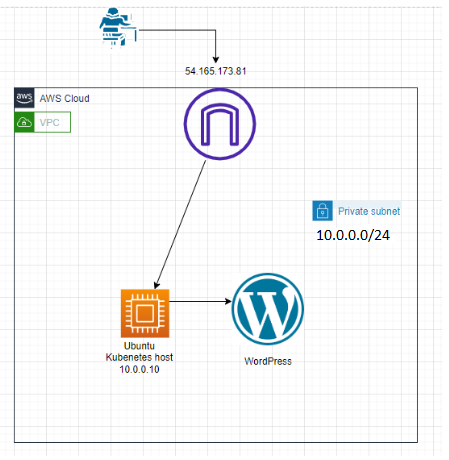
This is a diagram that I have used for this lab.
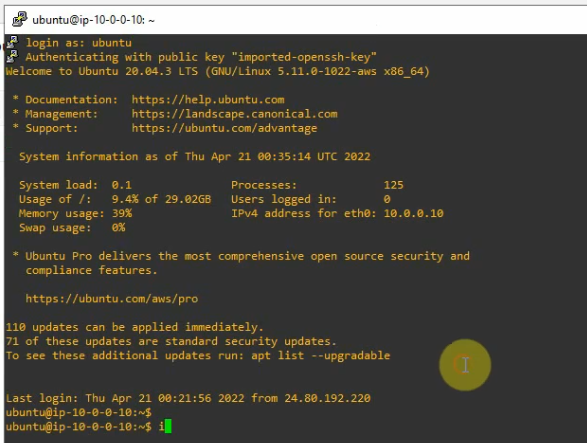
+ Create a Ubuntu Linux instance with 2GB RAM and 30GB storage for Kubernetes.
+ Create a MySQL deployment file.

#mysql-deployment.yaml

apiVersion: v1
kind: Service
metadata:
  name: wordpress-mysql
  labels:
    app: wordpress
spec:
  ports:
    - port: 3306
  selector:
    app: wordpress
    tier: mysql
  clusterIP: None
---
apiVersion: v1
kind: PersistentVolumeClaim
metadata:
  name: mysql-pv-claim
  labels:
    app: wordpress
spec:
  accessModes:
    - ReadWriteOnce
  resources:
    requests:
      storage: 20Gi
---
apiVersion: apps/v1
kind: Deployment
metadata:
  name: wordpress-mysql
  labels:
    app: wordpress
spec:
  selector:
    matchLabels:
      app: wordpress
      tier: mysql
  strategy:
    type: Recreate
  template:
    metadata:
      labels:
        app: wordpress
        tier: mysql
    spec:
      containers:
      - image: mysql:5.6
        name: mysql
        env:
        - name: MYSQL_ROOT_PASSWORD
          valueFrom:
            secretKeyRef:
              name: mysql-pass
              key: password
        ports:
        - containerPort: 3306
          name: mysql
        volumeMounts:
        - name: mysql-persistent-storage
          mountPath: /var/lib/mysql
      volumes:
      - name: mysql-persistent-storage
        persistentVolumeClaim:
          claimName: mysql-pv-claim

+ Create a WordPress deployment file

#wordpress-deployment.yaml

apiVersion: v1
kind: Service
metadata:
  name: wordpress
  labels:
    app: wordpress
spec:
  ports:
    - port: 80
  selector:
    app: wordpress
    tier: frontend
  type: LoadBalancer
---
apiVersion: v1
kind: PersistentVolumeClaim
metadata:
  name: wp-pv-claim
  labels:
    app: wordpress
spec:
  accessModes:
    - ReadWriteOnce
  resources:
    requests:
      storage: 20Gi
---
apiVersion: apps/v1
kind: Deployment
metadata:
  name: wordpress
  labels:
    app: wordpress
spec:
  selector:
    matchLabels:
      app: wordpress
      tier: frontend
  strategy:
    type: Recreate
  template:
    metadata:
      labels:
        app: wordpress
        tier: frontend
    spec:
      containers:
      - image: wordpress:4.8-apache
        name: wordpress
        env:
        - name: WORDPRESS_DB_HOST
          value: wordpress-mysql
        - name: WORDPRESS_DB_PASSWORD
          valueFrom:
            secretKeyRef:
              name: mysql-pass
              key: password
        ports:
        - containerPort: 80
          name: wordpress
        volumeMounts:
        - name: wordpress-persistent-storage
          mountPath: /var/www/html
      volumes:
      - name: wordpress-persistent-storage
        persistentVolumeClaim:
          claimName: wp-pv-claim

+ Download the MySQL deployment configuration file.

sudo curl -LO https://k8s.io/examples/application/wordpress/mysql-deployment.yaml

+ Download the WordPress configuration file.

sudo curl -LO https://k8s.io/examples/application/wordpress/wordpress-deployment.yaml

+ Create a kustomization.yaml.

secretGenerator:
- name: mysql-pass
  literals:
  - password=YOUR_PASSWORD
resources:
  - mysql-deployment.yaml
  - wordpress-deployment.yaml

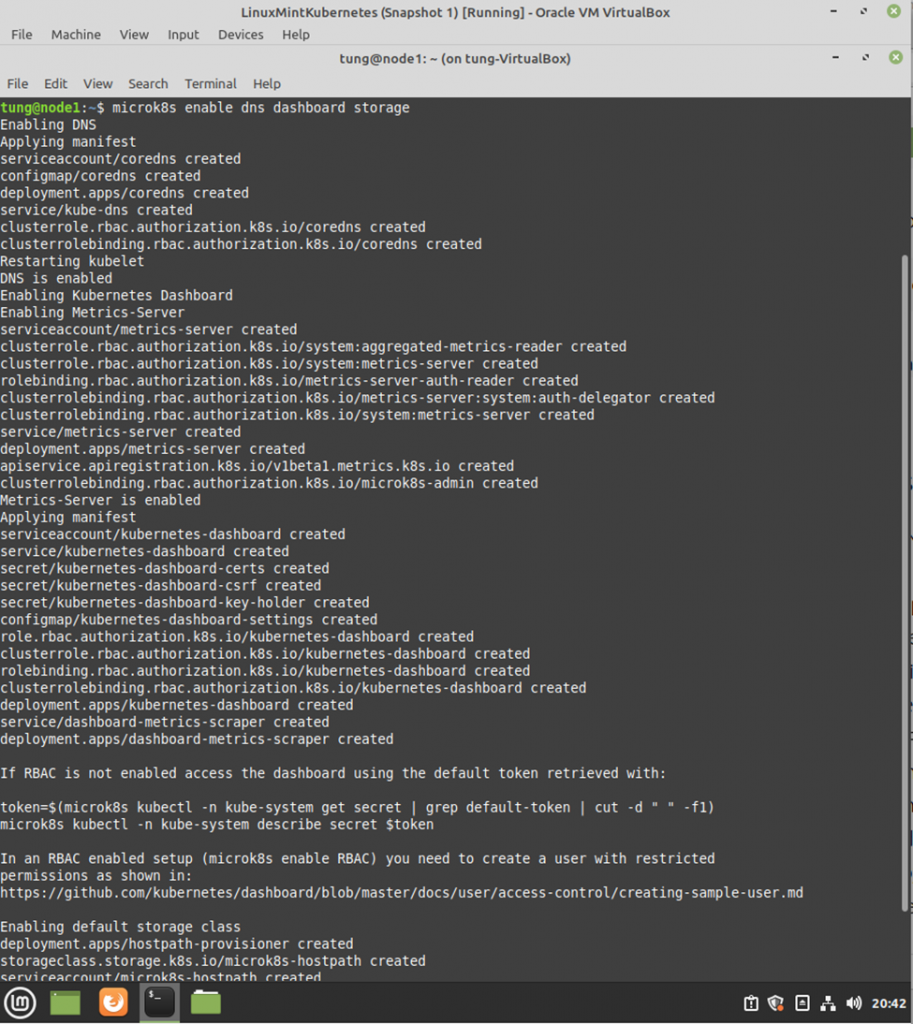
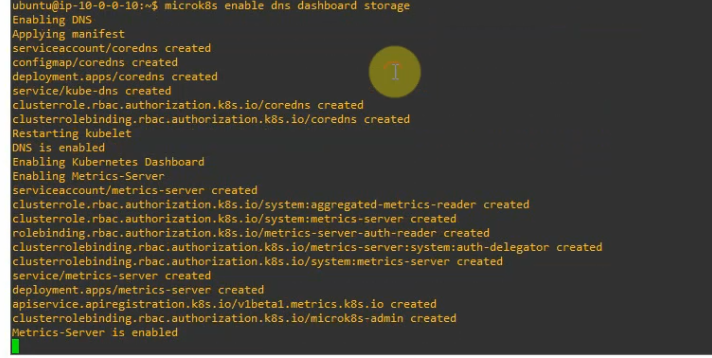
+ Enable DNS dashboard storage.

microk8s enable dns dashboard storage
+ Apply and verify

microk8s kubectl apply -k ./

+ Verify a PersistentVolumeClaims (PVC) got dynamically provisioned.

microk8s kubectl get pvc

+ Verify the Pod is running.

microk8s kubectl get pods

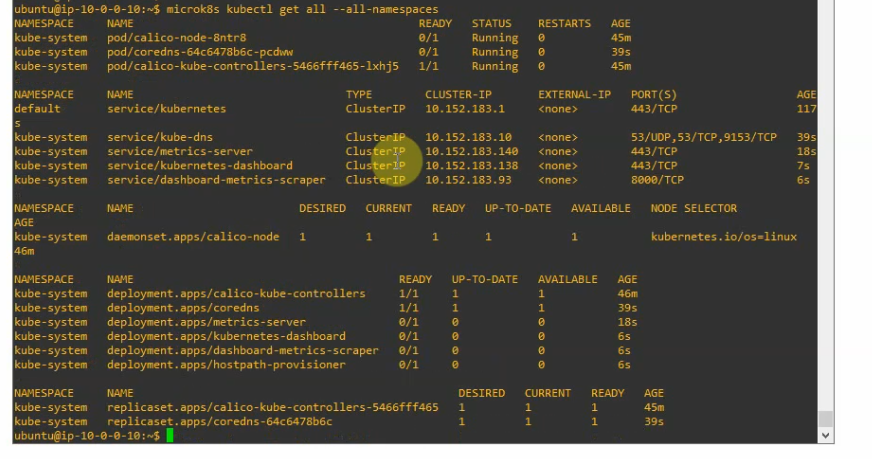
+ Check Kubernetes is running.

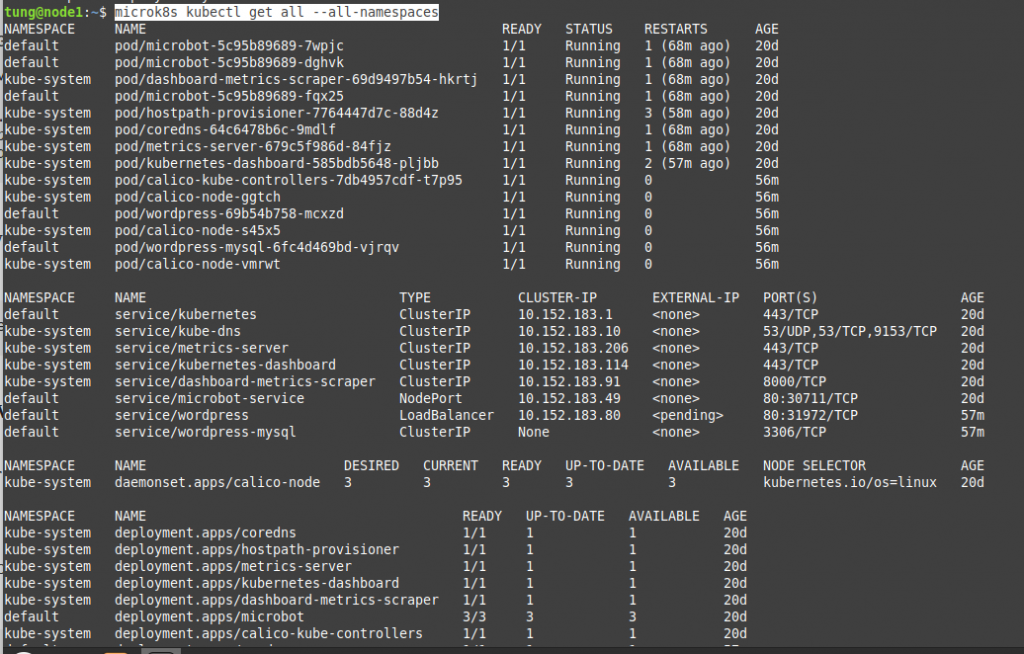
microk8s kubectl get all --all-namespaces
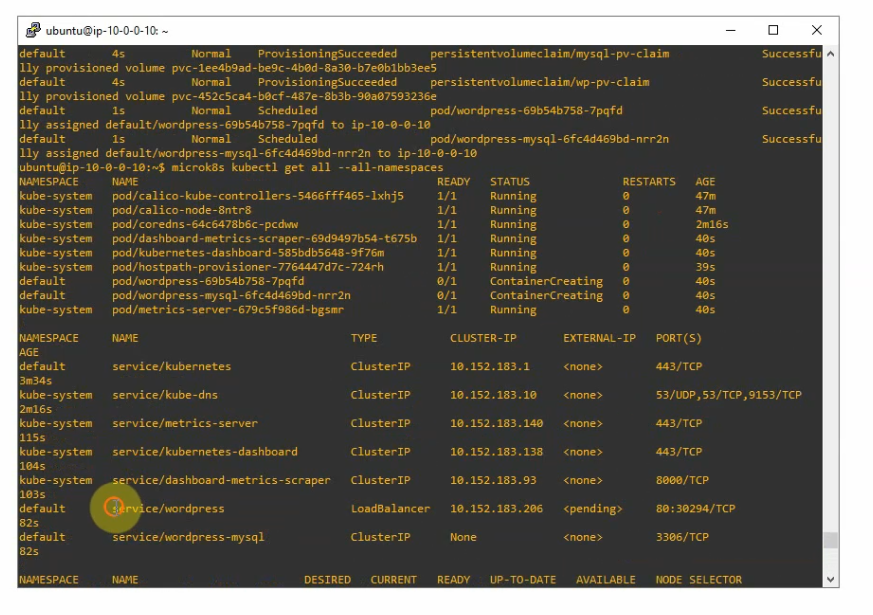
+ Expose port 80 via External IP address (10.0.0.10) of Kubernetes instance on AWS. This allows accessing WordPress via the Internet.

microk8s kubectl patch svc wordpress -n default -p '{"spec": {"type": "LoadBalancer", "externalIPs":["10.0.0.10"]}}'

Check the port 80 is listening on the Kubernetes host.

+ Verify the WordPress service is running.

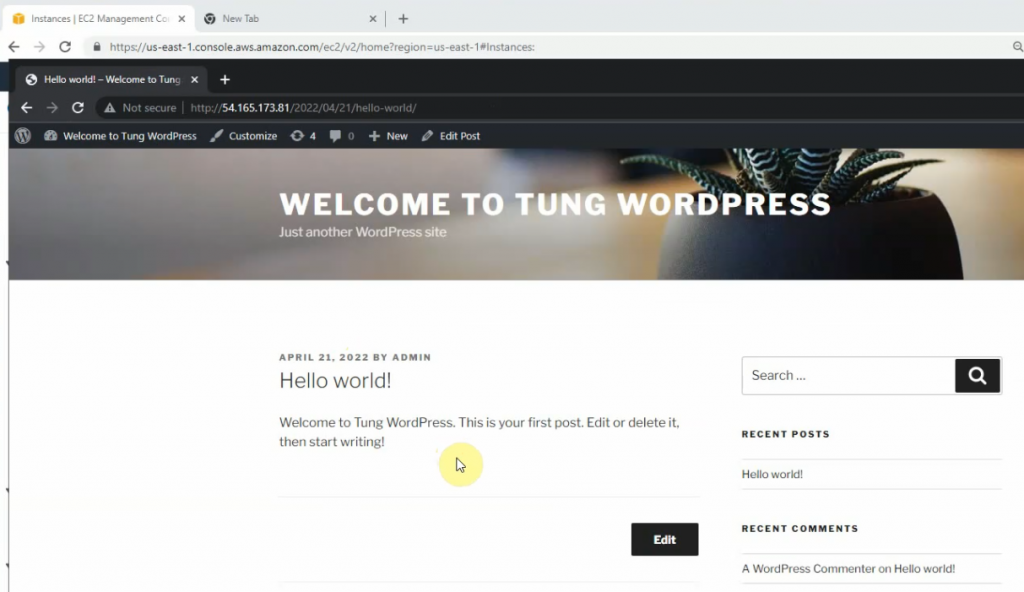
Access the WordPress on Kubernetes. (http://54.165.173.81)
Using Kubernetes to deploy PHP Guestbook application with Redis in AWS

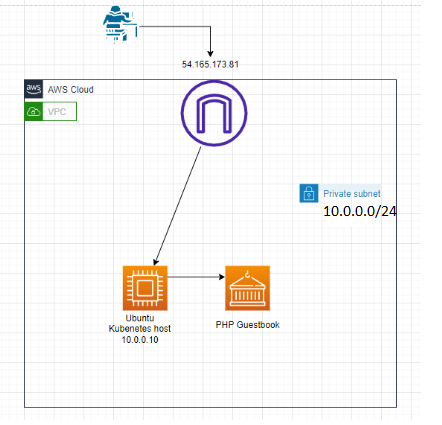
This is a diagram that I have used for this lab.

I have used the following link to deploy the PHP Guestbook application with Redis (https://kubernetes.io/docs/tutorials/stateless-application/guestbook/)

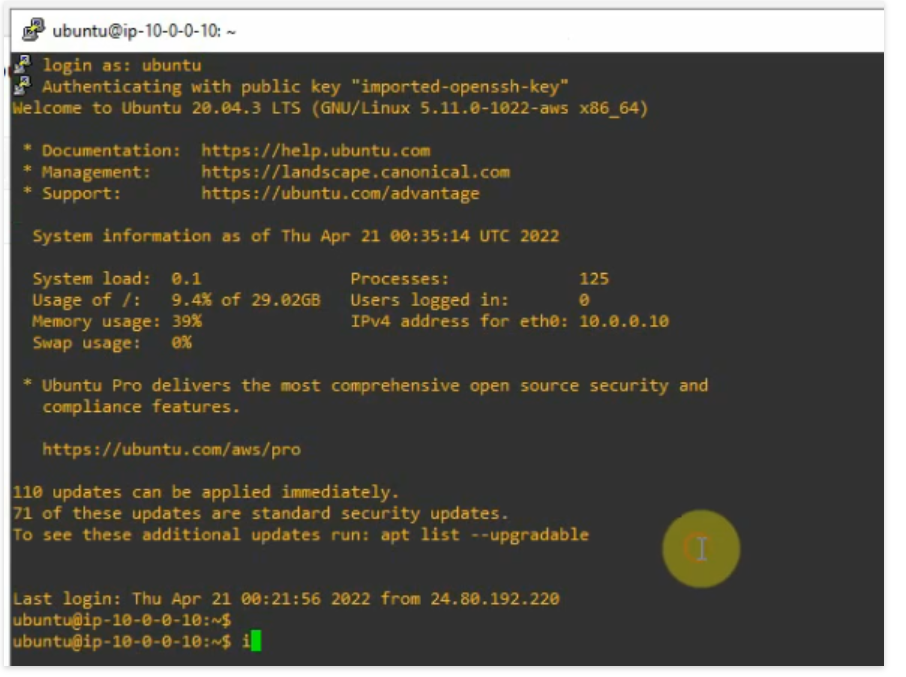
Set up an Ubuntu Linux with 2GB RAM and 30GB storage for the Kubernetes host. Allow SSH and HTTP from anywhere to the Linux instance on Security Group.

+ Deployment Redis Database.

Creating the Redis Deployment

#nano redis-leader-deployment.yaml
# SOURCE: https://cloud.google.com/kubernetes-engine/docs/tutorials/guestbook
apiVersion: apps/v1
kind: Deployment
metadata:
  name: redis-leader
  labels:
    app: redis
    role: leader
    tier: backend
spec:
  replicas: 1
  selector:
    matchLabels:
      app: redis
  template:
    metadata:
      labels:
        app: redis
        role: leader
        tier: backend
    spec:
      containers:
      - name: leader
        image: "docker.io/redis:6.0.5"
        resources:
          requests:
            cpu: 100m
            memory: 100Mi
        ports:
        - containerPort: 6379

#Apply the Redis deployment.

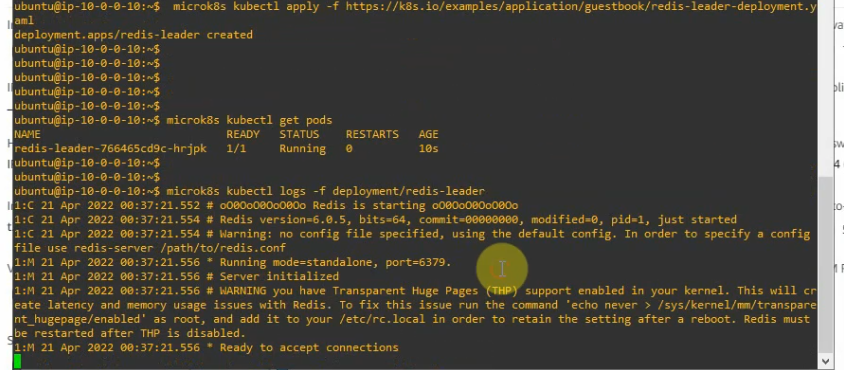
microk8s kubectl apply -f https://k8s.io/examples/application/guestbook/redis-leader-deployment.yaml

# Check Redis Pod is running

microk8s kubectl get pods

# View logs from the Redis leader Pod

microk8s kubectl logs -f deployment/redis-leader

+ Creating the Redis leader Service

#Apply a service to proxy the traffic to the Redis Pod.

#nano redis-leader-service.yaml
# SOURCE: https://cloud.google.com/kubernetes-engine/docs/tutorials/guestbook
apiVersion: v1
kind: Service
metadata:
  name: redis-leader
  labels:
    app: redis
    role: leader
    tier: backend
spec:
  ports:
  - port: 6379
    targetPort: 6379
  selector:
    app: redis
    role: leader
    tier: backend

#Apply the Redis Service with the deployment file.

microk8s kubectl apply -f https://k8s.io/examples/application/guestbook/redis-leader-service.yaml

#verify that the Redis service is running

microk8s kubectl get service

+ Set up Redis followers to make it highly available on a few Redis followers.

#nano redis-follower-deployment.yaml

# SOURCE: https://cloud.google.com/kubernetes-engine/docs/tutorials/guestbook
apiVersion: apps/v1
kind: Deployment
metadata:
  name: redis-follower
  labels:
    app: redis
    role: follower
    tier: backend
spec:
  replicas: 2
  selector:
    matchLabels:
      app: redis
  template:
    metadata:
      labels:
        app: redis
        role: follower
        tier: backend
    spec:
      containers:
      - name: follower
        image: gcr.io/google_samples/gb-redis-follower:v2
        resources:
          requests:
            cpu: 100m
            memory: 100Mi
        ports:
        - containerPort: 6379

#Apply the Redis Deployment for the redis-follower-deployment.yaml file.

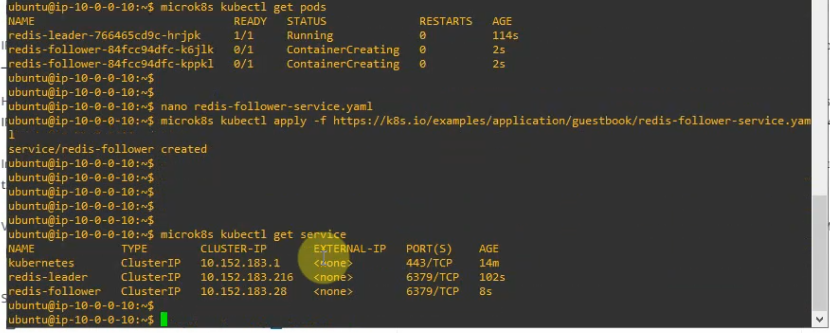
microk8s kubectl apply -f https://k8s.io/examples/application/guestbook/redis-follower-deployment.yaml

# Verify two Redis follower replicas are running. 

microk8s kubectl get pods

+ Creating the Redis follower service.

#nano redis-follower-service.yaml
# SOURCE: https://cloud.google.com/kubernetes-engine/docs/tutorials/guestbook
apiVersion: v1
kind: Service
metadata:
  name: redis-follower
  labels:
    app: redis
    role: follower
    tier: backend
spec:
  ports:
    # the port that this service should serve on
  - port: 6379
  selector:
    app: redis
    role: follower
    tier: backend

#Apply the Redis Service with the deployment file.

microk8s kubectl apply -f https://k8s.io/examples/application/guestbook/redis-follower-service.yaml

# verify that the Redis service is running.

microk8s kubectl get service

+ Set up and Expose the Guestbook Frontend.

#Creating Guestbook Frontend Deployment.

#nano frontend-deployment.yaml

# SOURCE: https://cloud.google.com/kubernetes-engine/docs/tutorials/guestbook
apiVersion: apps/v1
kind: Deployment
metadata:
  name: frontend
spec:
  replicas: 3
  selector:
    matchLabels:
        app: guestbook
        tier: frontend
  template:
    metadata:
      labels:
        app: guestbook
        tier: frontend
    spec:
      containers:
      - name: php-redis
        image: gcr.io/google_samples/gb-frontend:v5
        env:
        - name: GET_HOSTS_FROM
          value: "dns"
        resources:
          requests:
            cpu: 100m
            memory: 100Mi
        ports:
        - containerPort: 80

#Apply the frontend Deployment file

microk8s kubectl apply -f https://k8s.io/examples/application/guestbook/frontend-deployment.yaml

#Verify three frontend replicas are running.

microk8s kubectl get pods -l app=guestbook -l tier=frontend

+ Creating the Frontend Service.

#nano frontend-service.yaml

# SOURCE: https://cloud.google.com/kubernetes-engine/docs/tutorials/guestbook
apiVersion: v1
kind: Service
metadata:
  name: frontend
  labels:
    app: guestbook
    tier: frontend
spec:
  # if your cluster supports it, uncomment the following to automatically create
  # an external load-balanced IP for the frontend service.
  # type: LoadBalancer
  #type: LoadBalancer
  ports:
    # the port that this service should serve on
  - port: 80
  selector:
    app: guestbook
    tier: frontend

#Apply the frontend Service with the deployment file.

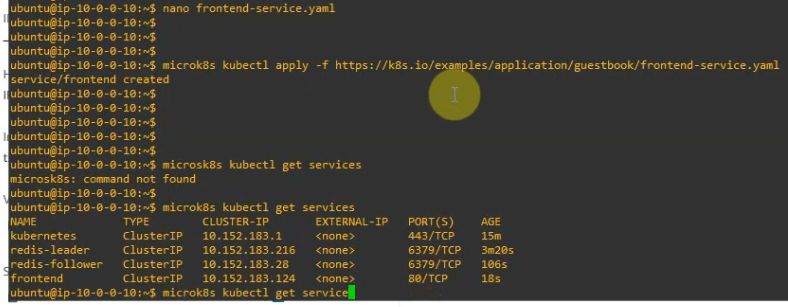
microk8s kubectl apply -f https://k8s.io/examples/application/guestbook/frontend-service.yaml

#Verify three frontend replicas are running.

microk8s kubectl get services

#Check the Frontend Service via LoadBalancer

microk8s kubectl get service frontend

+ Scale the Web Frontend.

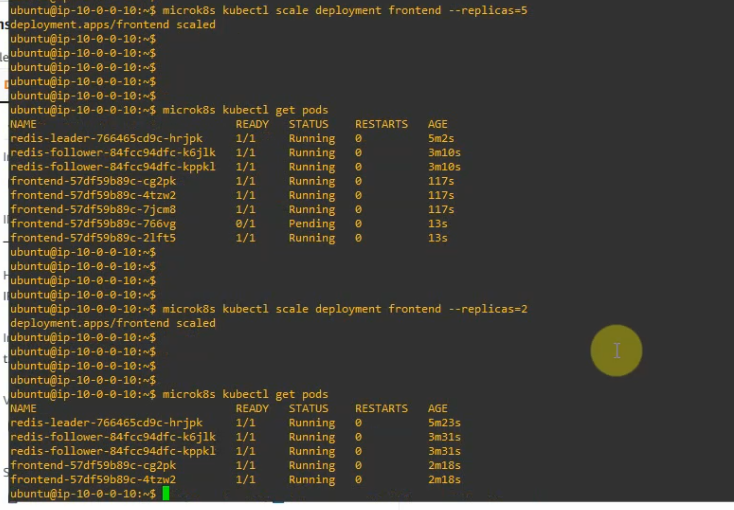
microk8s kubectl scale deployment frontend --replicas=5
microk8s kubectl get pods
microk8s kubectl scale deployment frontend --replicas=2
microk8s kubectl get pods

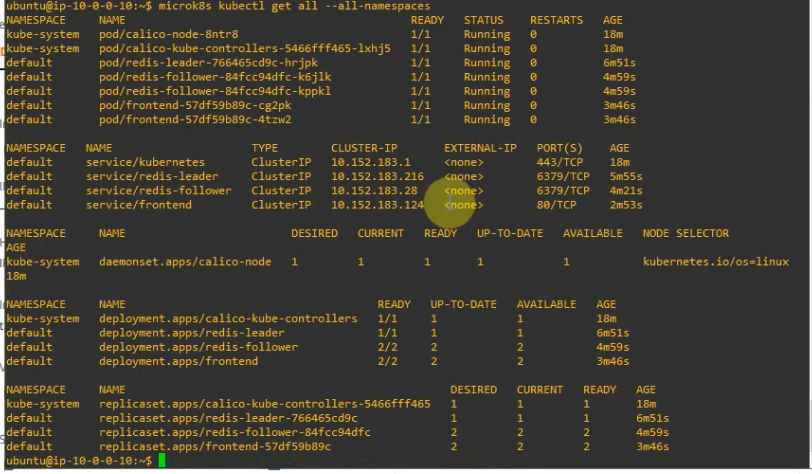
#check frontend service.

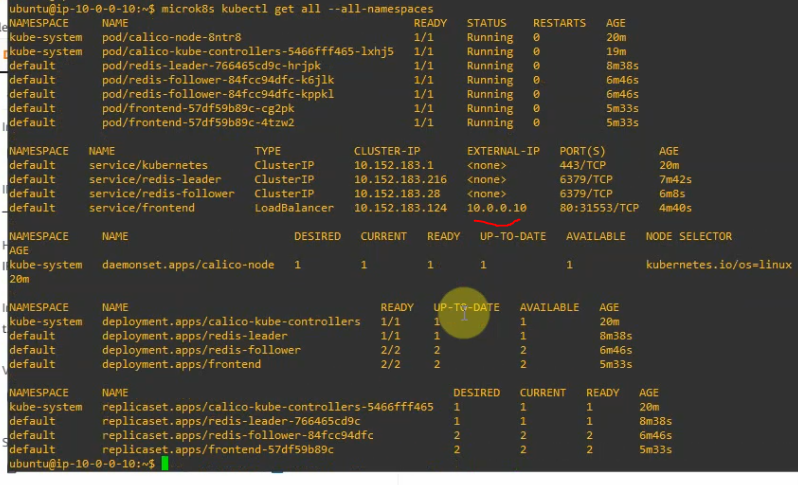
+ Expose port 80 via public IP address on Kubernetes host (10.0.0.10). This allows accessing PHP Guestbook from outside.

microk8s kubectl patch svc frontend -n default -p '{"spec": {"type": "LoadBalancer", "externalIPs":["10.0.0.10"]}}'

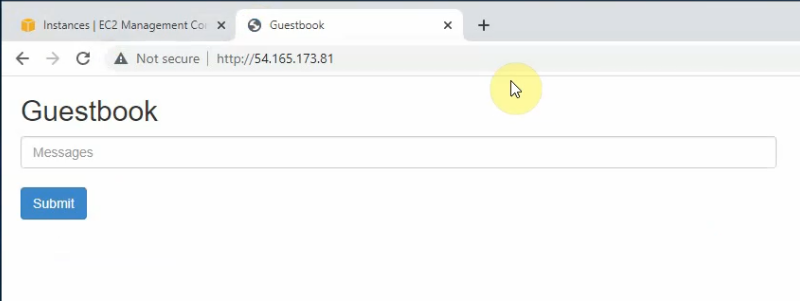
Access PHP Guestbook from the Internet (http://54.165.173.81).

Deploying WordPress and MySQL with Kubernetes

I have used this link below to deploy WordPress and MySQL with Kubernetes.

https://kubernetes.io/docs/tutorials/stateful-application/mysql-wordpress-persistent-volume/

+ mysql-deployment.yaml

apiVersion: v1
kind: Service
metadata:
  name: wordpress-mysql
  labels:
    app: wordpress
spec:
  ports:
    - port: 3306
  selector:
    app: wordpress
    tier: mysql
  clusterIP: None
---
apiVersion: v1
kind: PersistentVolumeClaim
metadata:
  name: mysql-pv-claim
  labels:
    app: wordpress
spec:
  accessModes:
    - ReadWriteOnce
  resources:
    requests:
      storage: 20Gi
---
apiVersion: apps/v1
kind: Deployment
metadata:
  name: wordpress-mysql
  labels:
    app: wordpress
spec:
  selector:
    matchLabels:
      app: wordpress
      tier: mysql
  strategy:
    type: Recreate
  template:
    metadata:
      labels:
        app: wordpress
        tier: mysql
    spec:
      containers:
      - image: mysql:5.6
        name: mysql
        env:
        - name: MYSQL_ROOT_PASSWORD
          valueFrom:
            secretKeyRef:
              name: mysql-pass
              key: password
        ports:
        - containerPort: 3306
          name: mysql
        volumeMounts:
        - name: mysql-persistent-storage
          mountPath: /var/lib/mysql
      volumes:
      - name: mysql-persistent-storage
        persistentVolumeClaim:
          claimName: mysql-pv-claim

+ wordpress-deployment.yaml

apiVersion: v1
kind: Service
metadata:
  name: wordpress
  labels:
    app: wordpress
spec:
  ports:
    - port: 80
  selector:
    app: wordpress
    tier: frontend
  type: LoadBalancer
---
apiVersion: v1
kind: PersistentVolumeClaim
metadata:
  name: wp-pv-claim
  labels:
    app: wordpress
spec:
  accessModes:
    - ReadWriteOnce
  resources:
    requests:
      storage: 20Gi
---
apiVersion: apps/v1
kind: Deployment
metadata:
  name: wordpress
  labels:
    app: wordpress
spec:
  selector:
    matchLabels:
      app: wordpress
      tier: frontend
  strategy:
    type: Recreate
  template:
    metadata:
      labels:
        app: wordpress
        tier: frontend
    spec:
      containers:
      - image: wordpress:4.8-apache
        name: wordpress
        env:
        - name: WORDPRESS_DB_HOST
          value: wordpress-mysql
        - name: WORDPRESS_DB_PASSWORD
          valueFrom:
            secretKeyRef:
              name: mysql-pass
              key: password
        ports:
        - containerPort: 80
          name: wordpress
        volumeMounts:
        - name: wordpress-persistent-storage
          mountPath: /var/www/html
      volumes:
      - name: wordpress-persistent-storage
        persistentVolumeClaim:
          claimName: wp-pv-claim

+ Download the MySQL deployment configuration file.

curl -LO https://k8s.io/examples/application/wordpress/mysql-deployment.yaml

+ Download the WordPress configuration file.

curl -LO https://k8s.io/examples/application/wordpress/wordpress-deployment.yaml

+ Create a kustomization.yaml.

#Add a Secret generator in kustomization.yaml from the following command. 

tung@node1:~$ cat kustomization.yaml 
secretGenerator:
- name: mysql-pass
  literals:
  - password=YOUR_PASSWORD
resources:
  - mysql-deployment.yaml
  - wordpress-deployment.yaml

+ Apply and Verify

microk8s kubectl apply -k ./

+ Verify all objects exist.

microk8s kubectl get secrets

+ Verify a PersistentVolumeClaims (PVC) got dynamically provisioned.

microk8s kubectl get pvc

+ Verify the Pod is running.

microk8s kubectl get pods

+ Verify the Service is running.

microk8s kubectl get service wordpress

+ Access the WordPress site.

+ Check Kubernetes is running.

microk8s kubectl get all --all-namespaces

 Build Kubernetes cluster with MicroK8s

Below is a process to install the Kubernetes cluster on three nodes. with MicroK8s.

+ Deploying MicroK8s on node 1, node 2, and node 3

Install MicroK8s directly from the snap store.

sudo apt install snapd

To follow a specific upstream release series it’s possible to select a channel during installation, for example, v1.18 series.

sudo snap install microk8s --classic --channel=1.18/stable

Configure your firewall to allow pod-to-pod and pod-to-internet communication.

sudo ufw allow in on cni0 && sudo ufw allow out on cni0
sudo ufw default allow routed

Dashboard, core-dns, or local storage can be enabled by running the microk8s enable command:

microk8s enable dns dashboard storage
sudo usermod -a -G microk8s tung
sudo chown -f -R tung ~/.kube
newgrp microk8s

Get the output of the first node.

Get token.

Copy and paste the token on the following screenshot.

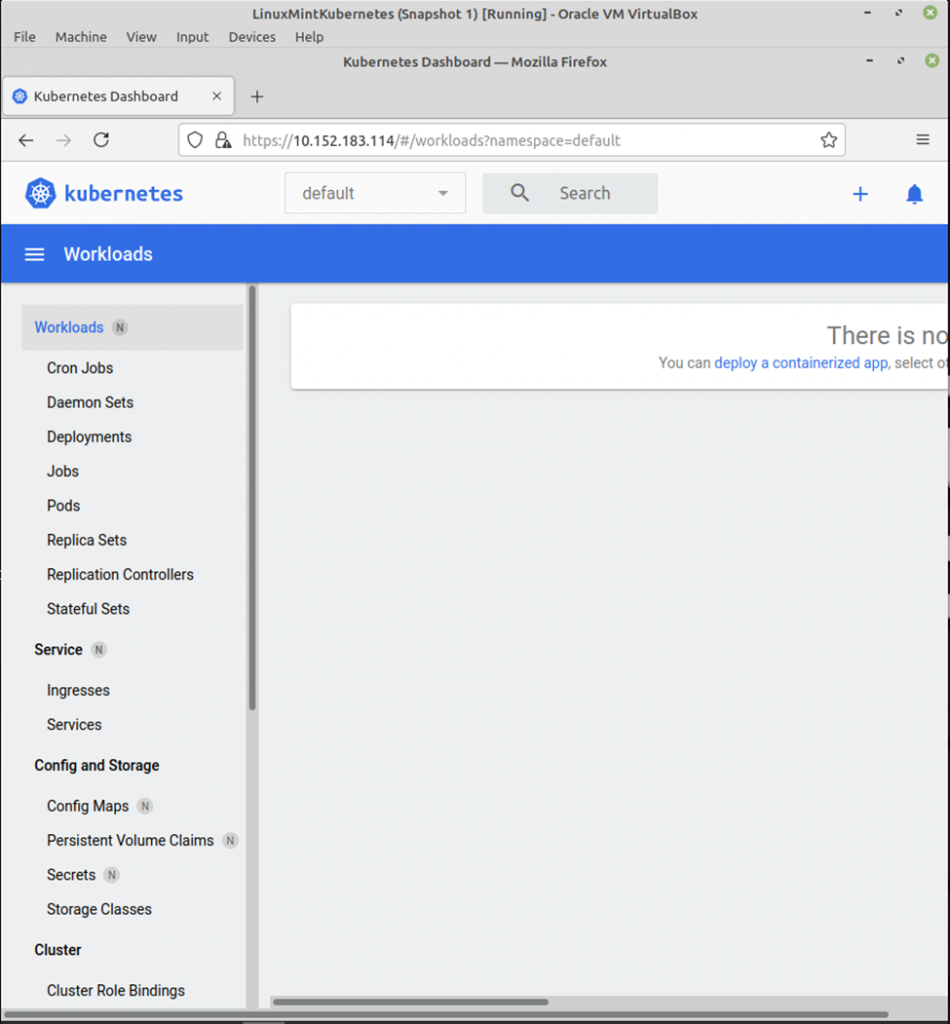
Kubernetes dashboard.

Get status of mircok8s service.

Do previous steps on node 2 and node 3. We do not need to install dashboard service on node 2 and node 3.

+ Create a MicroK8s multi-node cluster.

Now let’s focus on creating the Kubernetes cluster. On the first node run a command below.

microk8s add-node

This command will give you the following output:

On node 2, join the cluster.

Repeat this process (including generating a token, run it from the joining node) for the third node.

+ Deploy a sample containerized application

Let’s now create a microbot deployment with three pods via the kubectl cli. Run this on any of the control plane nodes:

microk8s kubectl create deployment microbot --image=dontrebootme/microbot:v1
microk8s kubectl scale deployment microbot --replicas=3

To expose our deployment we need to create a service:

microk8s kubectl expose deployment microbot --type=NodePort --port=80 --name=microbot-service

After a few minutes, check your cluster.

Check IP address of the K8S node.

Access micro-bot service via the port 30711.

Kubernetes dashboard.

Install Kubernetes on LinuxMint

Firstly, install Kubernetes and snapd package.

sudo apt install kubernetes snapd

Get an error as a screenshot below.

Enter “sudo rm /etc/apt/preferences.d/nosnap.pref”

sudo apt-get update
sudo apt-get install

Run the command above again.

Next, install Kurbenetes.

kubernetes install

+ Create our first app deployment using nginx.

microk8s.kubectl create deployment nginx --image nginx

+ Add your user to the microk8s admin group.

+ View all running services.

microk8s.kubectl get all

+ Enable Dashboard.

microk8s.enable dns dashboard

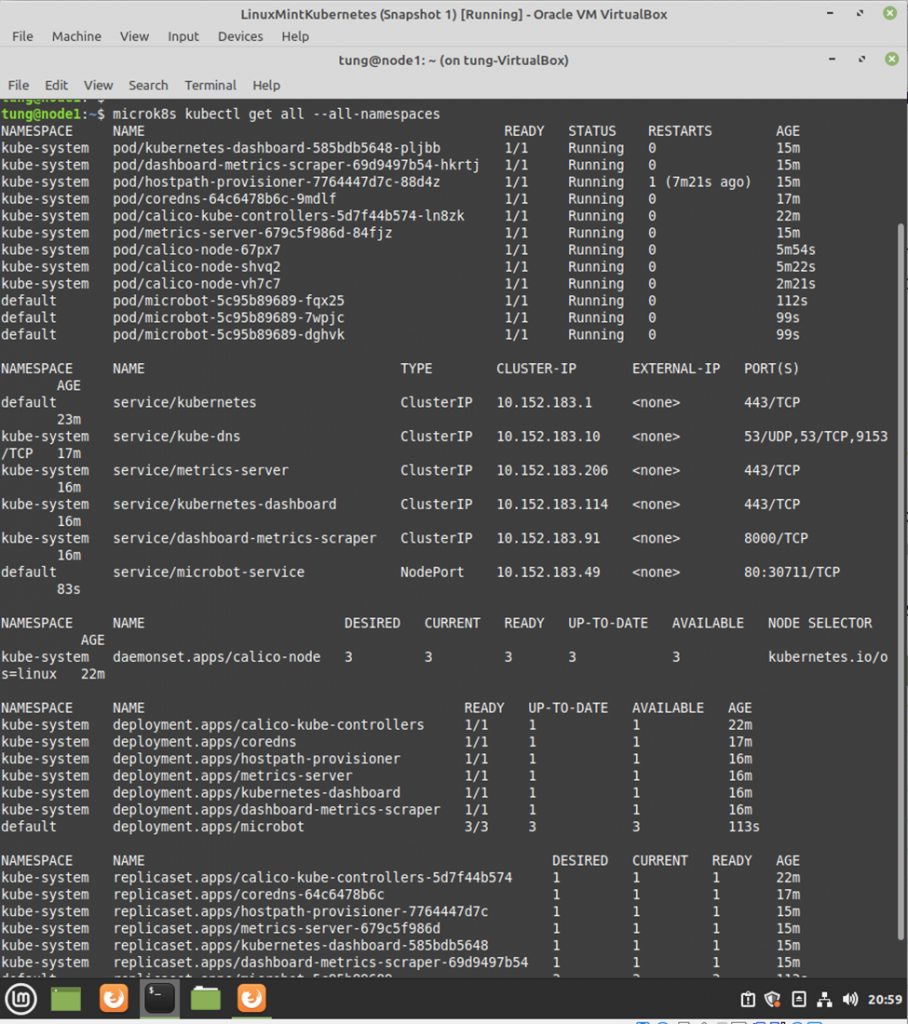
+ List all namespaces in microk8s. Take note of the IP address of the Kubernetes dashboard.

microk8s.kubectl get all –all-namespaces

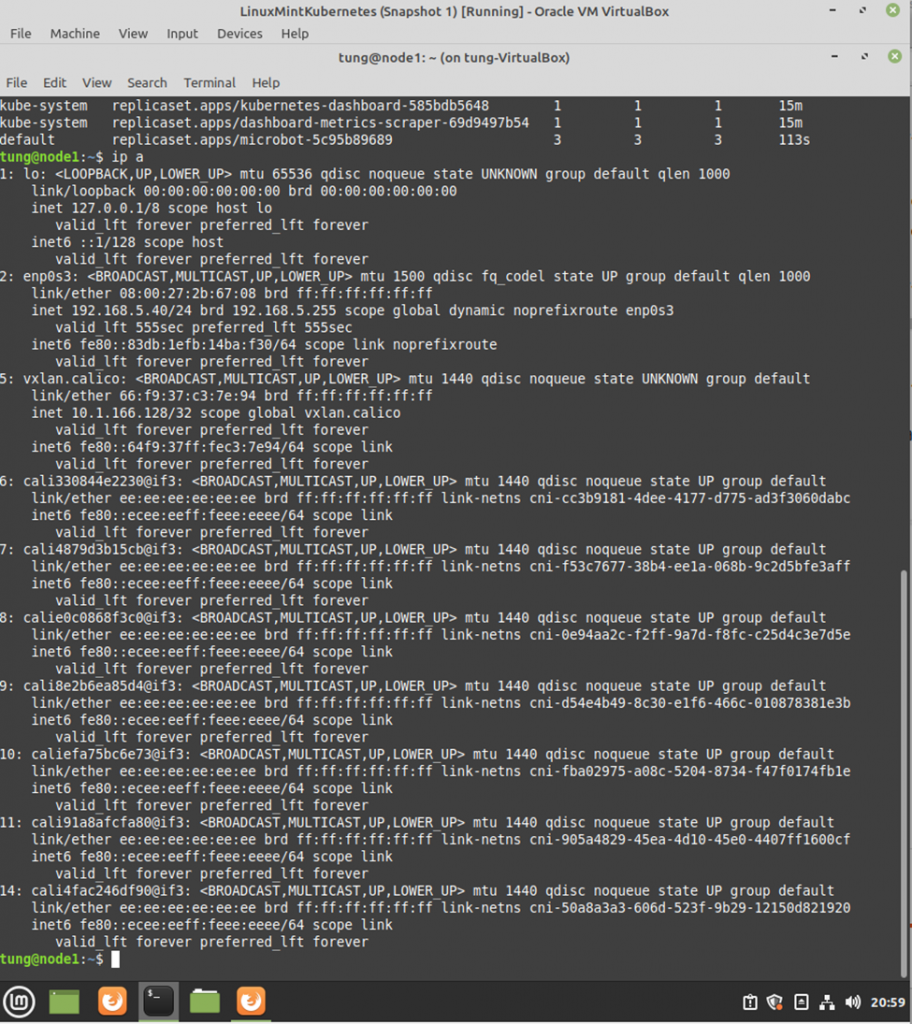
Kubernetes has created a couple of new network interfaces.

+ View token.

token=$(microk8s kubectl -n kube-system get secret | grep default-token | cut -d " " -f1)
microk8s kubectl -n kube-system describe secret $token

+ Access to Kubernetes dashboard https://10.152.183.198, and enter the token on the previous step.