Category Archives: Security

Deploy VPN site-to-site between Palo Alto on-prem and AWS. Setup OpenVPN and additional Domain Controller on AWS

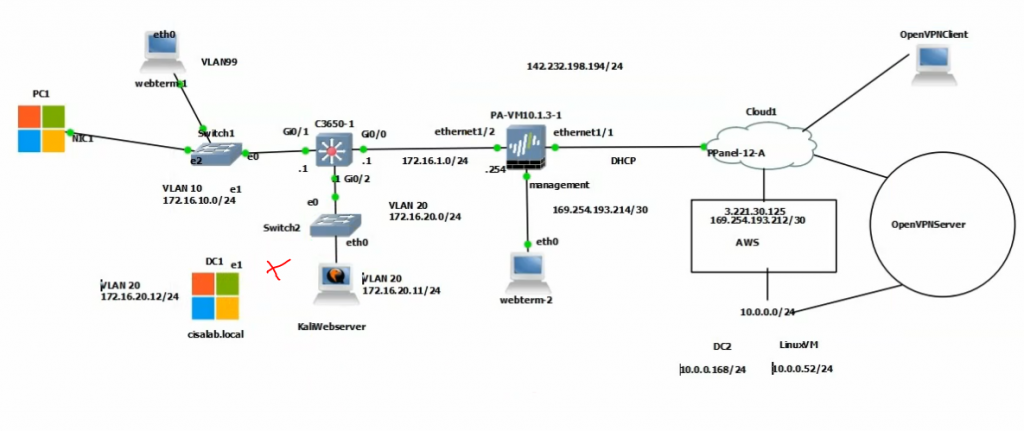
This is the diagram is used to deploy this lab.
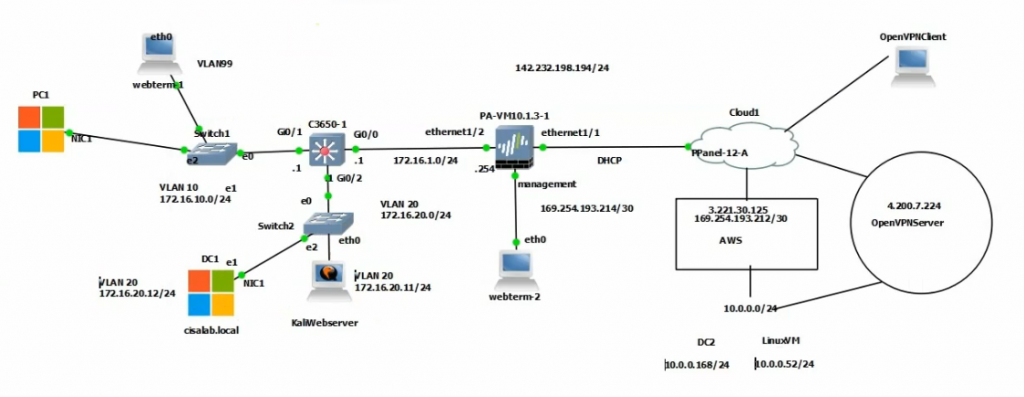
In this lab.

  • Configure VPN site to site IKEv2 between Palo Alto and Virtual Private Gateway on AWS.
  • Implementing multi-master domain controllers on-prem and AWS.
  • Authenticating OpenVPN tunnel via LDAP to support people working from home to access corporate servers on AWS.
  • Disconnect the domain controller on-prem to simulate migrating corporate servers to AWS in the near future.

Core Switch configuration.

CoreSW
conf t
hostname CoreSW
ip routing
ip dhcp excluded-address 172.16.10.1 172.16.10.10
!
ip dhcp pool VLAN10
 network 172.16.10.0 255.255.255.0
 default-router 172.16.10.1
 dns-server 172.16.20.12

interface GigabitEthernet0/0
 no switchport
 ip address 172.16.1.1 255.255.255.0
!
interface GigabitEthernet0/1
 switchport trunk allowed vlan 10,20,99
 switchport trunk encapsulation dot1q
 switchport trunk native vlan 99
 switchport mode trunk
 negotiation auto
!
interface GigabitEthernet0/2
 switchport trunk allowed vlan 10,20,99
 switchport trunk encapsulation dot1q
 switchport trunk native vlan 99
 switchport mode trunk

interface Vlan10
 ip address 172.16.10.1 255.255.255.0
!
interface Vlan20
 ip address 172.16.20.1 255.255.255.0
!
router ospf 1
 router-id 1.1.1.1
 network 172.16.0.0 0.0.255.255 area 0
!
ip route 0.0.0.0 0.0.0.0 172.16.1.254

--- 
SWCore#sh vlan brief

VLAN Name                             Status    Ports
---- -------------------------------- --------- -------------------------------
1    default                          active    Gi0/3, Gi1/0, Gi1/1, Gi1/2
                                                Gi1/3, Gi2/0, Gi2/1, Gi2/2
                                                Gi2/3, Gi3/0, Gi3/1, Gi3/2
                                                Gi3/3
10   End users                        active
20   Servers                          active
99   Native VLAN                      active

Check Kali VM., start SSH and Apache service on this machine.

On Palo Alto.

LAN interface.

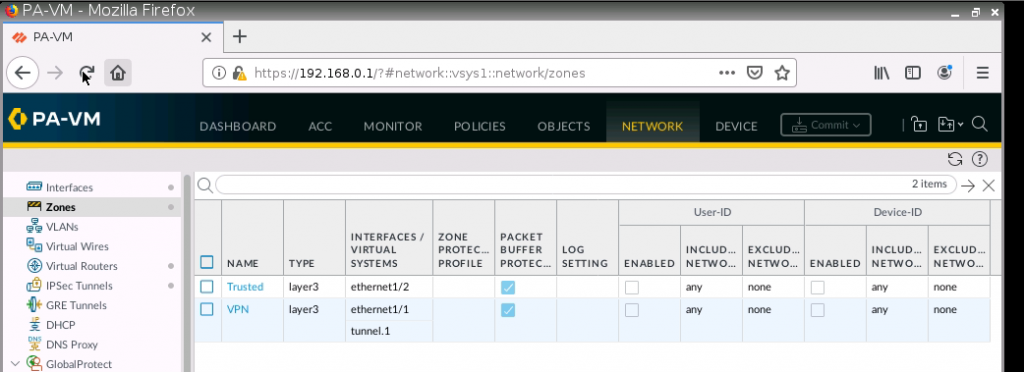
e1/1 belongs to the VPN zone, and e1/2 belongs to the LAN zone, respectively.

Create a new network object for the PA LAN subnet.

Configure SNAT to allow traffic from the PA LAN subnet to access the Internet.

Configure a default route.

Configure OSPF on PA.

Allow ICMP on the Mgmt interface to troubleshoot.

Ping from PA.

Ping from a VM on the PA LAN subnet.

+ Create a new VPC.

Create a private subnet.

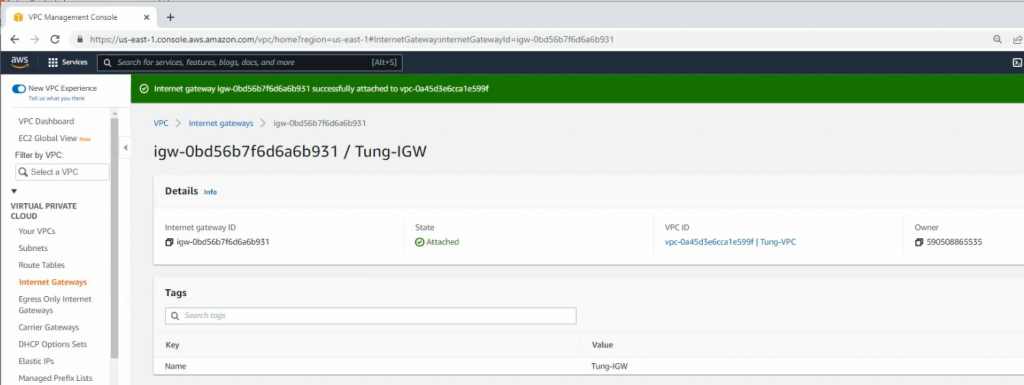
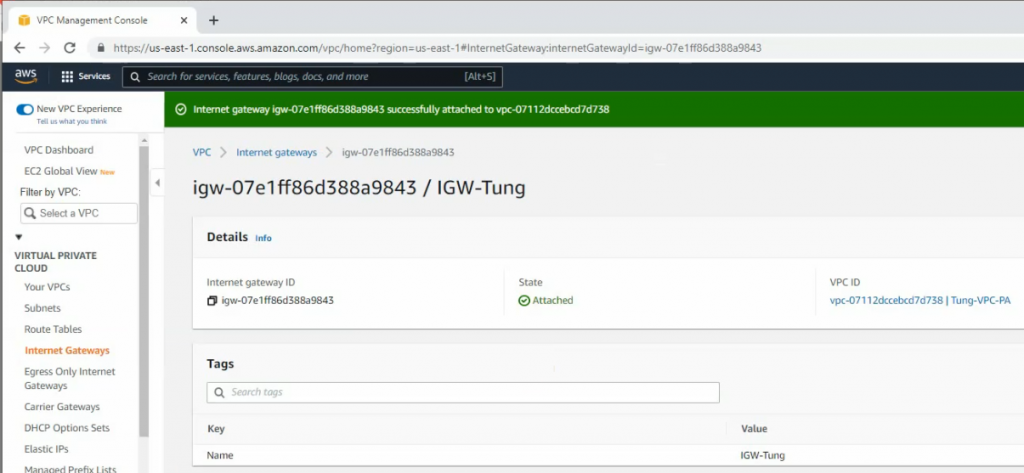
Create and attach Internet gateway to your VPC.
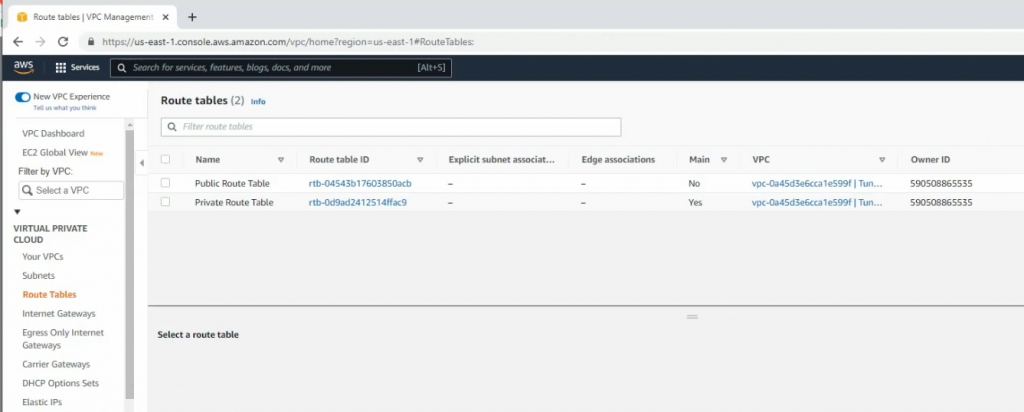
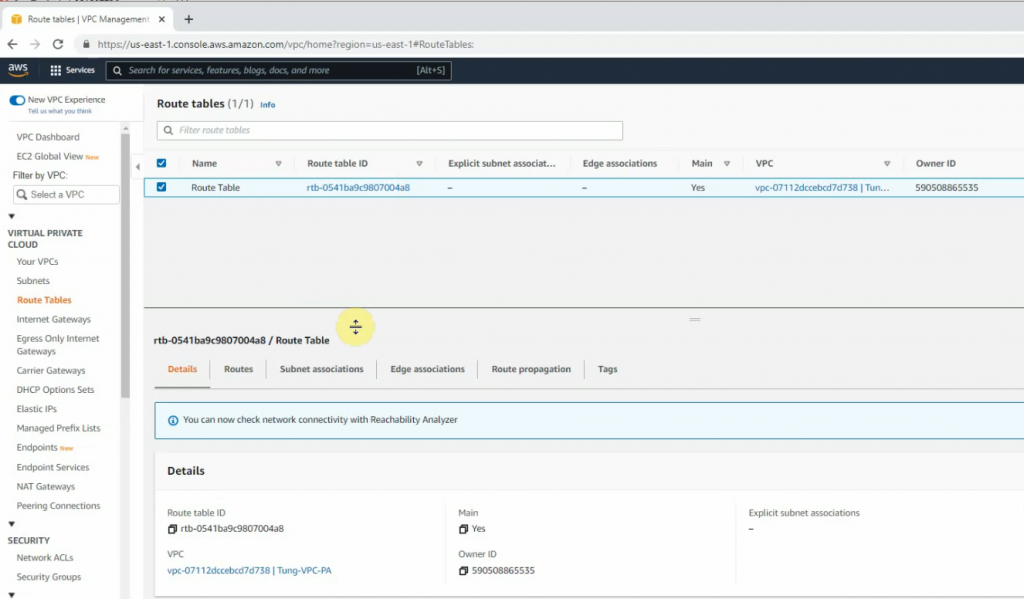
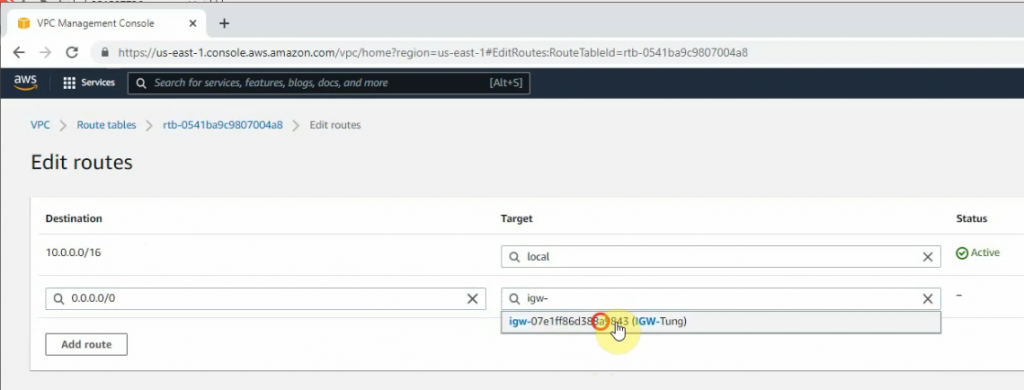
Route table.
Add a new route to your Internet Gateway.
Go to VPN, create a customer gateway.

Create a new VPN gateway.

Attach it to your VPC.

Create a VPN site to site.

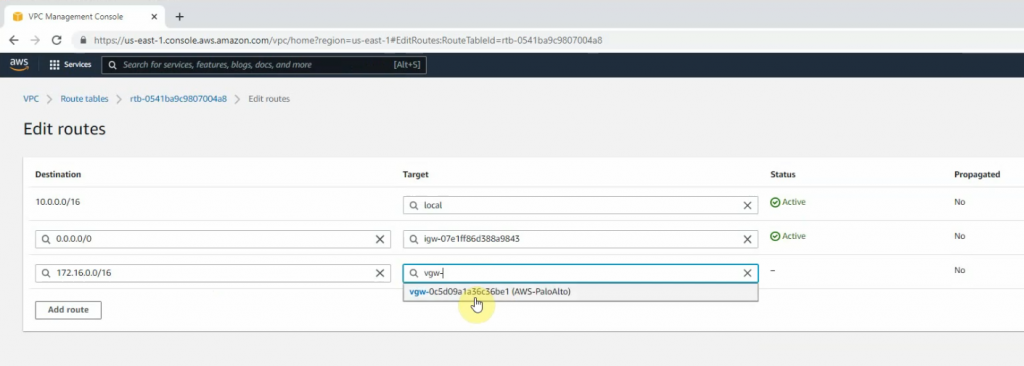
Go to the Route table and add a new route to PA LAN subnet.
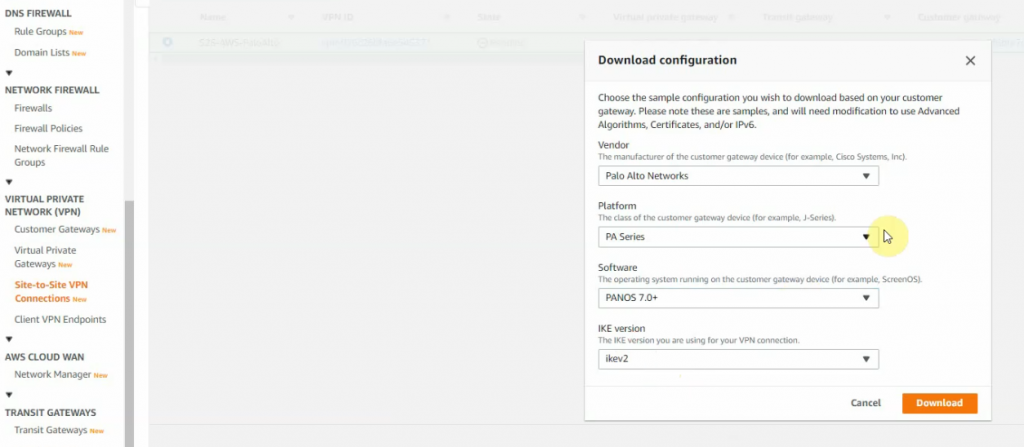
Click Download Configuration and select information as the following screenshot.
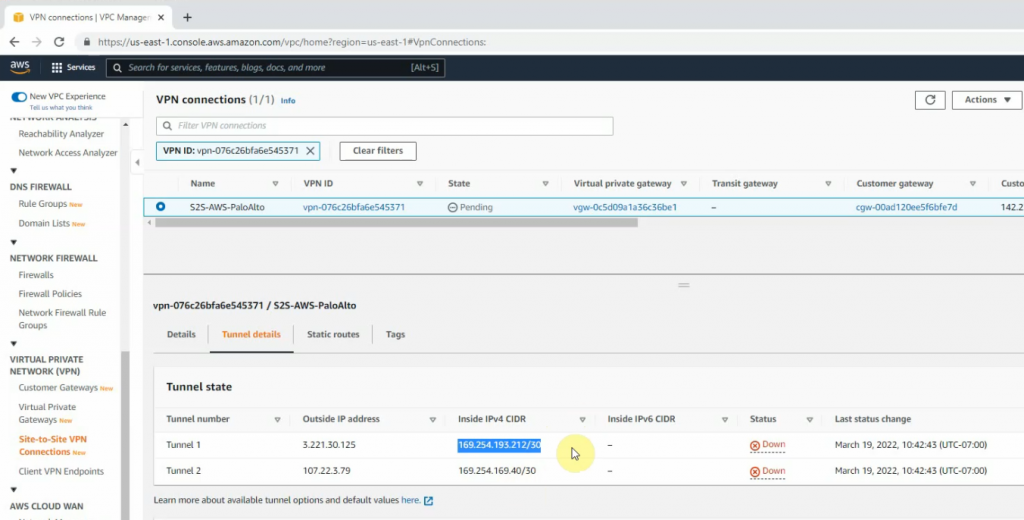
Open the file to use for configuring PA.

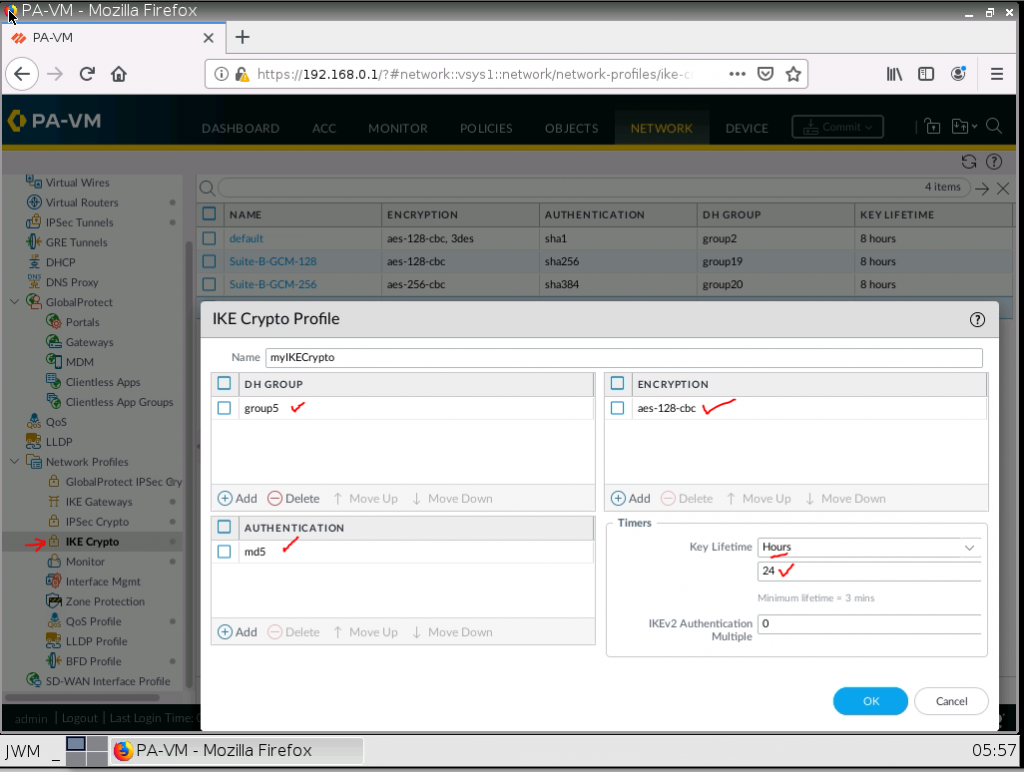
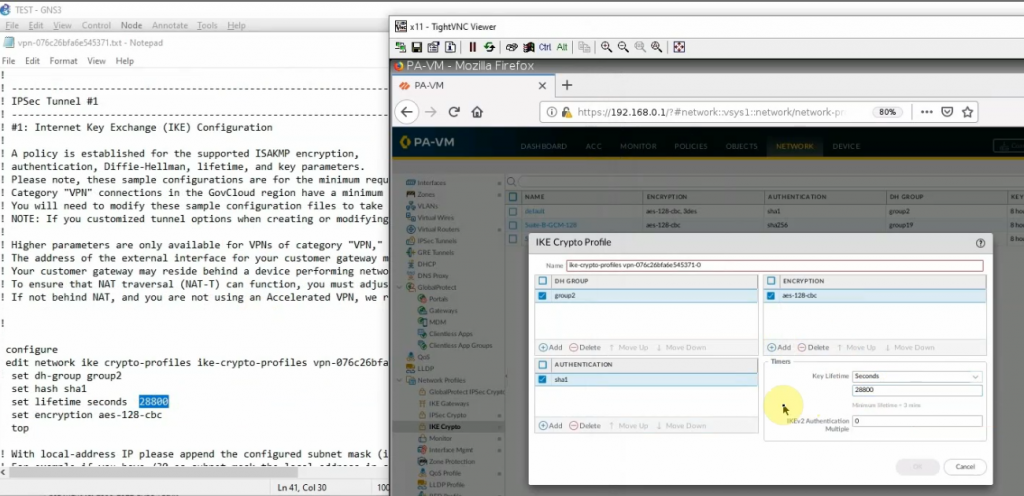
Configure IKECrypto.
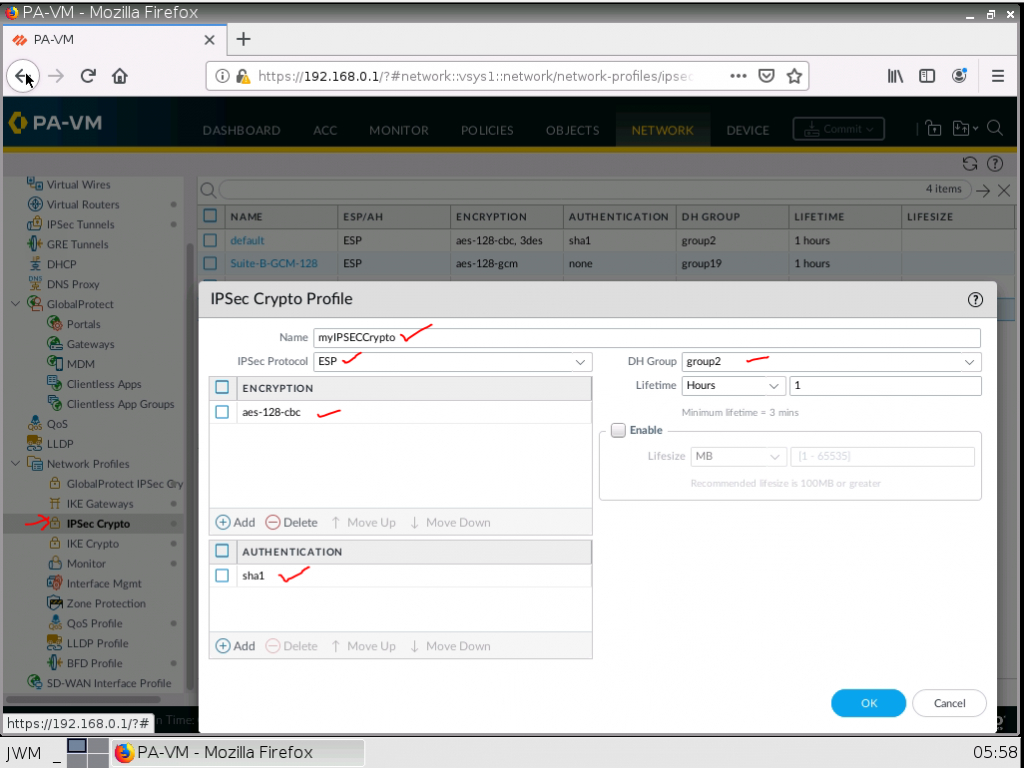
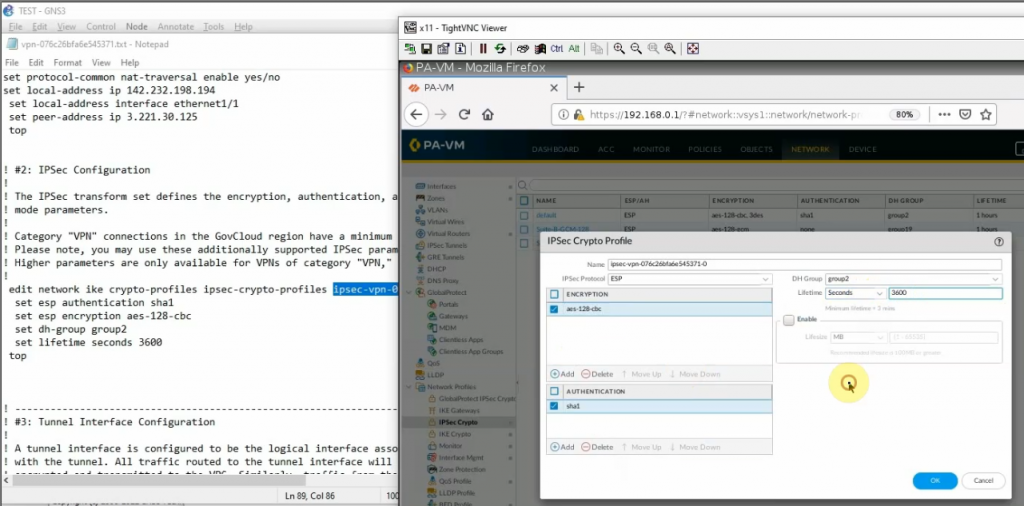
Configure IPSECCrypto.
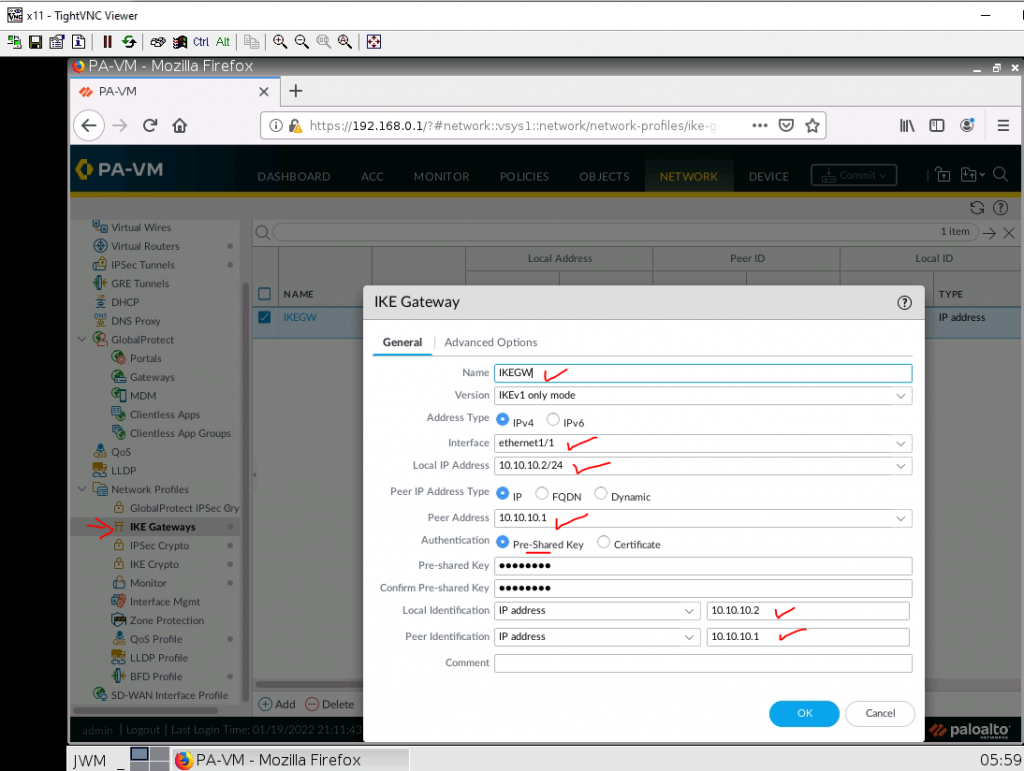
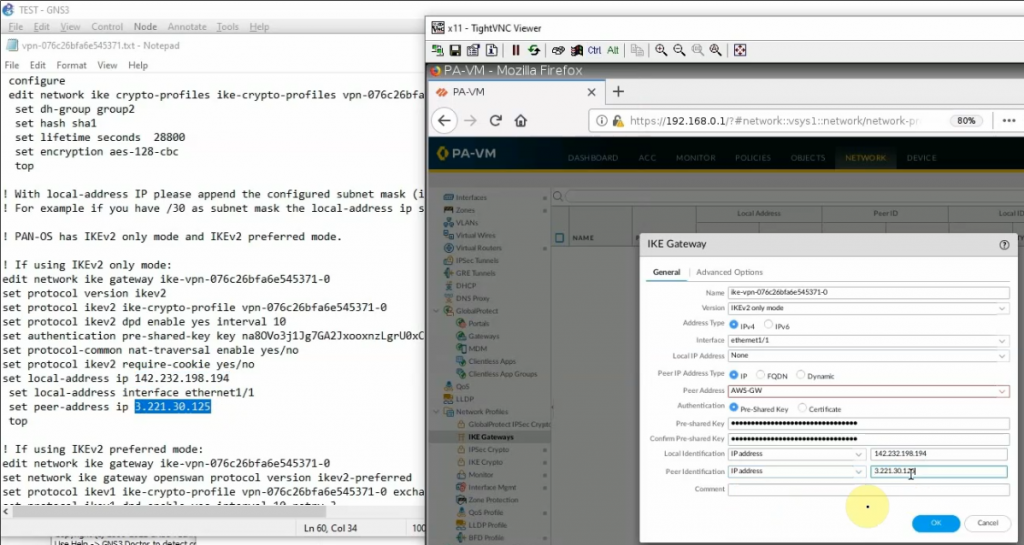
Configure IKE Gateway.
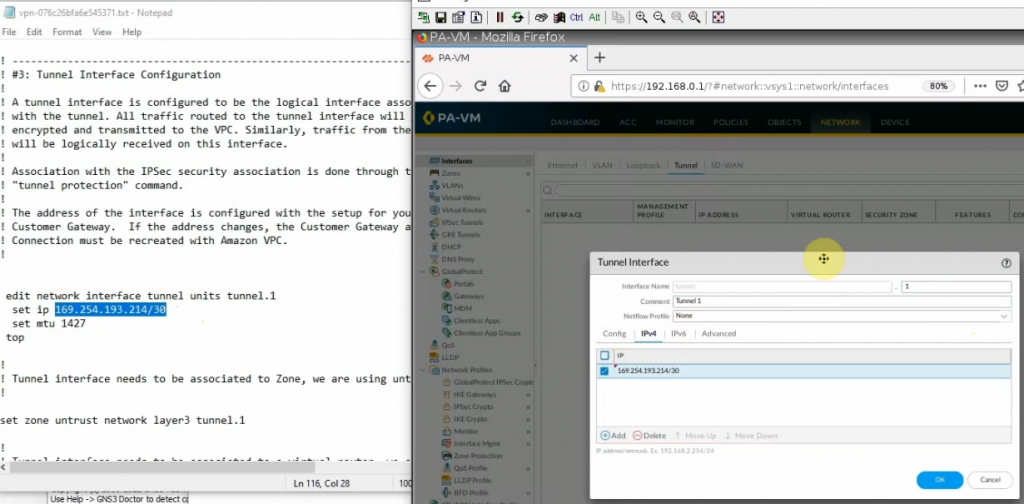
Create a new interface tunnel 1 for VPN IPSEC site to site between FG on AWS and PA.

Configure IPSEC Tunnel.

On Virtual Routers, add an interface tunnel 1 on the router settings.

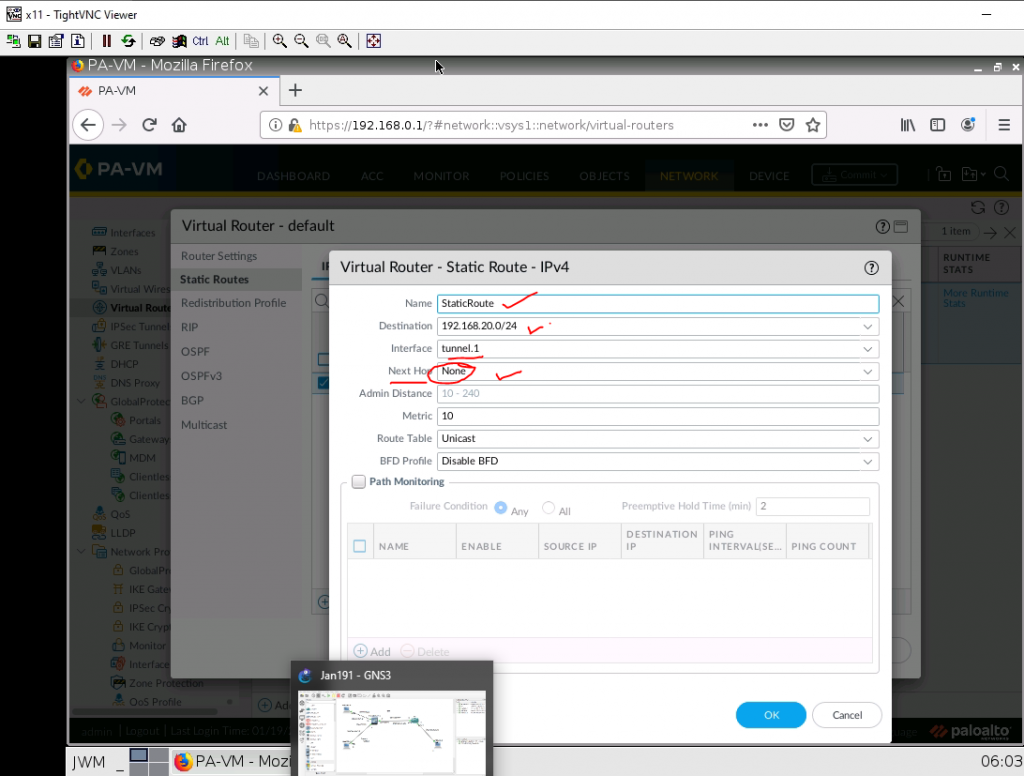
Create a new static route to the AWS LAN subnet.

New address object.

Create both Security policies to allow traffic from LAN to VPN.

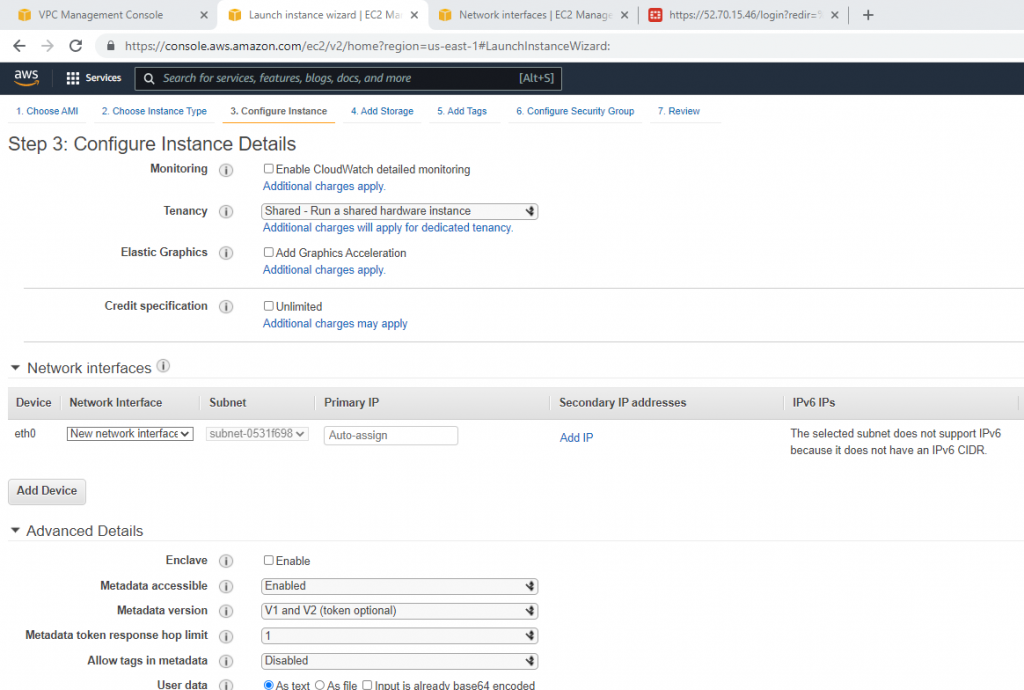
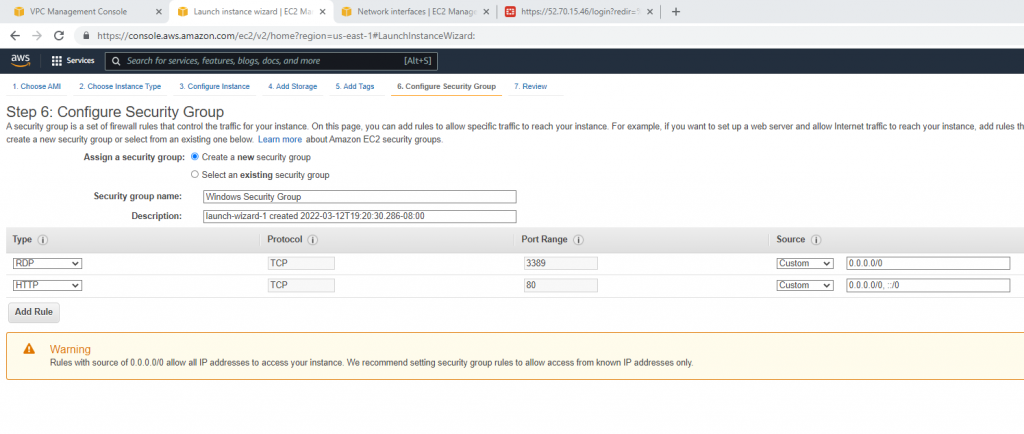
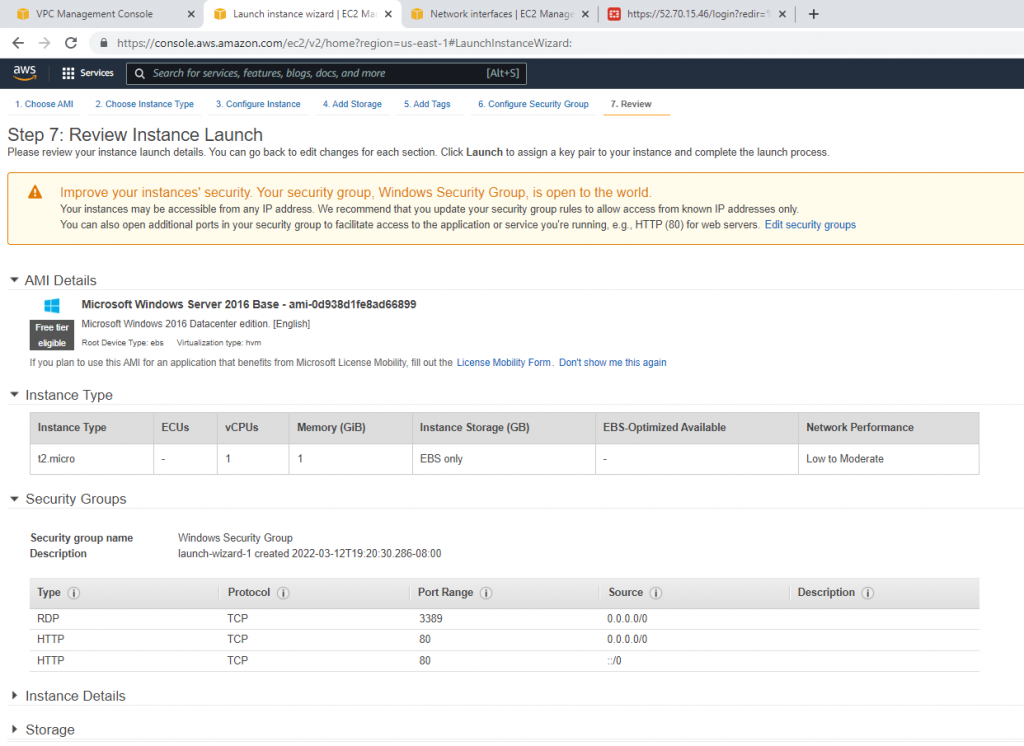
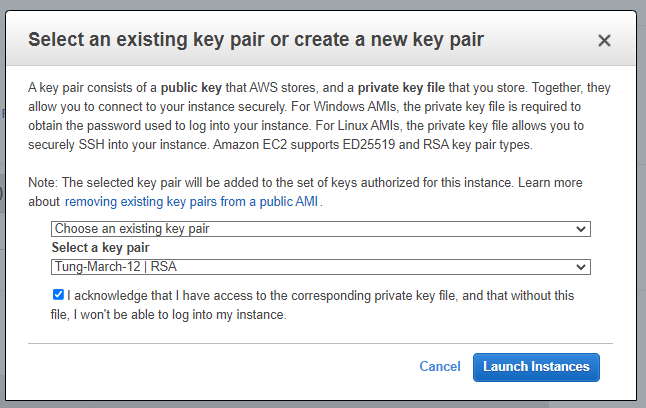
+ Back to AWS, create a new Linux and Windows instance on AWS.

Create a new key pair on AWS.

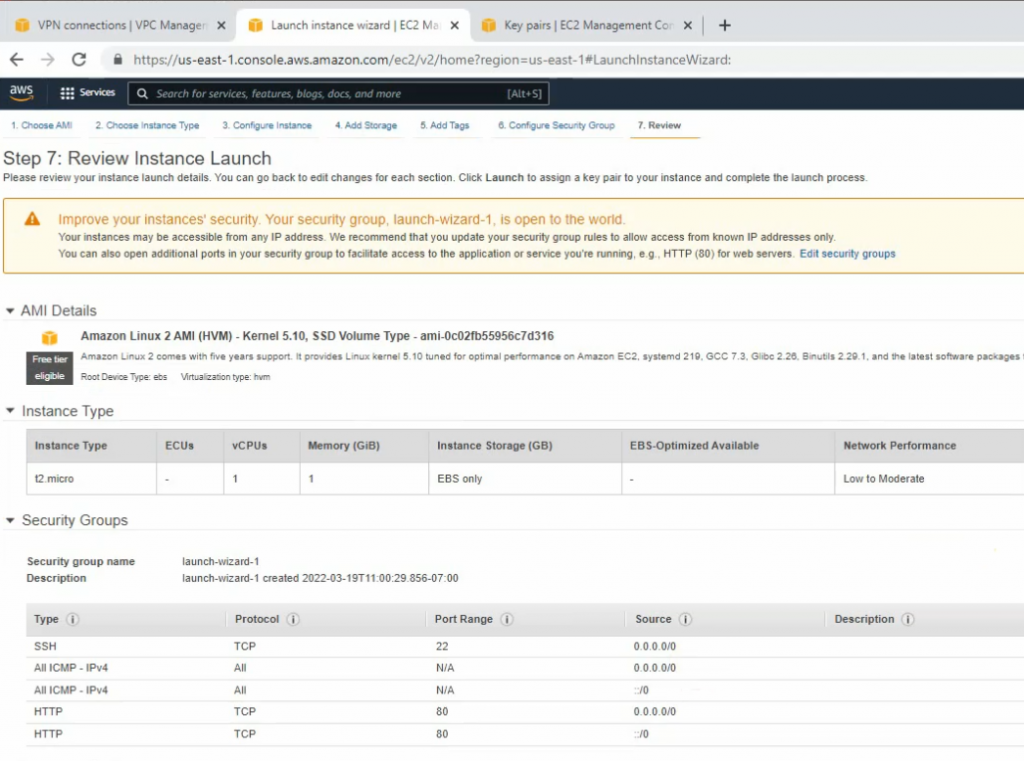
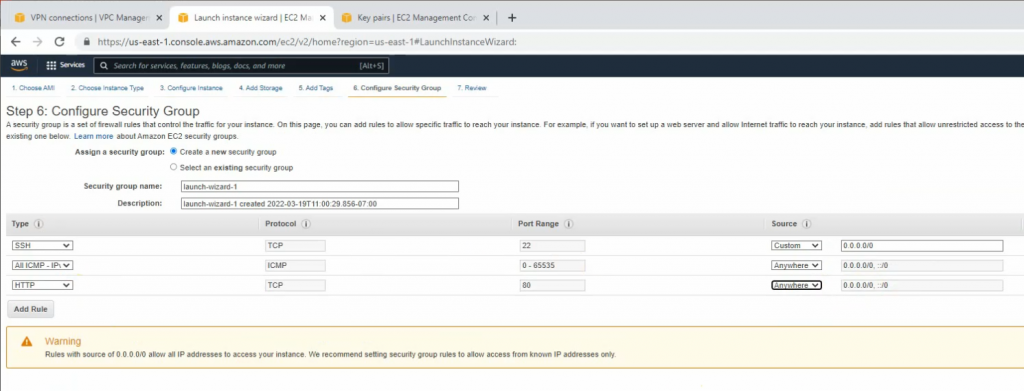
Allow HTTP, SSH, and ICMP on Security Group.
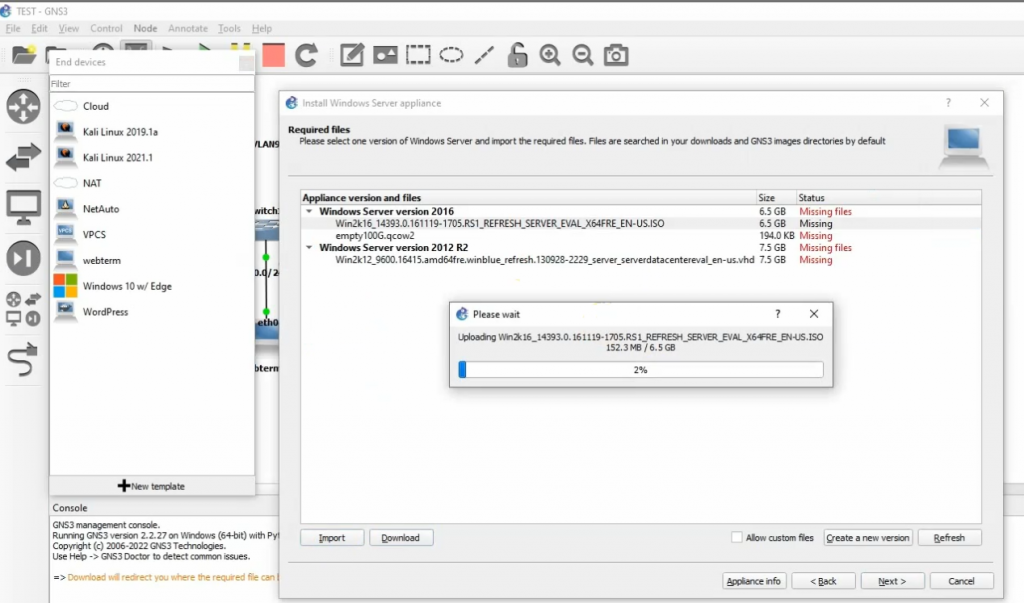
Back to GNS3, configure a new Windows 2016 server VM.
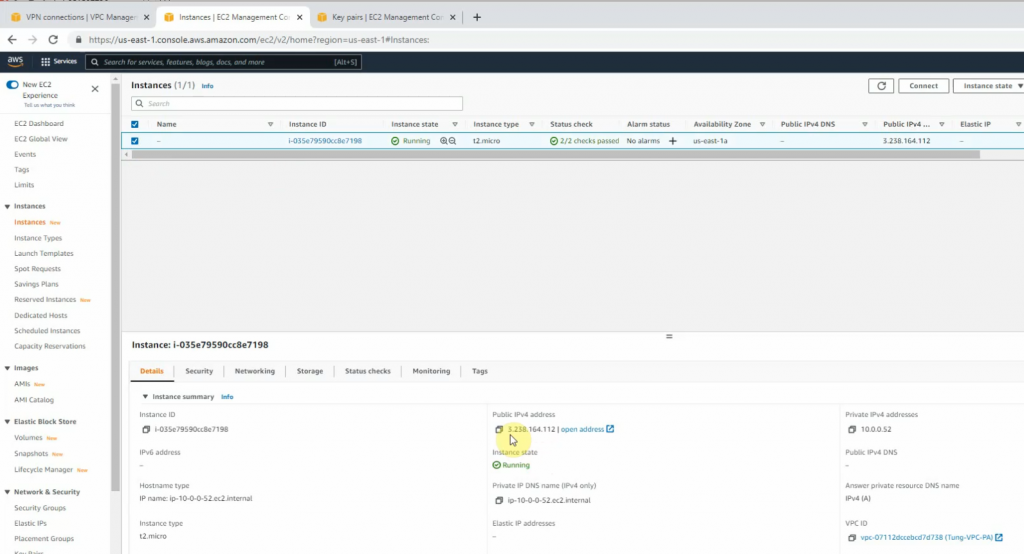
Takes notes of IP address of Linux instance on AWS.
Ping the Linux instance on AWS LAN subnet from PA LAN subnet.

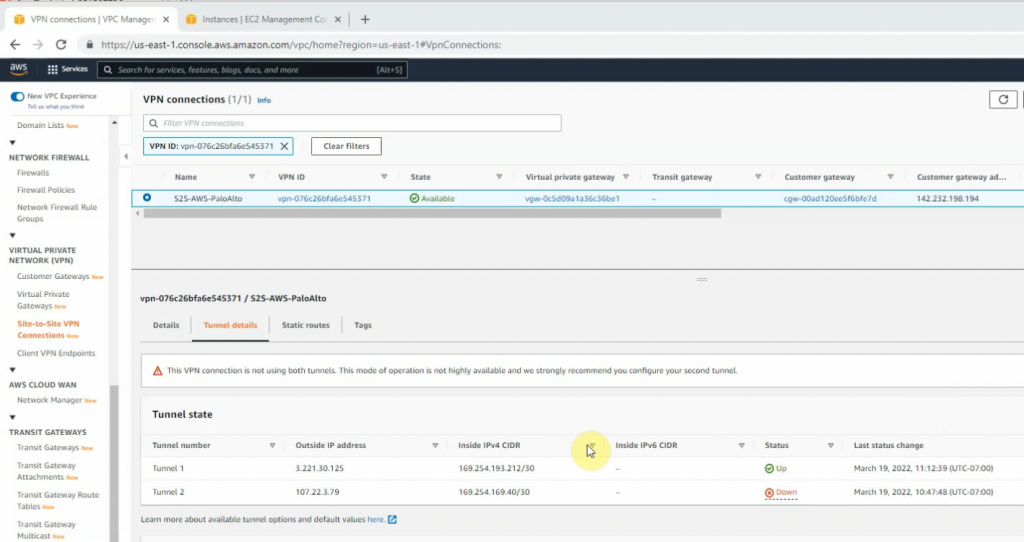
The tunnel is up on PA

On AWS, the tunnel is up as well.
Configure Windows 2016 on GNS3.

Install Windows 2016.

On Kali, access SSH to Linux VM instance on AWS>

Website on-prem.

Website on AWS.

Change computer name to DC1 and promote it to a domain controller.

Create a new Windows VM on AWS.
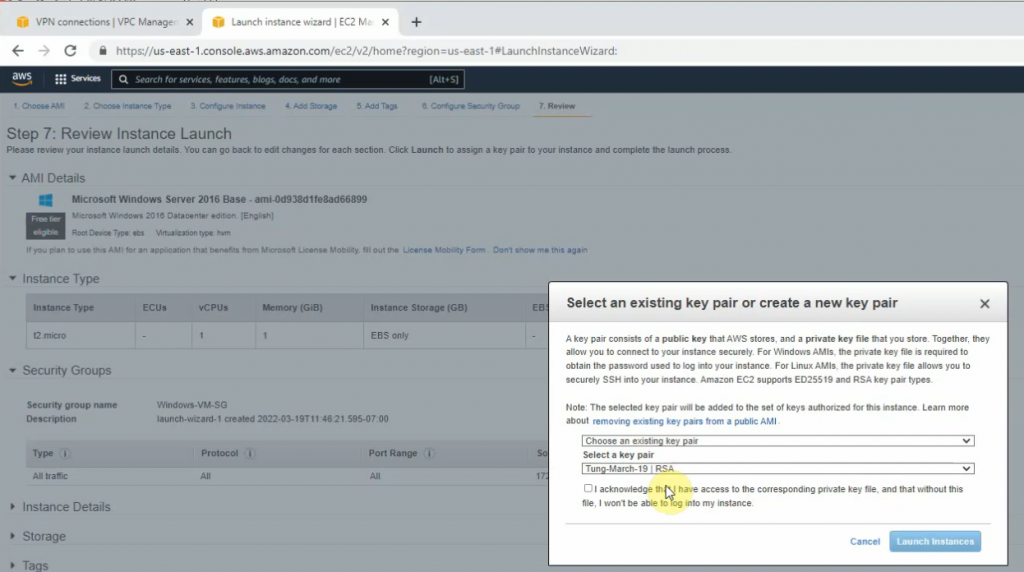
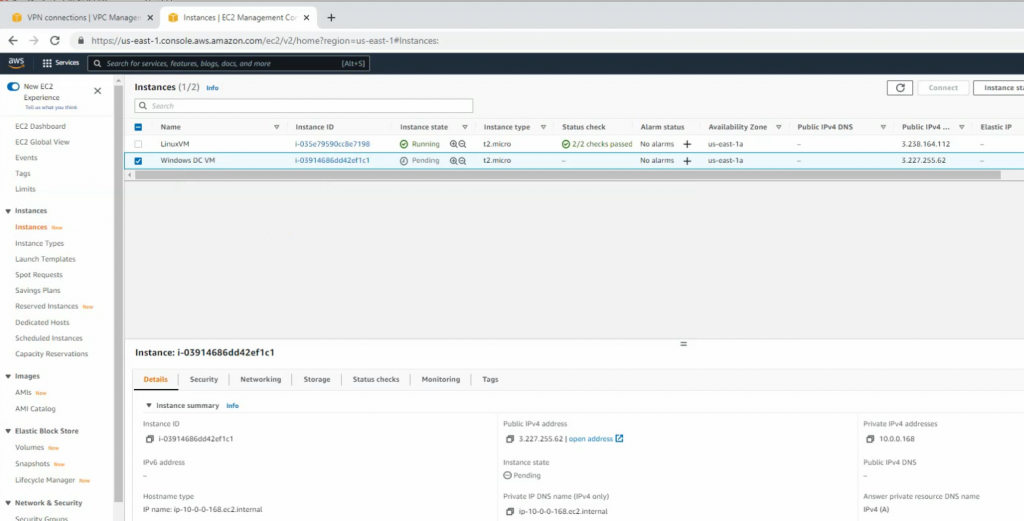
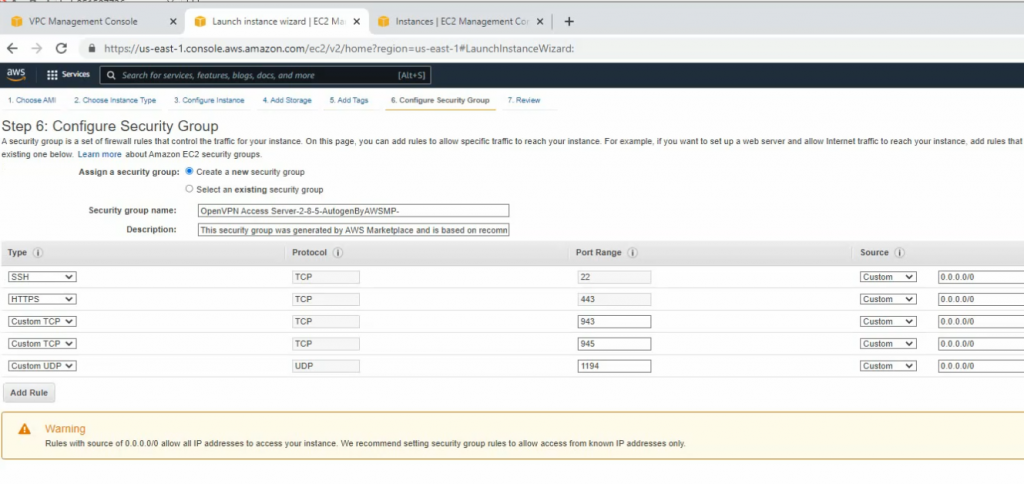
Create a new OpenVPN server instance on AWS.

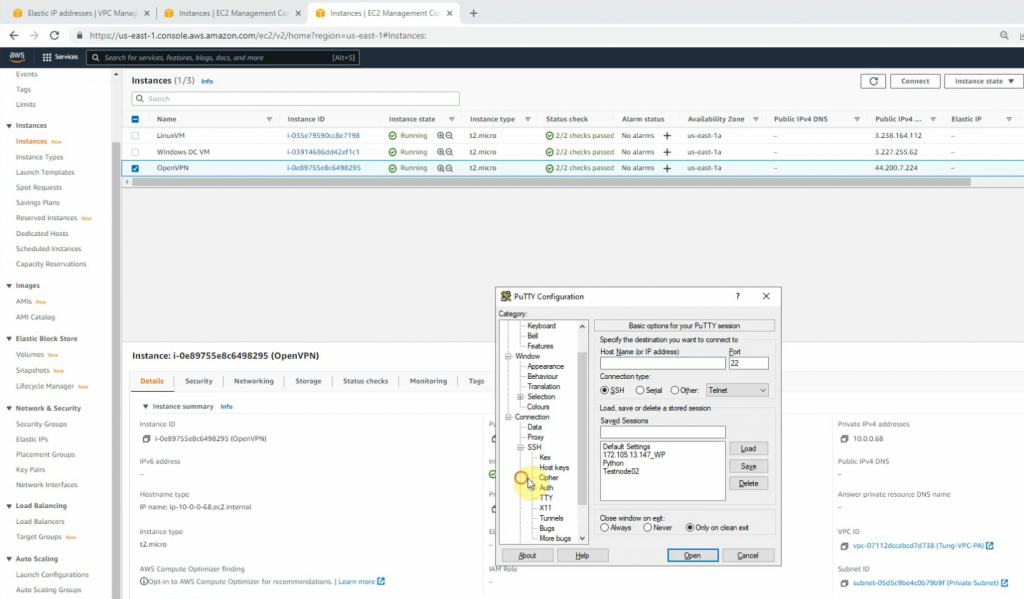
Access the OpenVPN server via SSH. Use openvpnas as a user to log in.
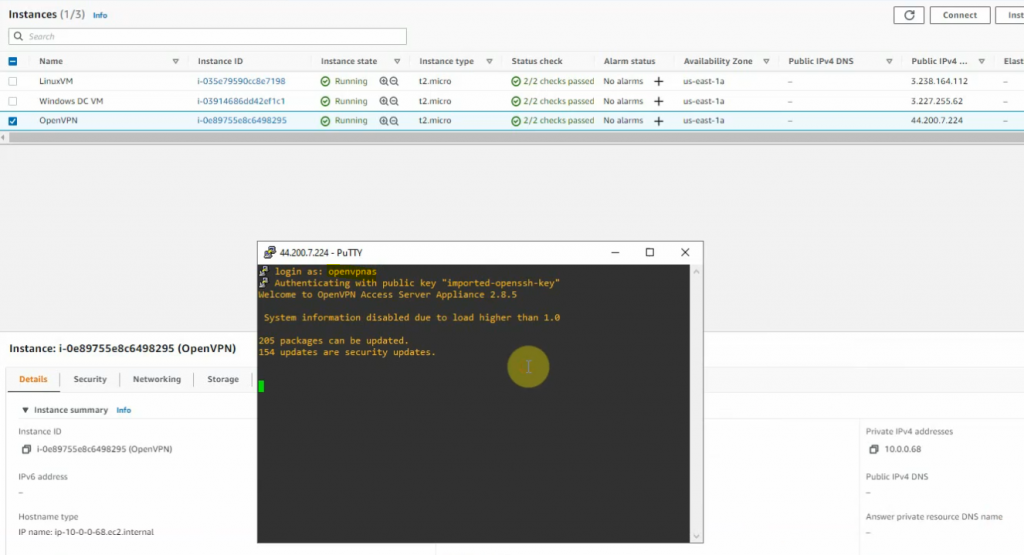
Check the private subnet on OpenVPN is matching with the private subnet on AWS.

Change the password of openvpn.

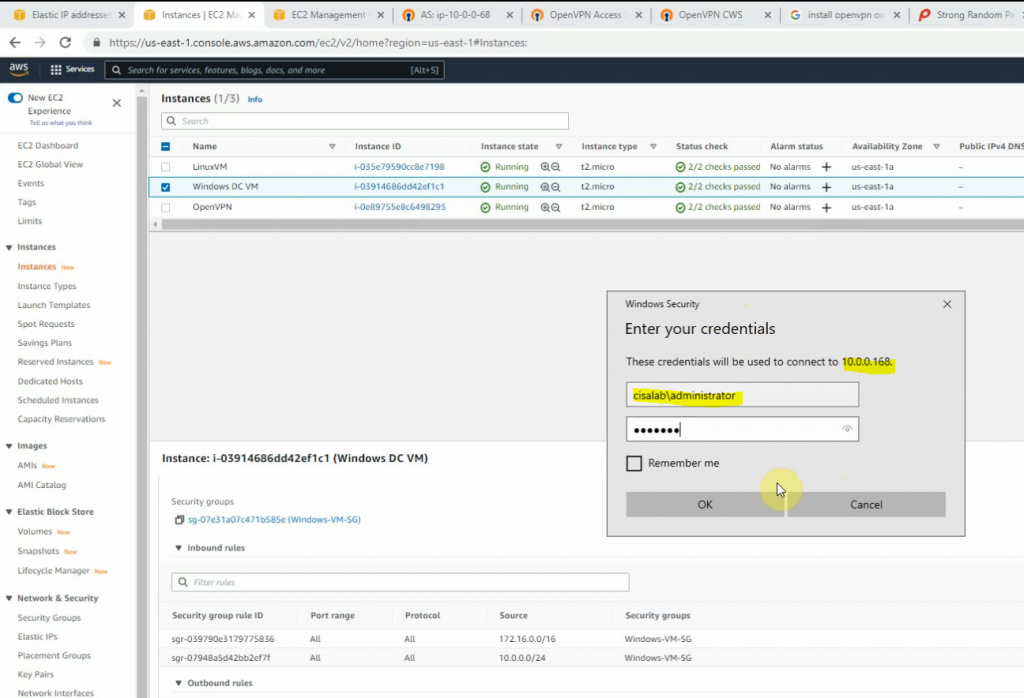
From Windows 2016 VM on GNS3, access RDP to Windows instance on AWS. Change DNS setting to DC1 on-prem.

Join the machine to domain on-prem and promote it to become additional domain controller.

Create a couple of users to test: tung, kevin, test on domain controllers.

On OpenVPN.

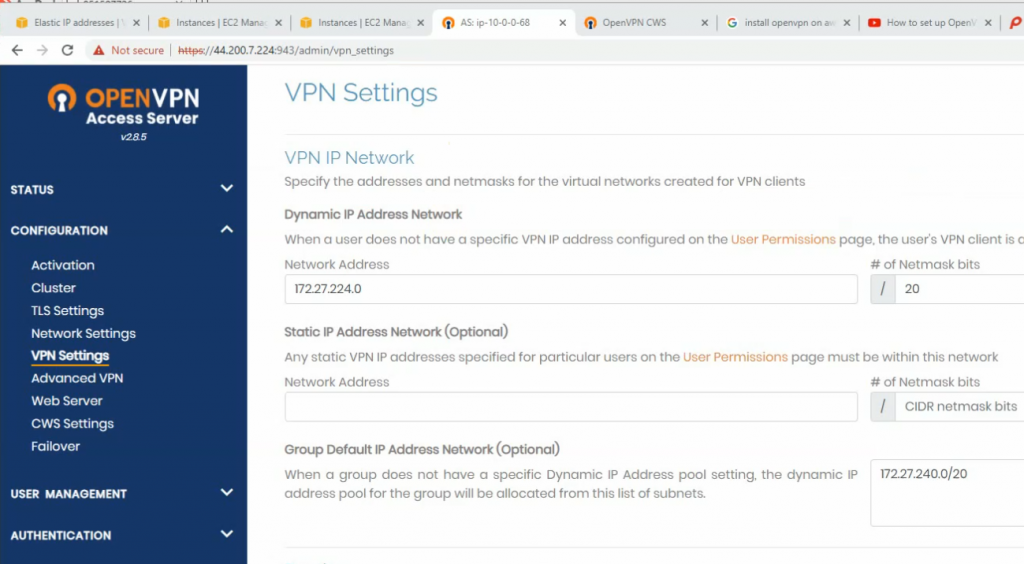
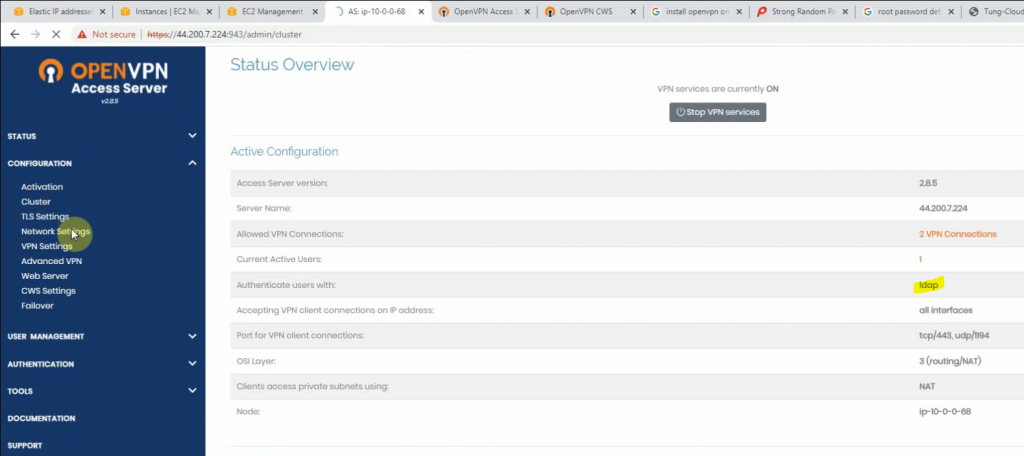
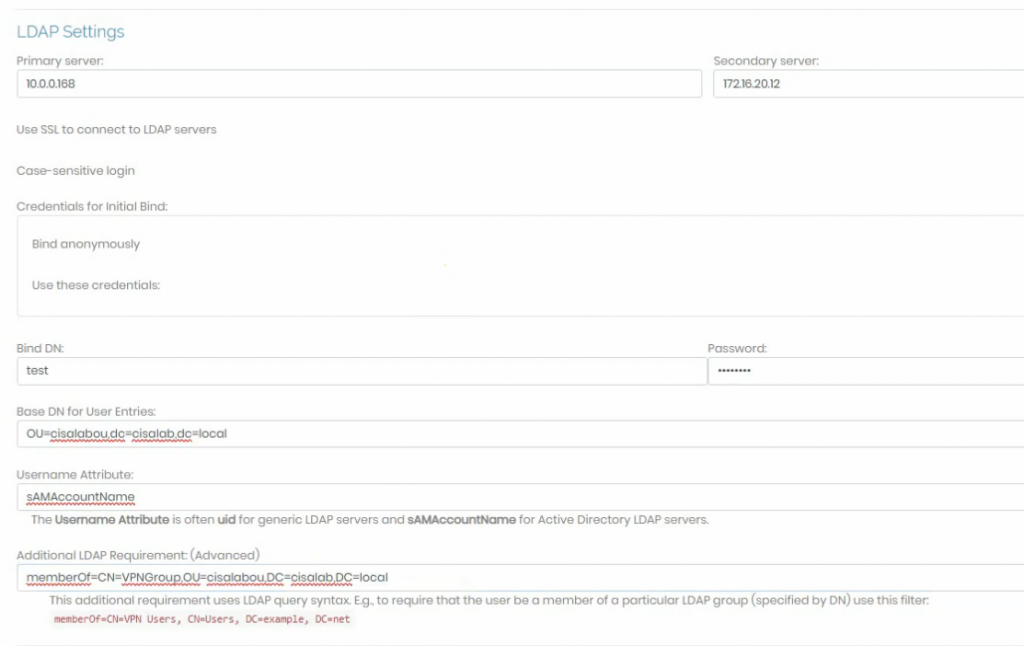
Change the setting to authenticate the OpenVPN tunnel via LDAP. We use both LDAP servers on AWS and on-prem.
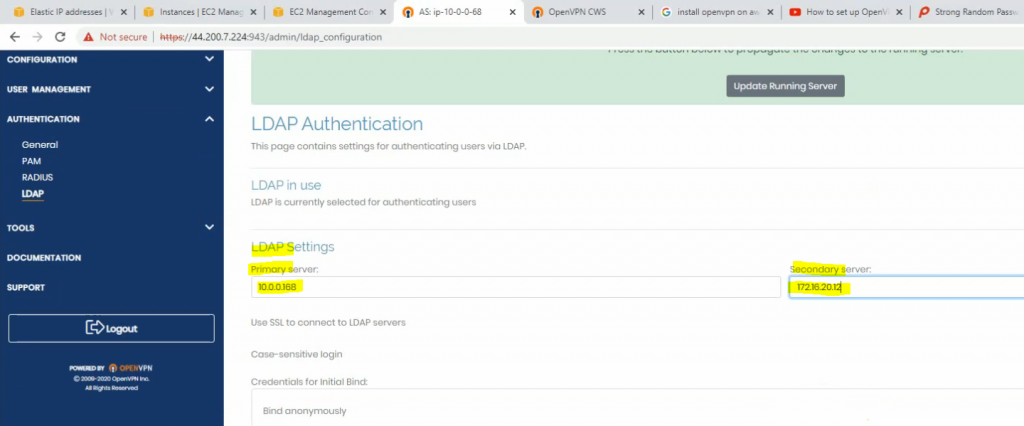
Configure LDAP settings to query the corresponding information on domain controllers.
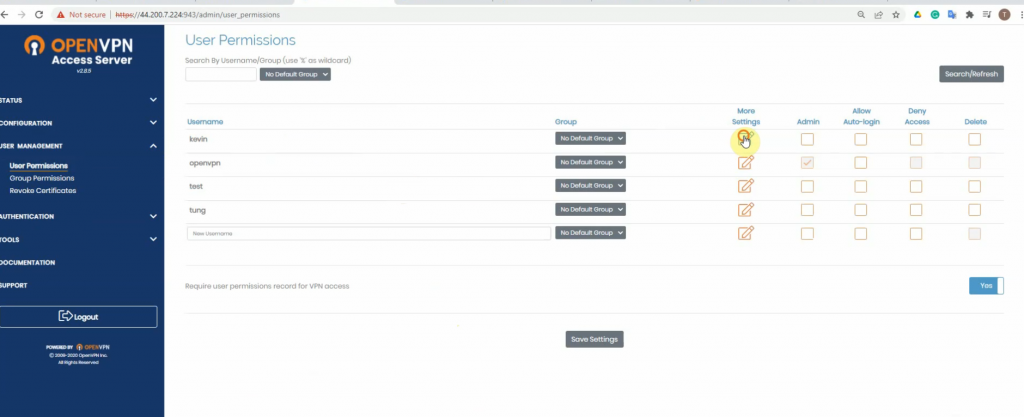
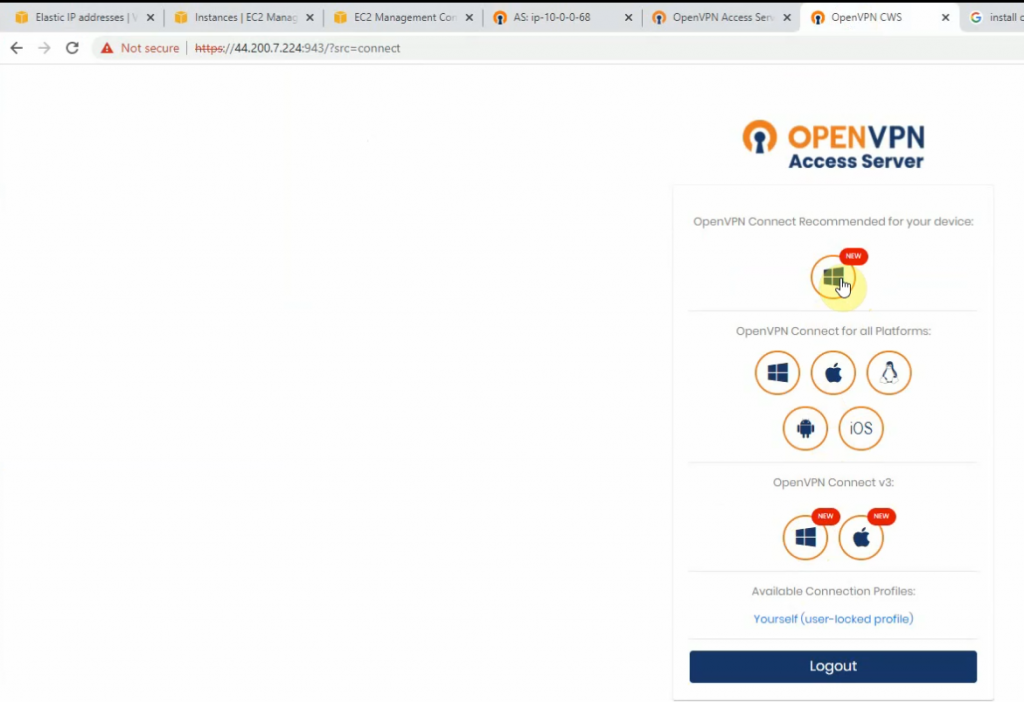
Access to OpenVPN mgmt interface.
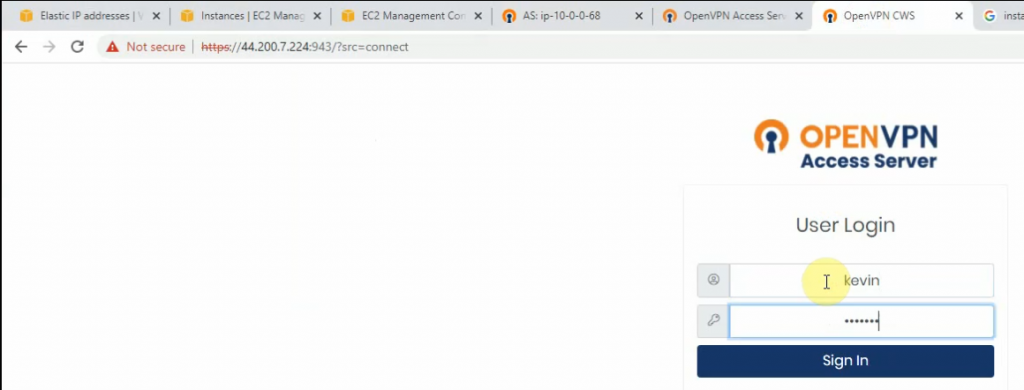
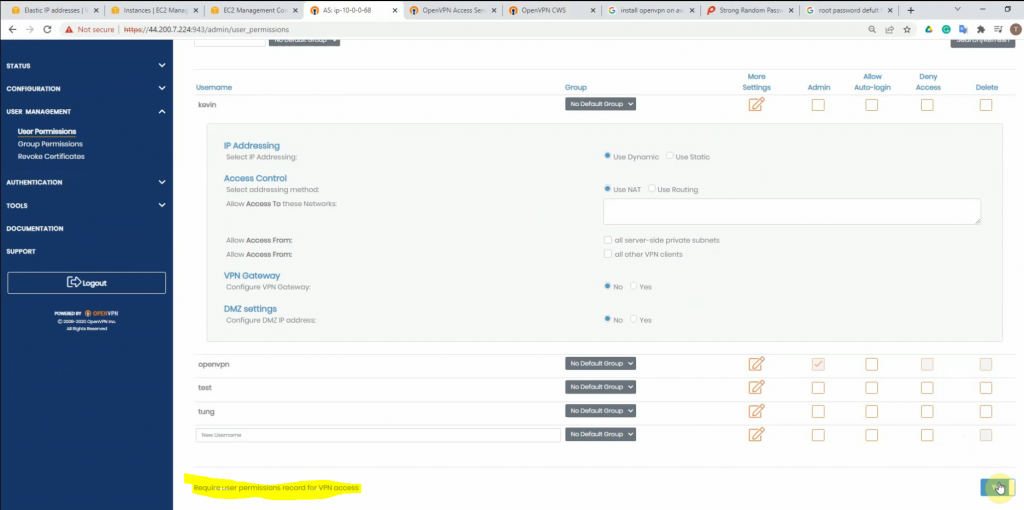
Using a kevin user to log in.

Access a web server on a private subnet on AWS.

RDP to a private IP address on Windows DC2 on AWS.

Monitor Security traffic on PA.

Join Windows 10 to the domain.

Disconnect interface from DC1 to SW2 to simulate migrating servers to AWS cloud.
Windows 10 is still accessible to the domain on DC2 on AWS.

Access RDP to DC2 and a web server on AWS.

Domain users are able to access a domain controller on AWS and a web server on AWS when the domain controller on-prem was down.

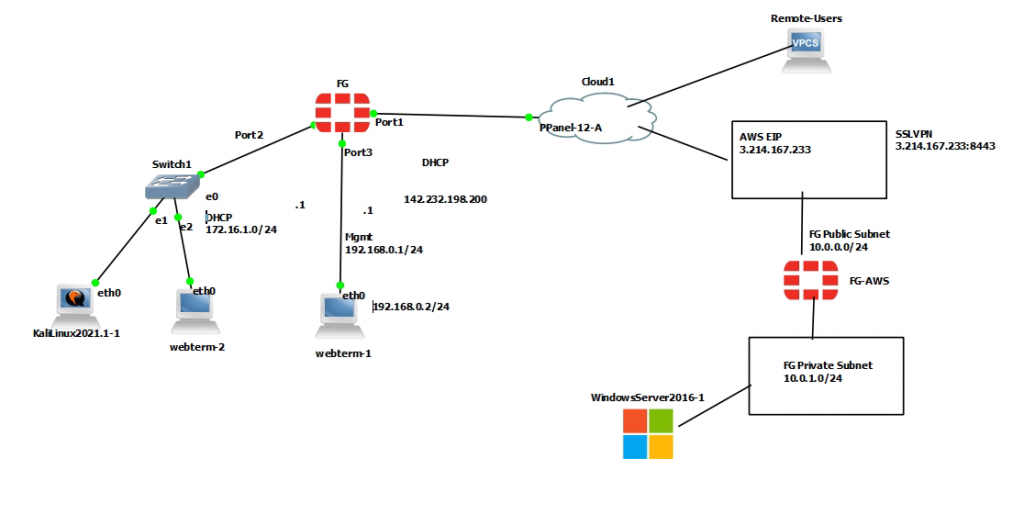
Deploy VPN IPSEC site-to-site between FortiGate on-prem and AWS

This is a topology that is used to deploy this lab.

+ Configure FortiGate on AWS.

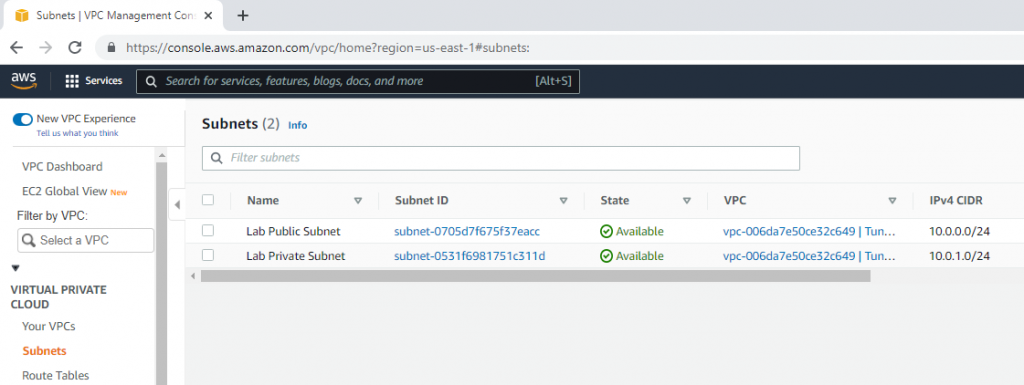
Create a new VPC with a CIDR network is 10.0.0.0/16. Then, create both Lab Public subnet and :ab Private subnet on AWS.

Create a new Internet gateway and attach to your VPC.

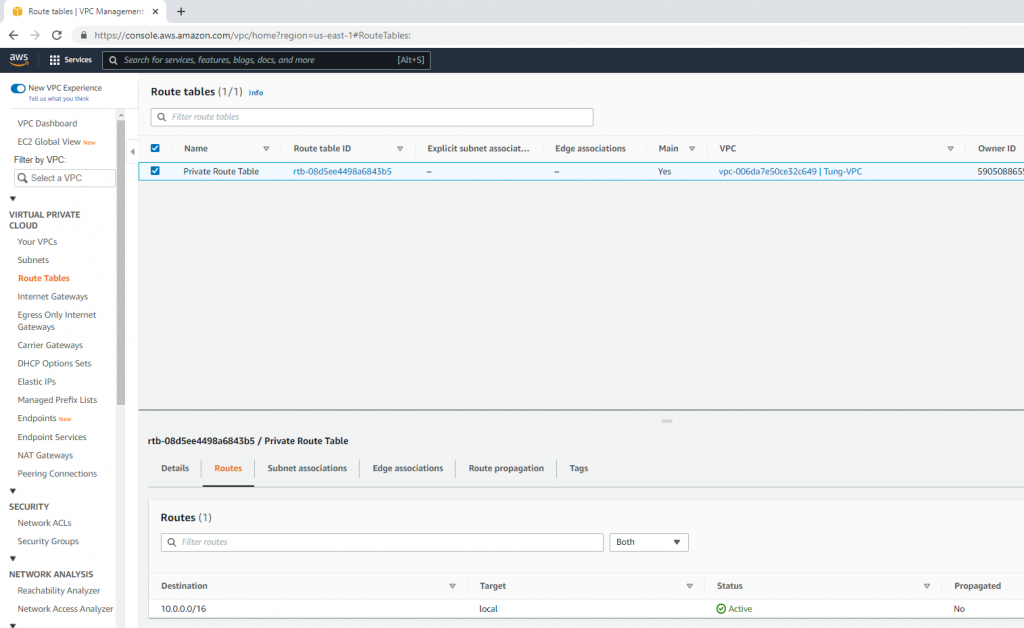
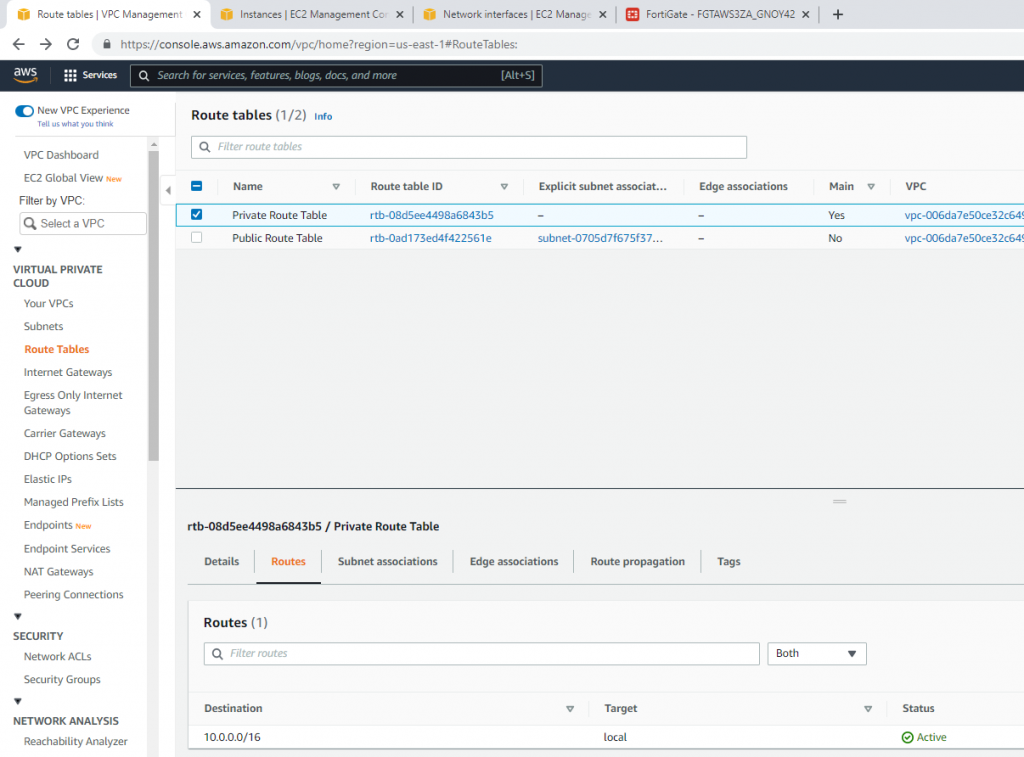
Create route tables.

Add a new route to the public Route table.

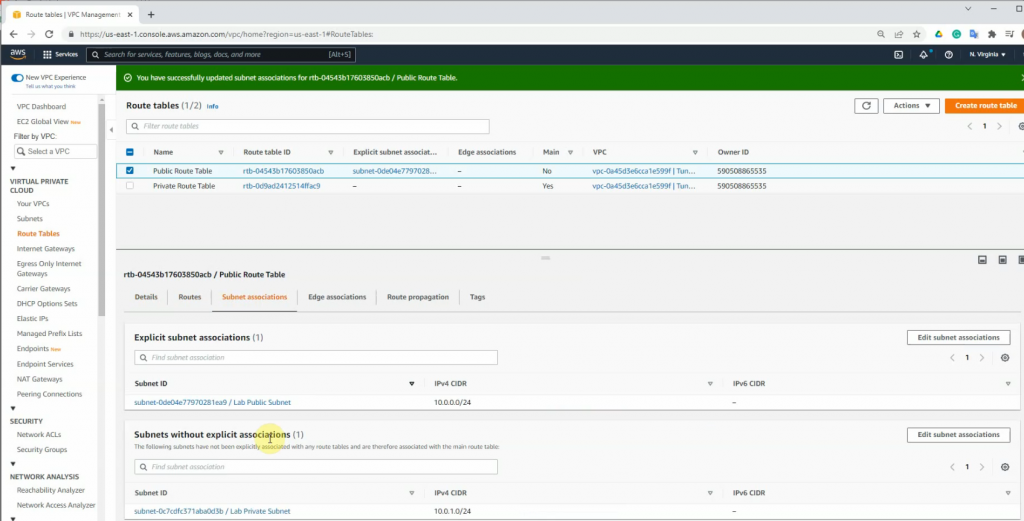
Associate the public subnet to the Public Route table.

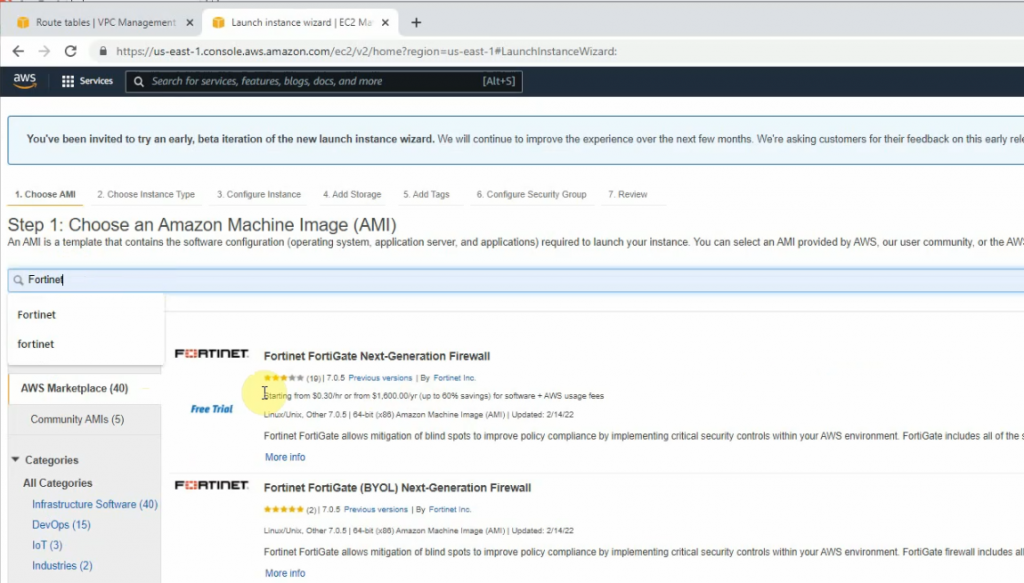
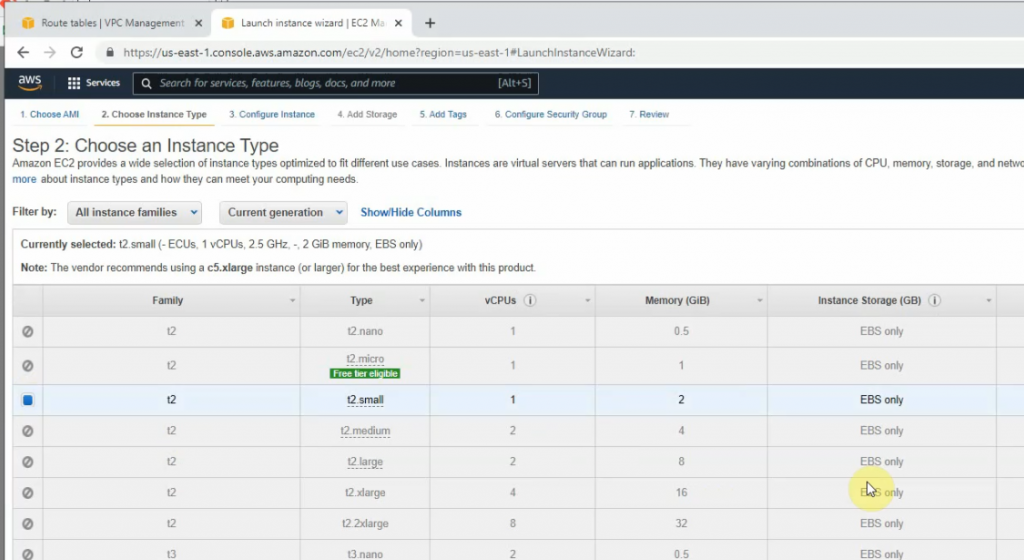
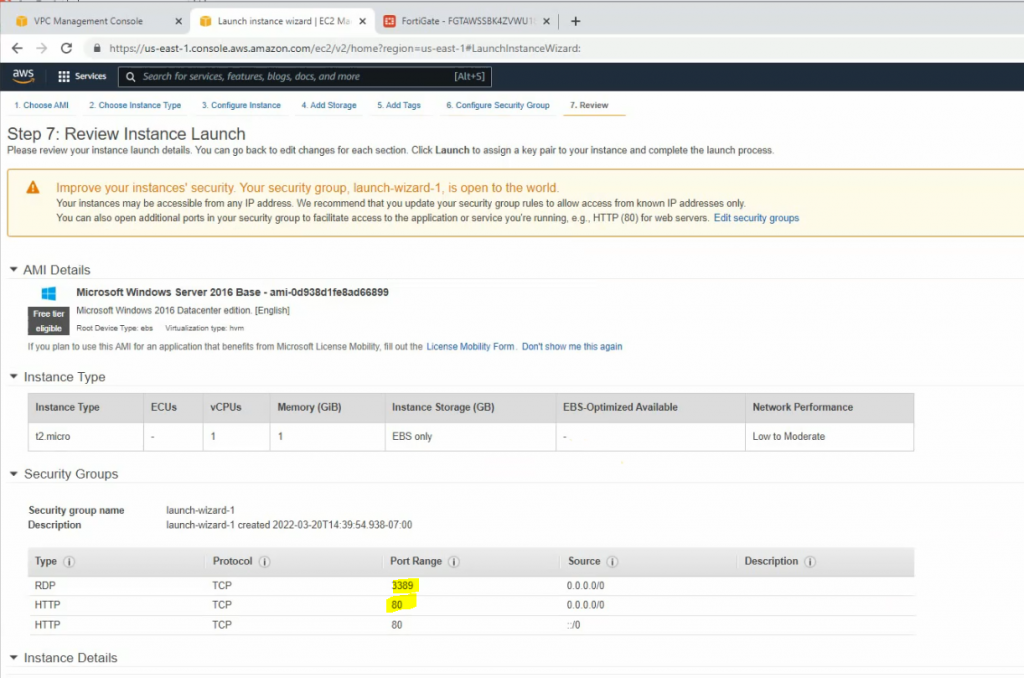
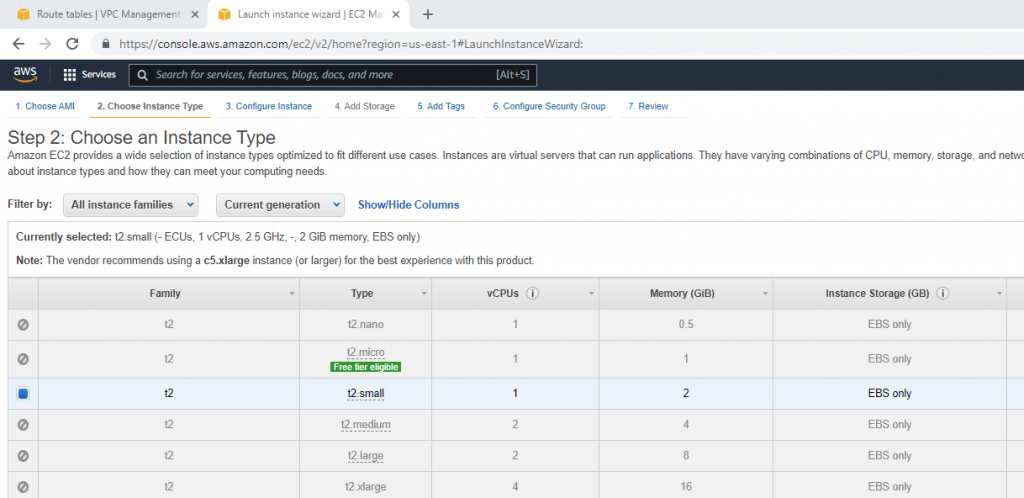
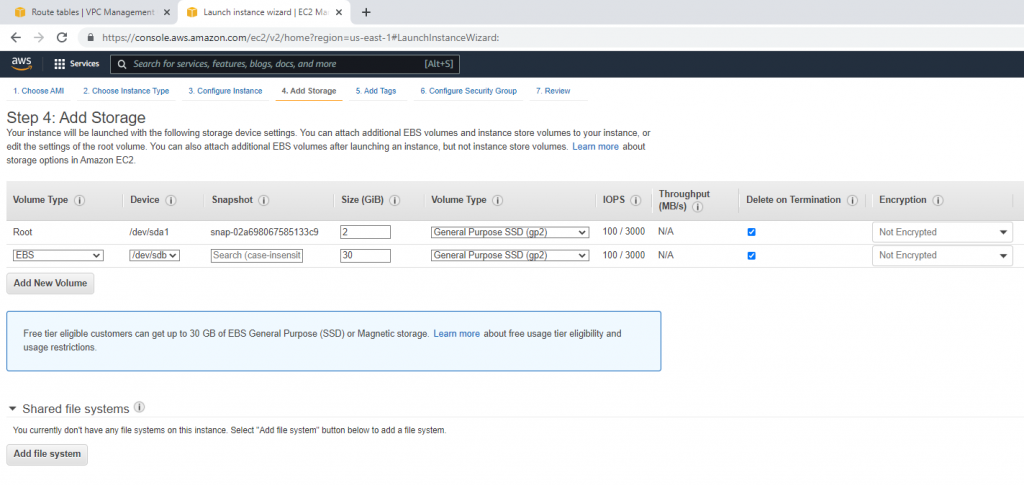
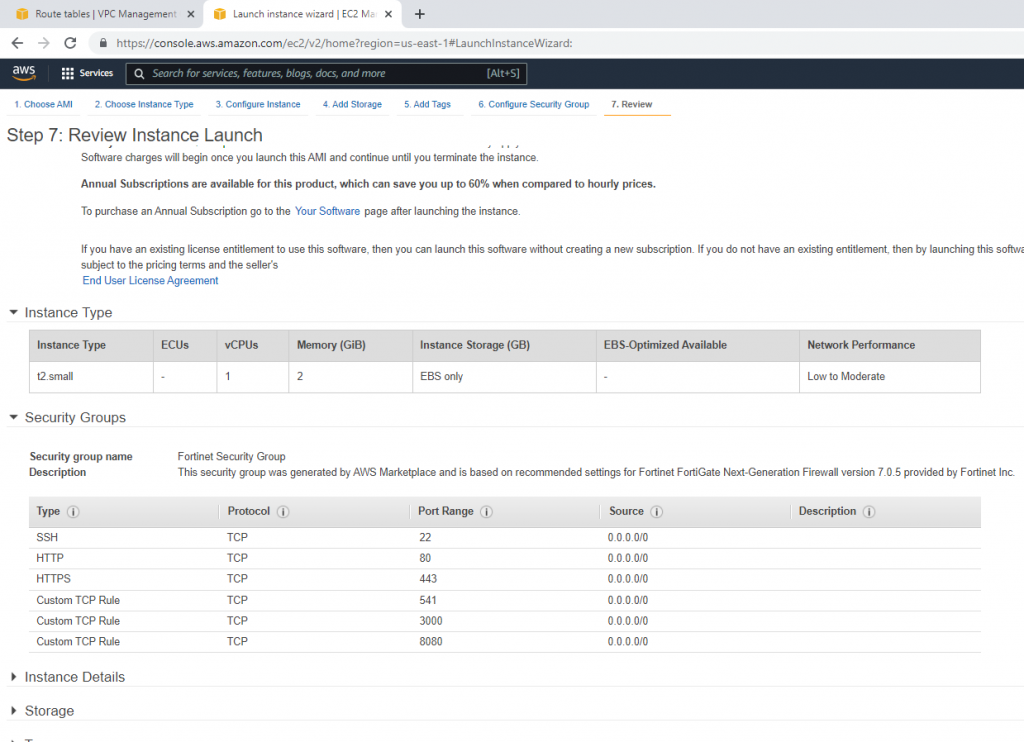
Go to EC2 and create a new FortiGate instance.

Create a new private interface for FortiGate.

Attach the interface to FortiGate.

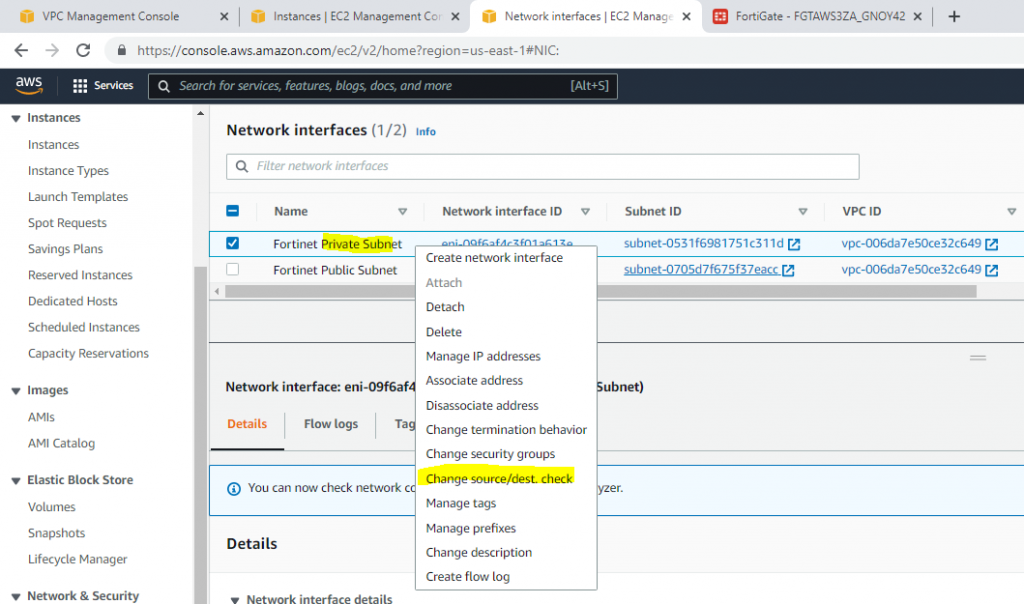
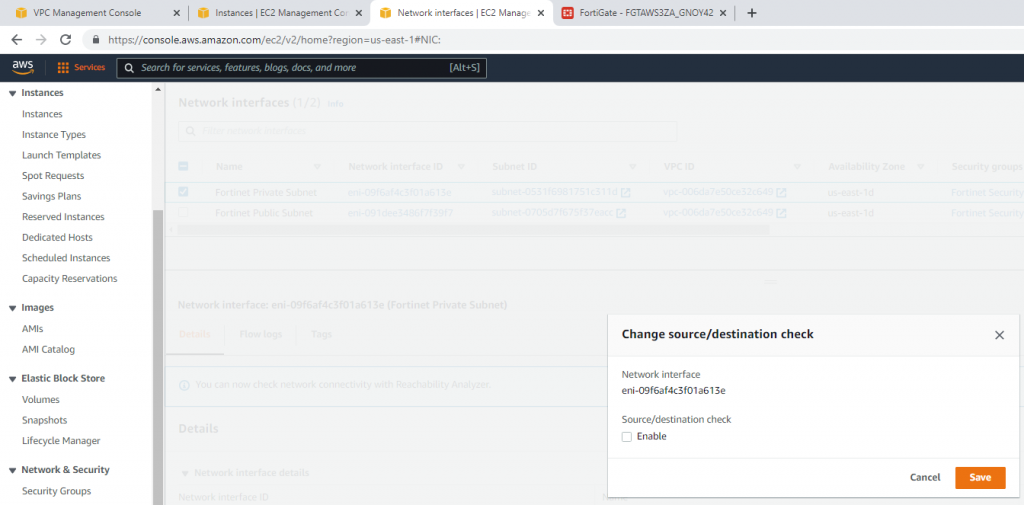
Disable “Source and destination check” on both Public and Private FortiGate interfaces.

Create a new Elastic IP address and assign it to your FortiGate instance.

Assign the Elastic IP address to public FortiGate interface.

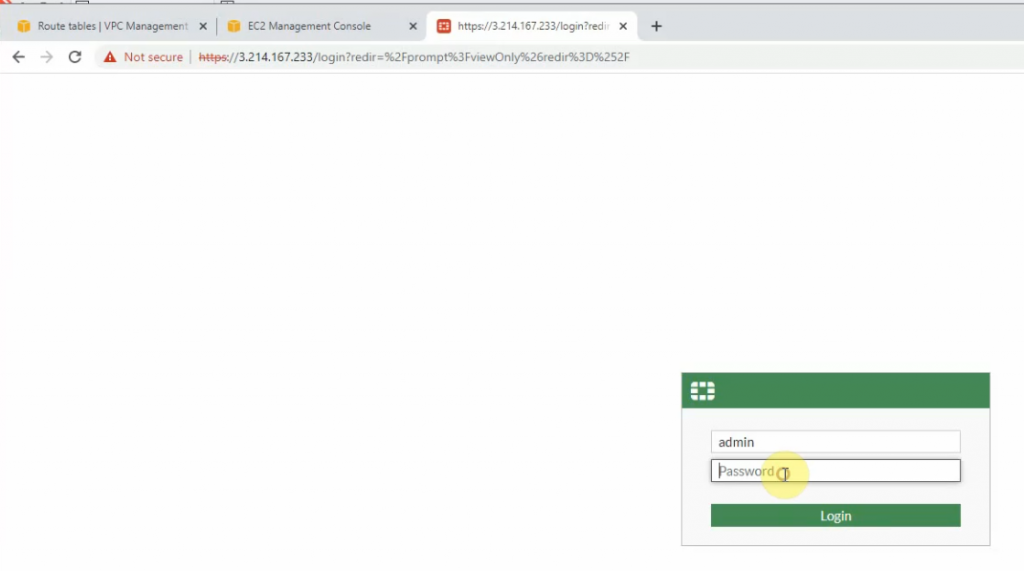
Access FortiGate management interface.

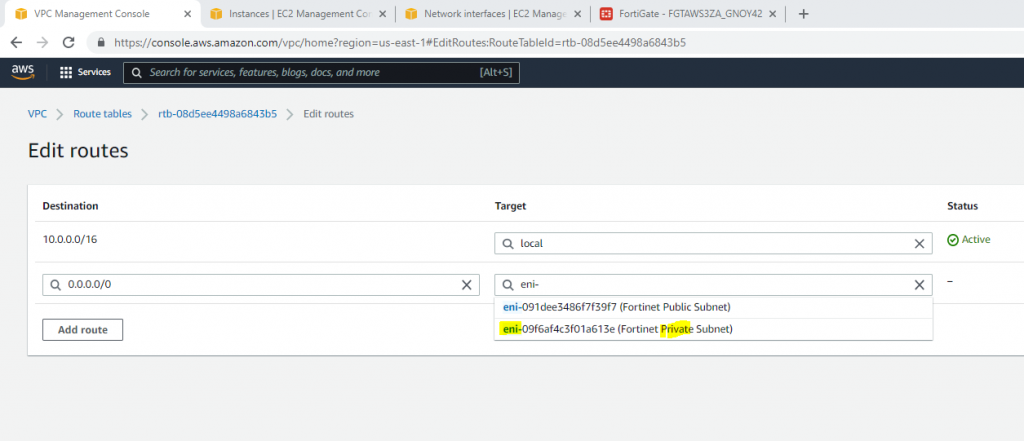
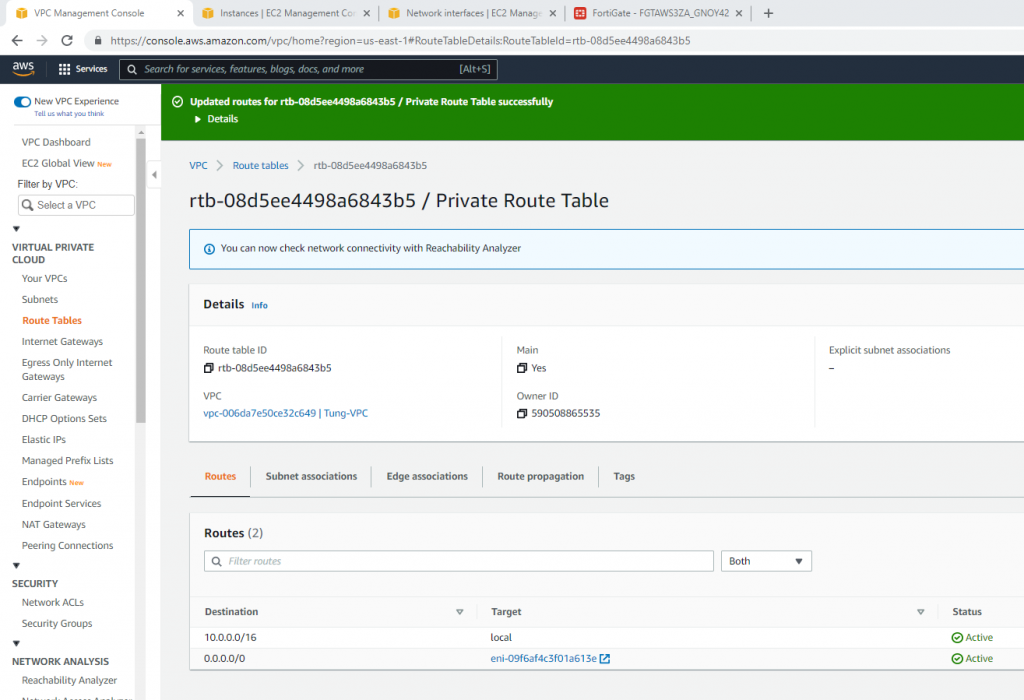
Add a new route on a Private Route table to the Private FortiGate interface.

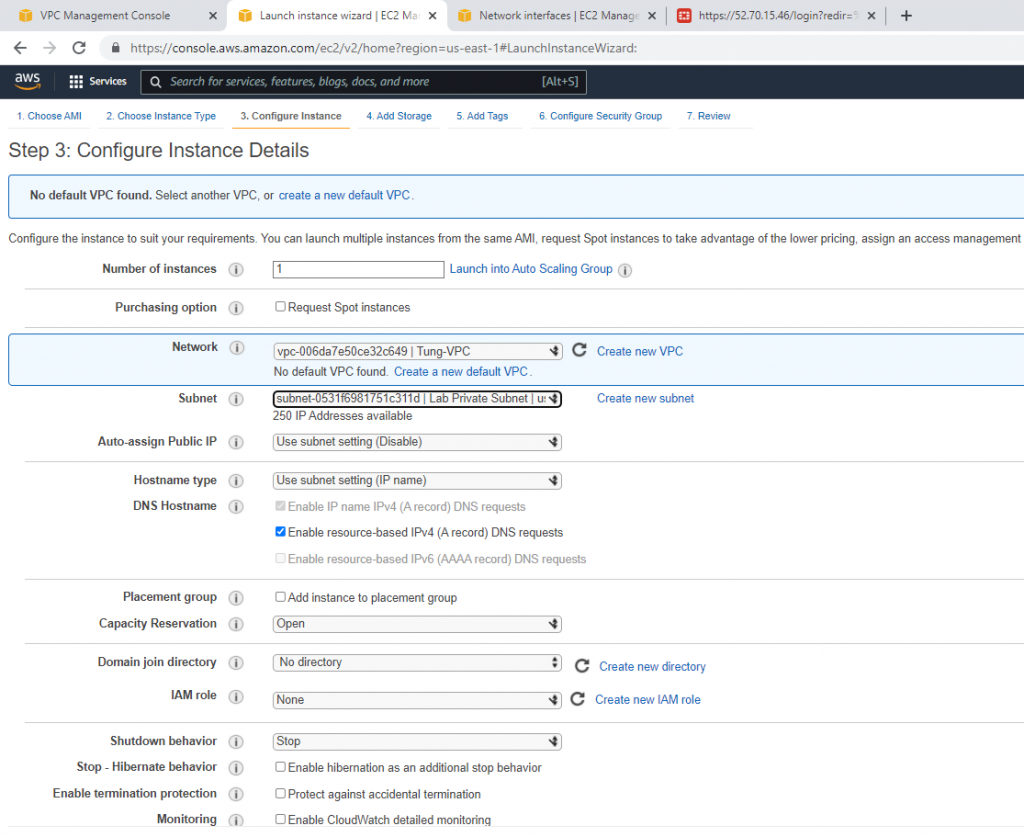
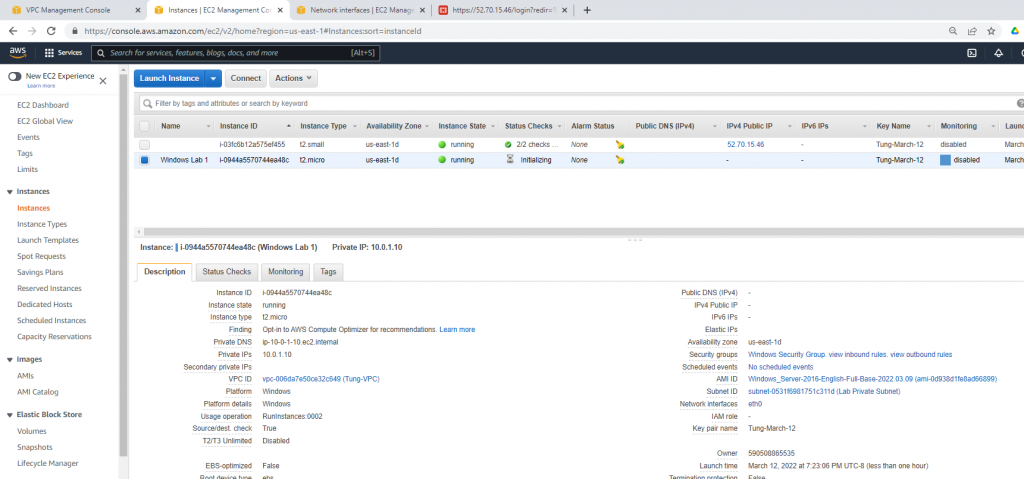
Create a new Windows instance on AWS.

Security Group.

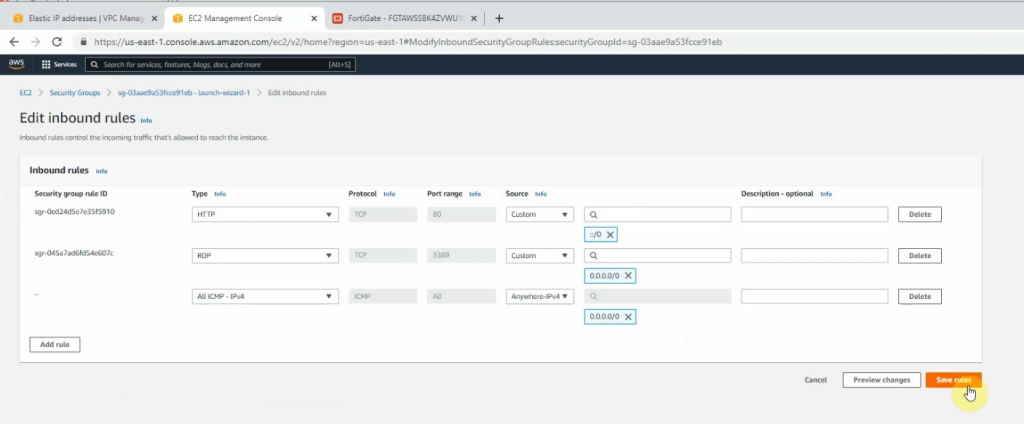
Modify Windows Security Group to allow ICMP traffic.

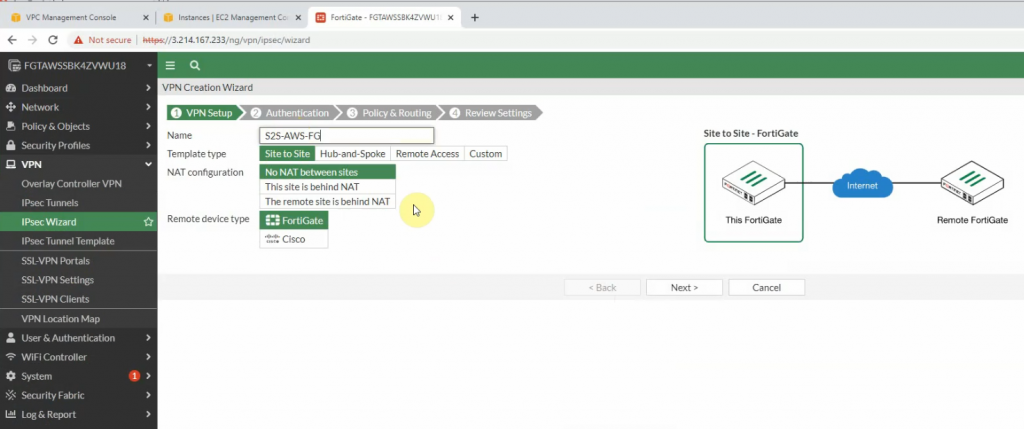
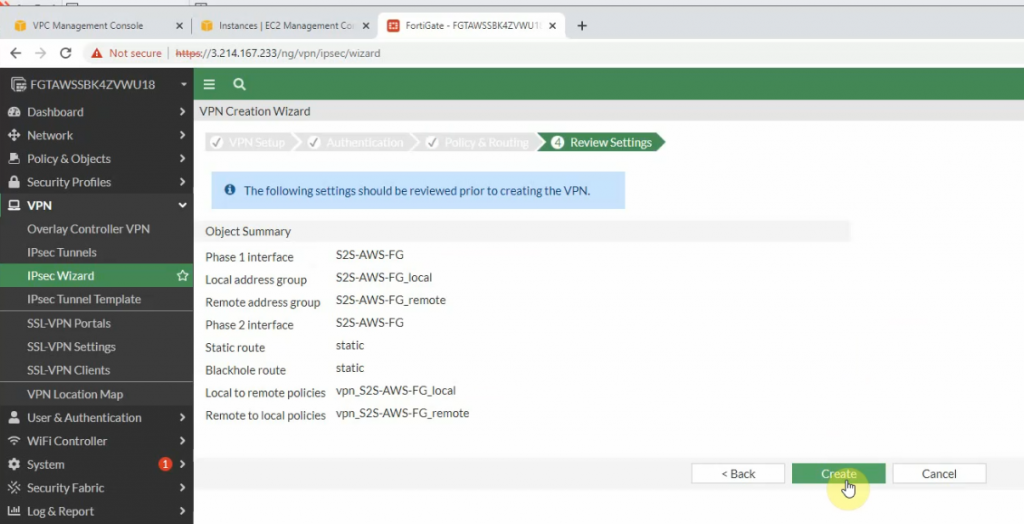
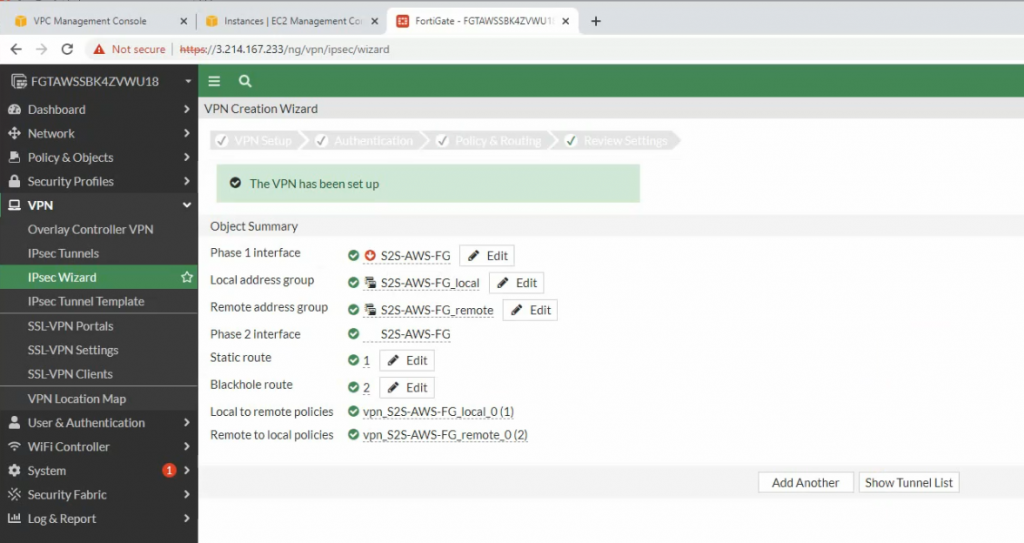
Configure VPN site to site.

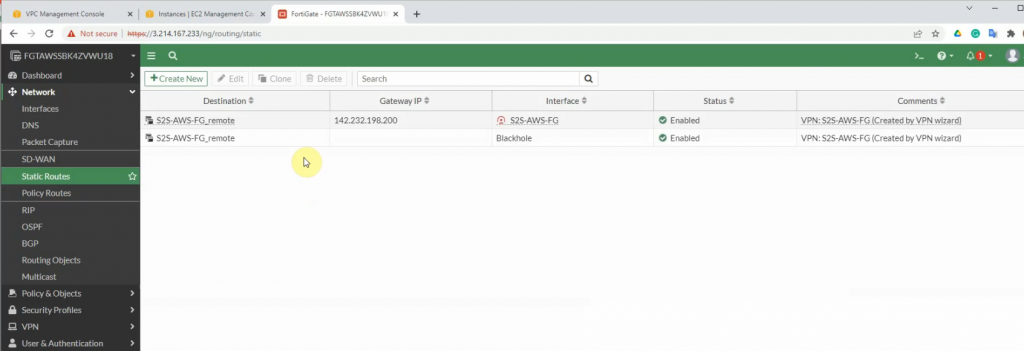
There are two routes that have been automatically created on FortiGate on the static routes setting.

+ Configure FortiGate on-prem.

Configure a default route on FortiGate.

Configure VPN site to site between both FortiGate.

+ Pings a Windows instance on AWS from a machine on FortiGate on-prem. Remember to access RDP to the machine and disable Windows Firewall to allow ICMP traffic from on-prem to that machine.

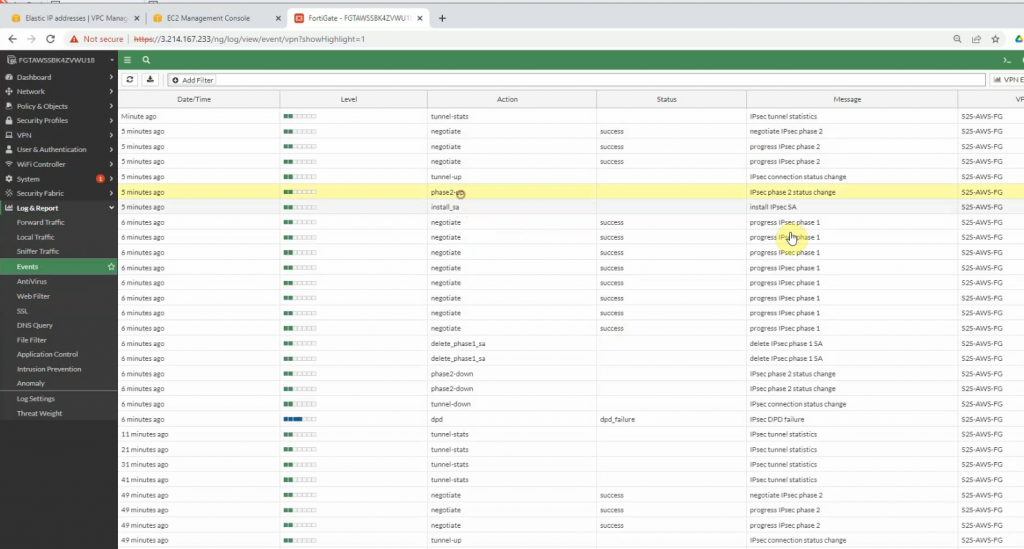
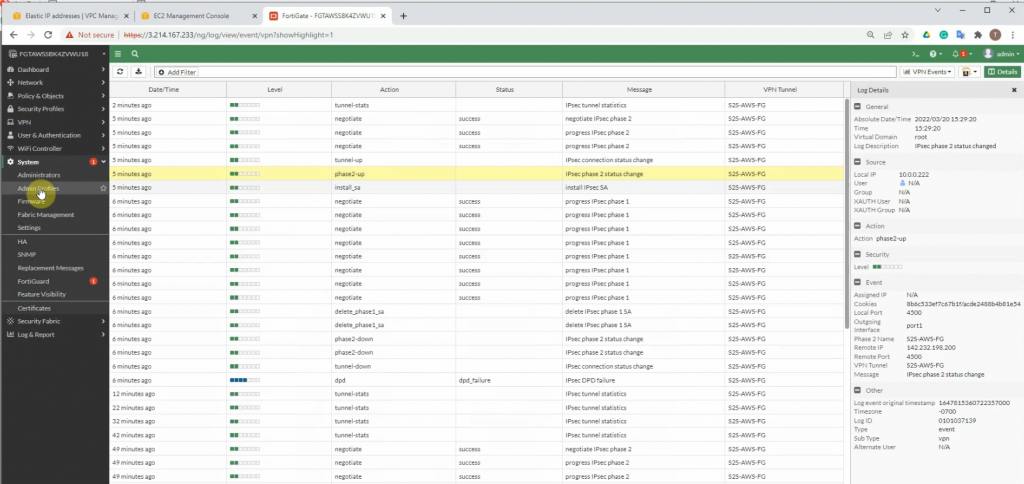
The IPSEC tunnel is up.

Pings from Windows instance on AWS to a computer on FortiGate LAN subnet on-prem.

The IPSEC tunnel on-prem is up.

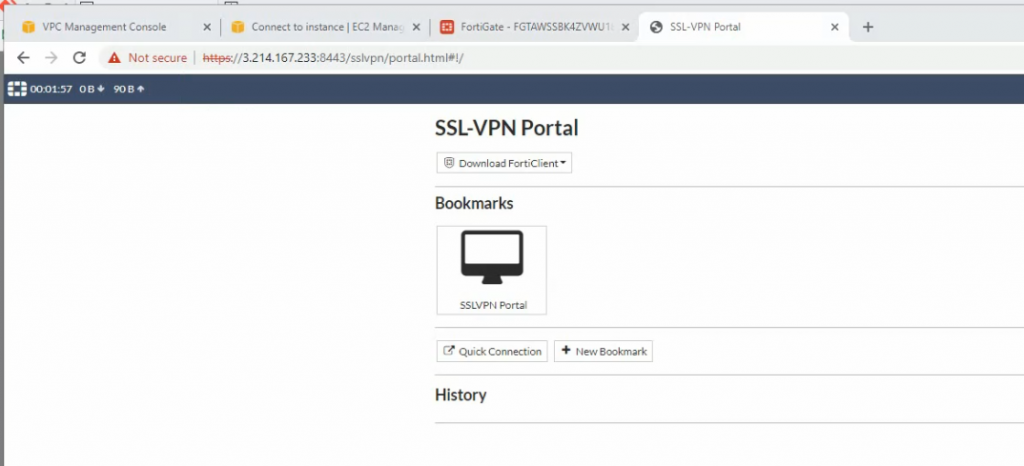
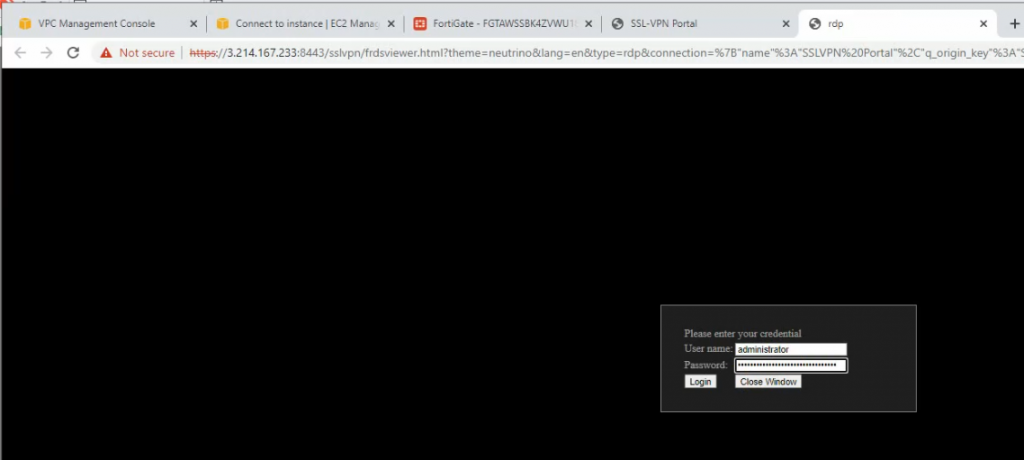
+ Configure SSLVPN portal on FortiGate on AWS.

Deploying FortiGate on Amazon AWS

Diagram.

Below are a couple of steps to deploy Fortinet on AWS.

Create a new VPC.

Create a public subnet.

Create a private subnet.

Create an Internet gateway.

Attach the gateway to your VPC.

Edit Route table, change default Route table to Private Route Table.

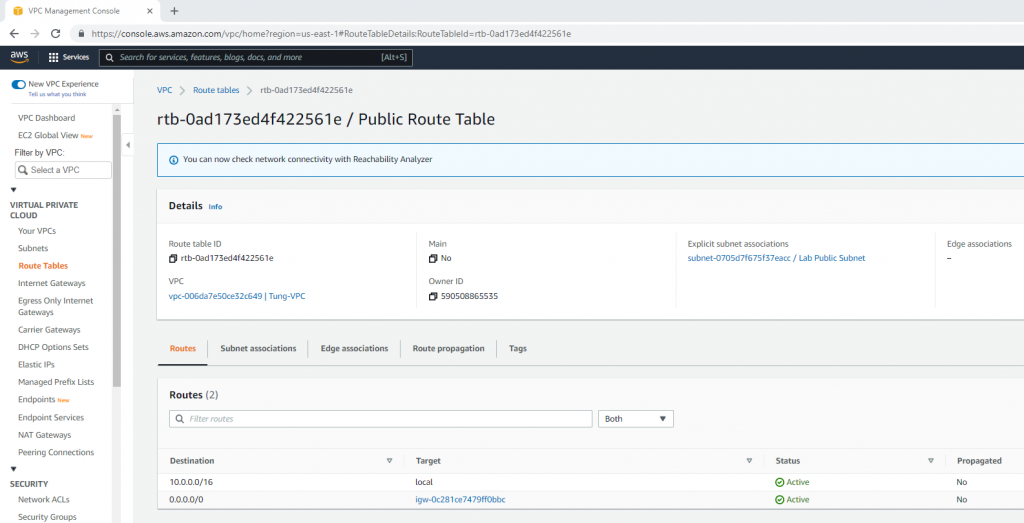
Create a Public Route Table.

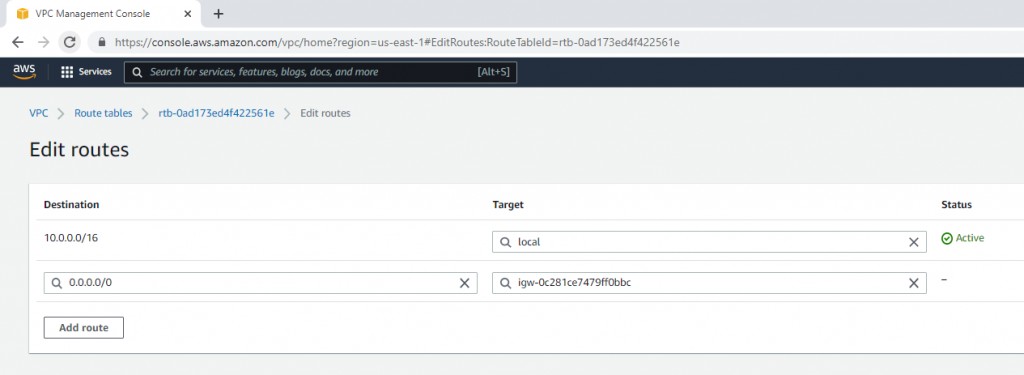
Edit the route and route all traffic to Internet Gateway.

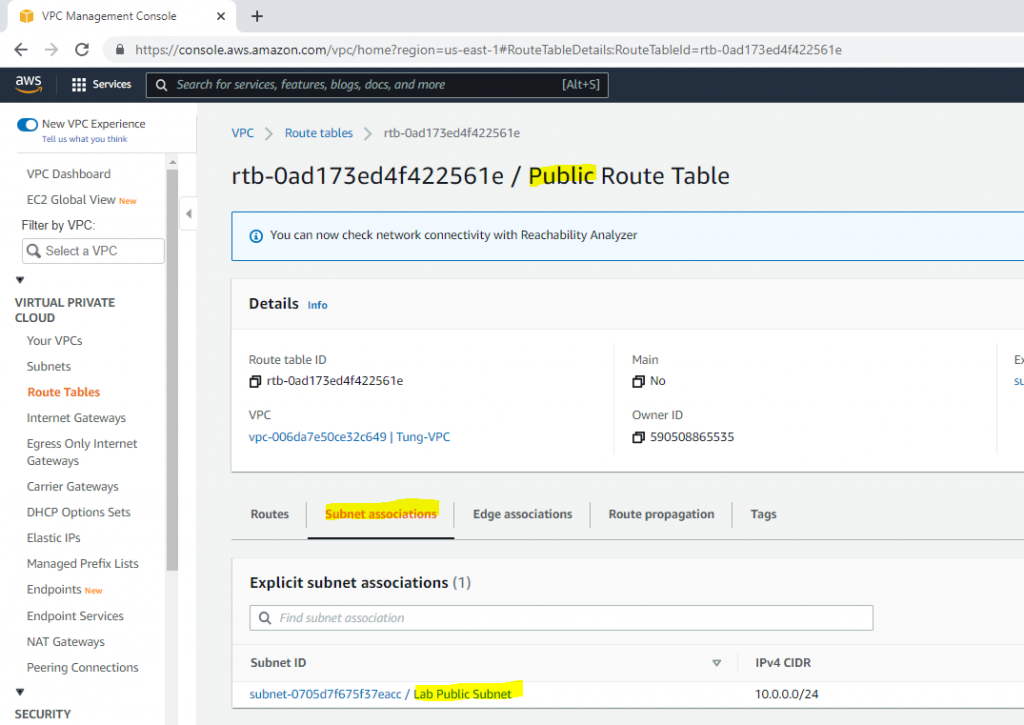
Link Lab Public Subnet to Public Route Table.

Create a new key pair.

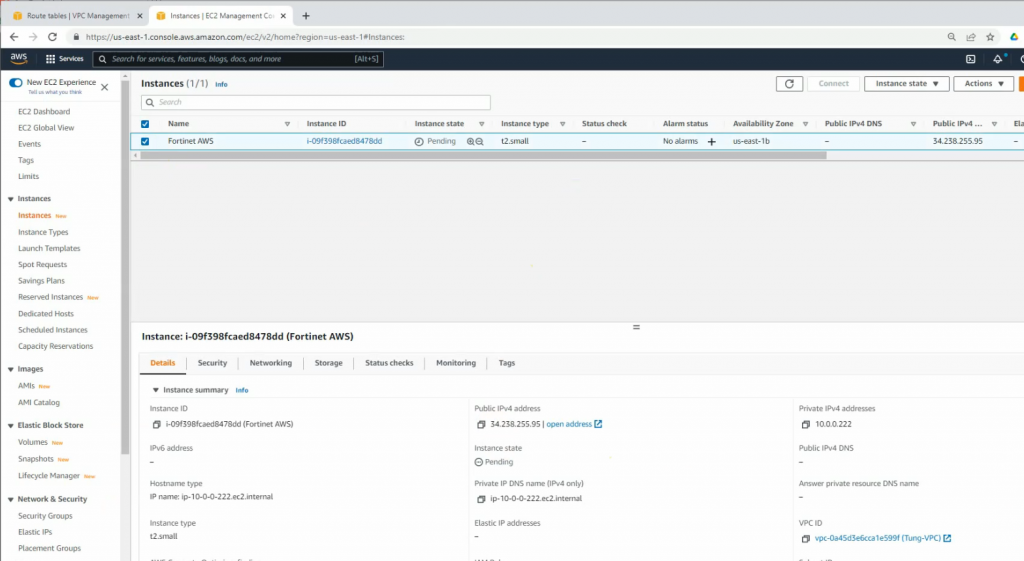
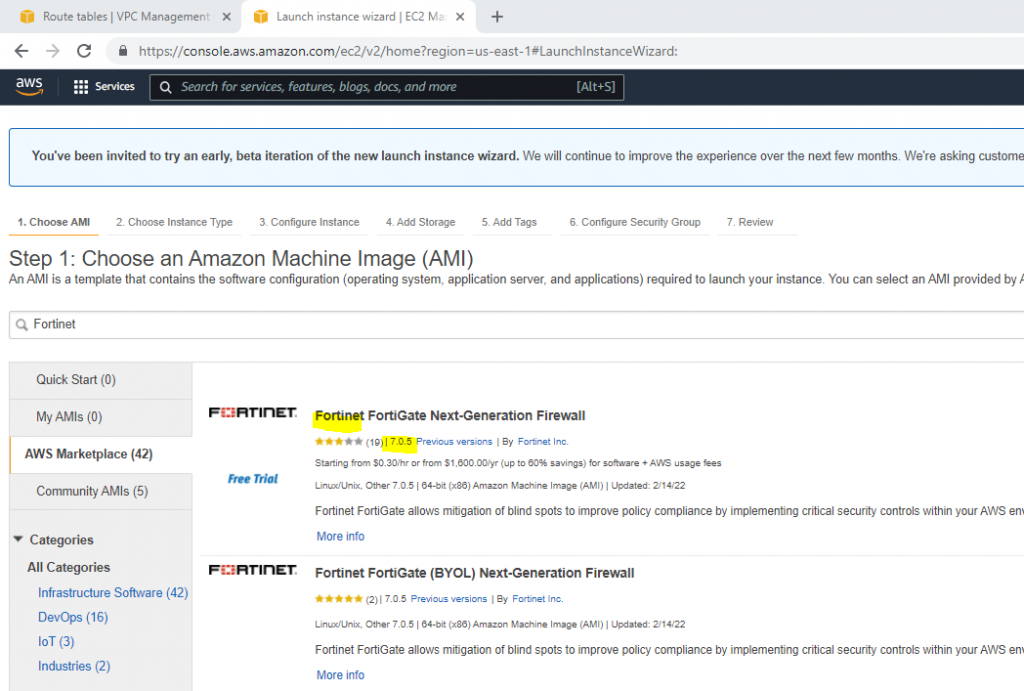
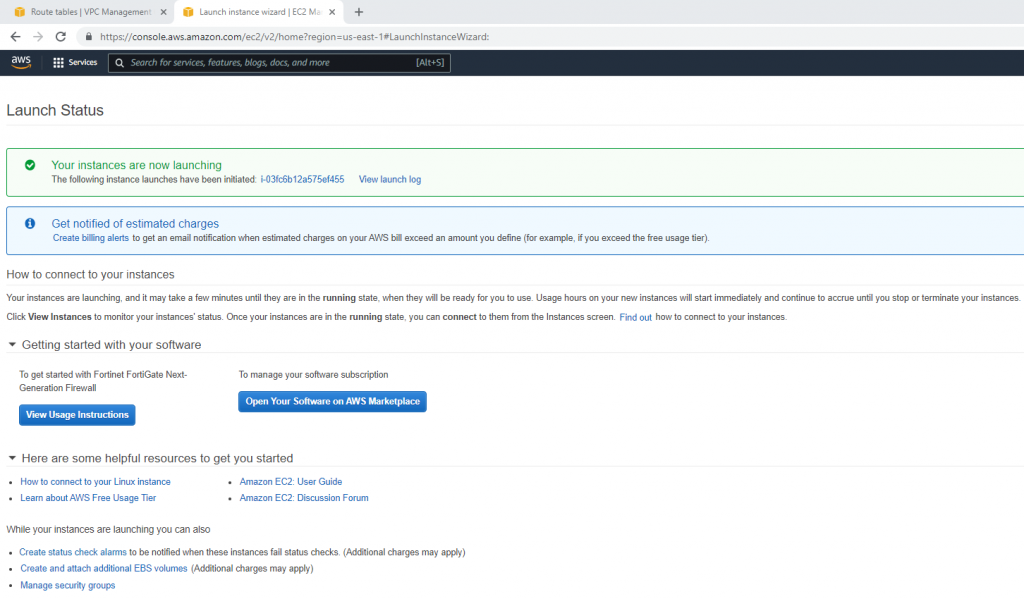
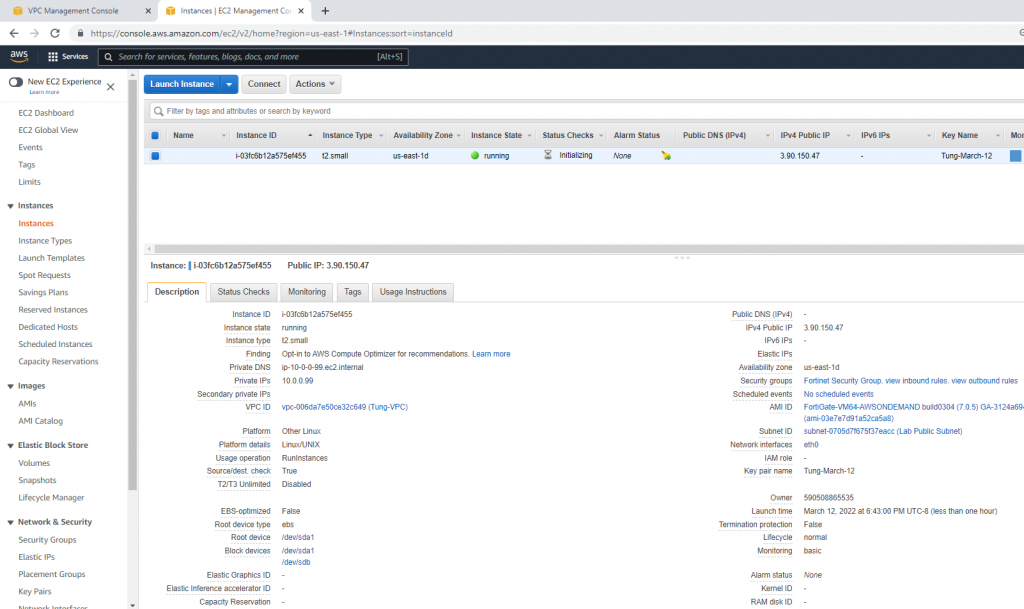
Go to EC2, and deploy Fortinet on AWS.

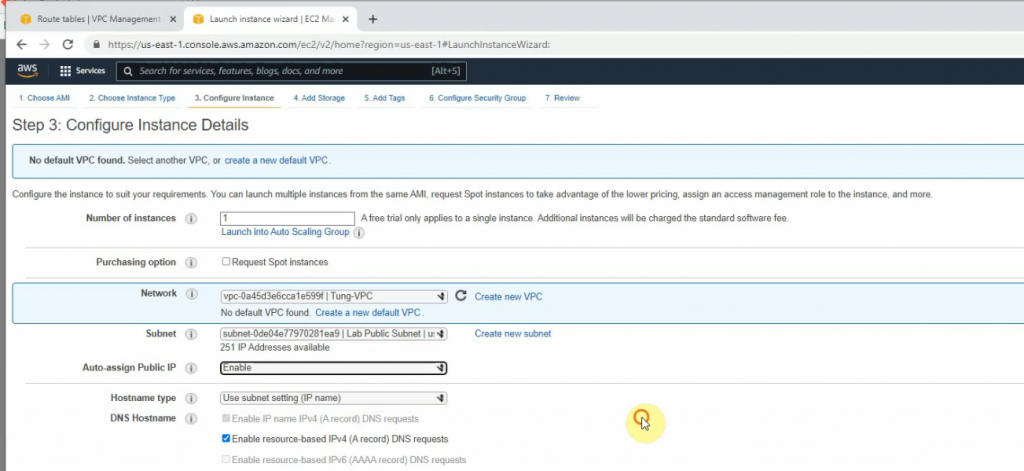
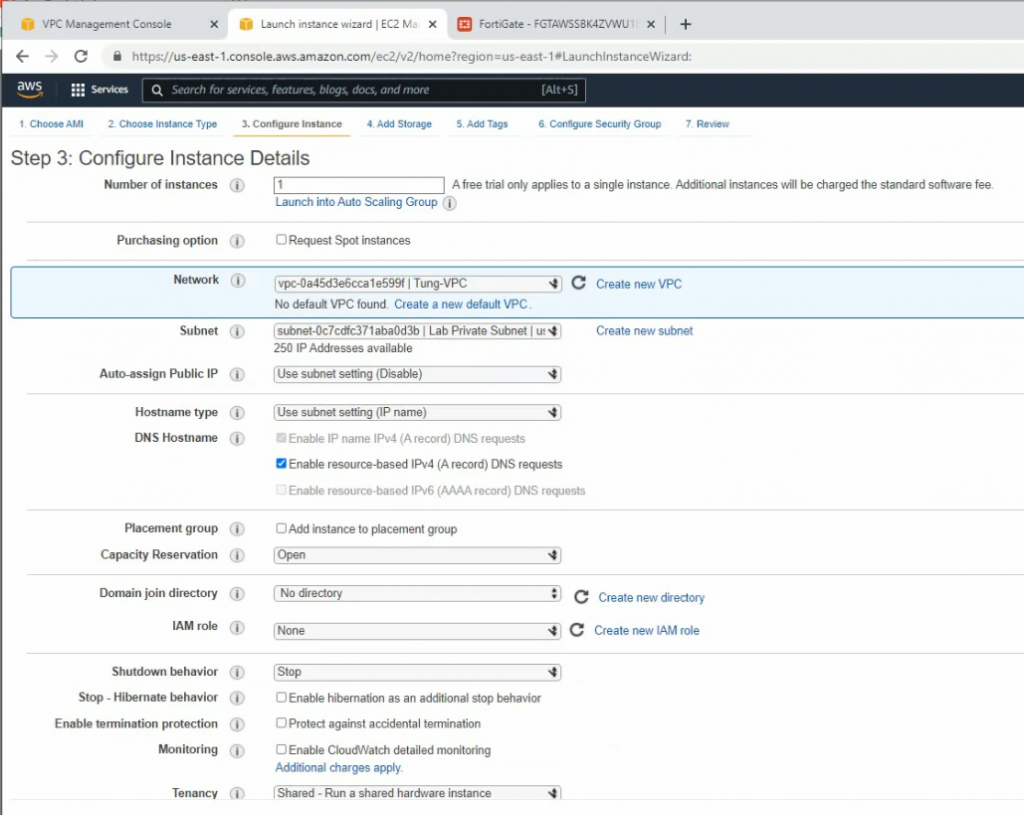
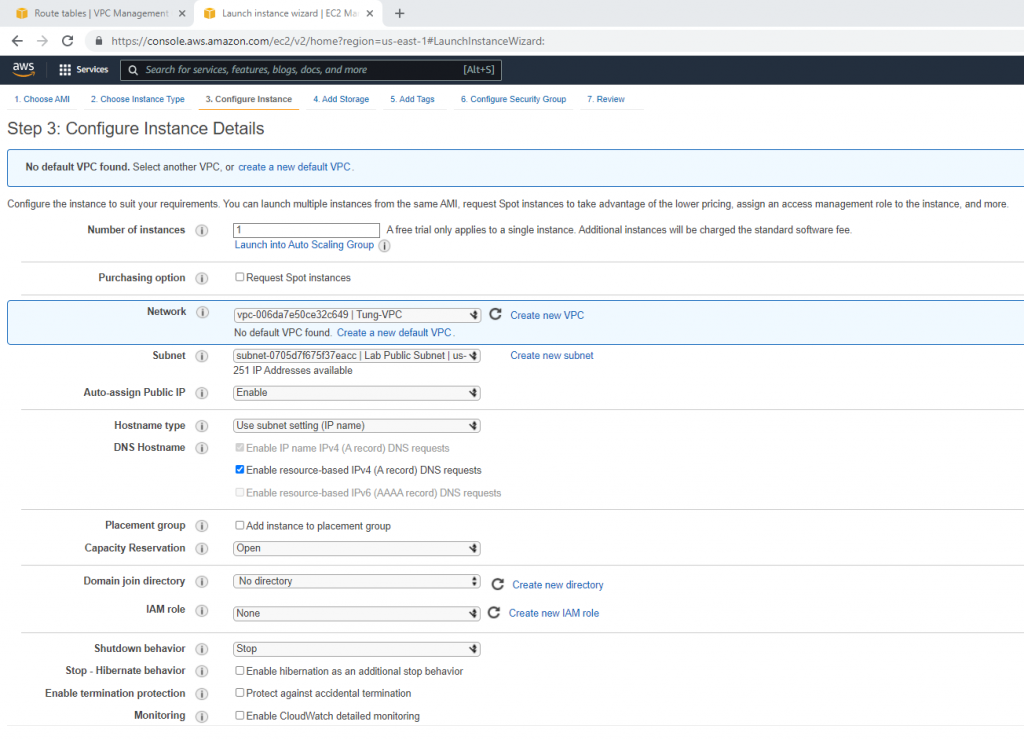
Select your VPC, the subnet belongs to Lab Public Subnet. Also Auto-assign Public IP is Enable.

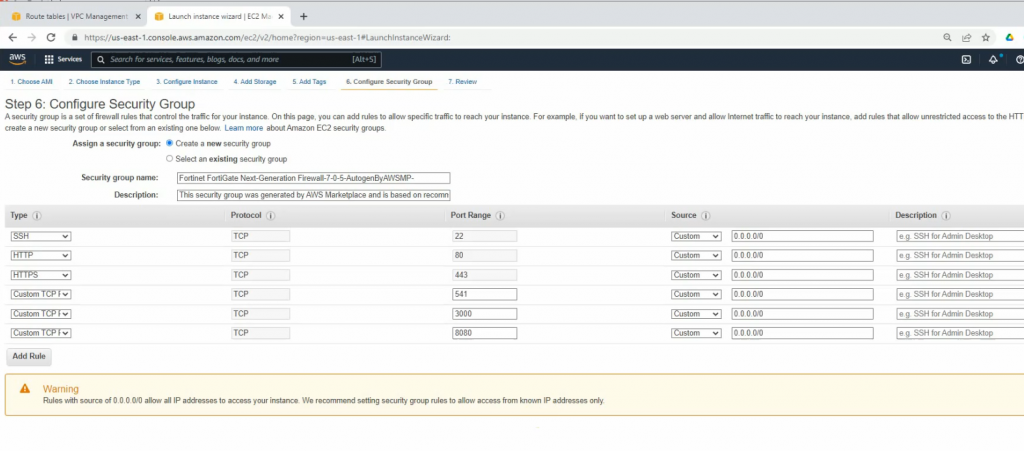
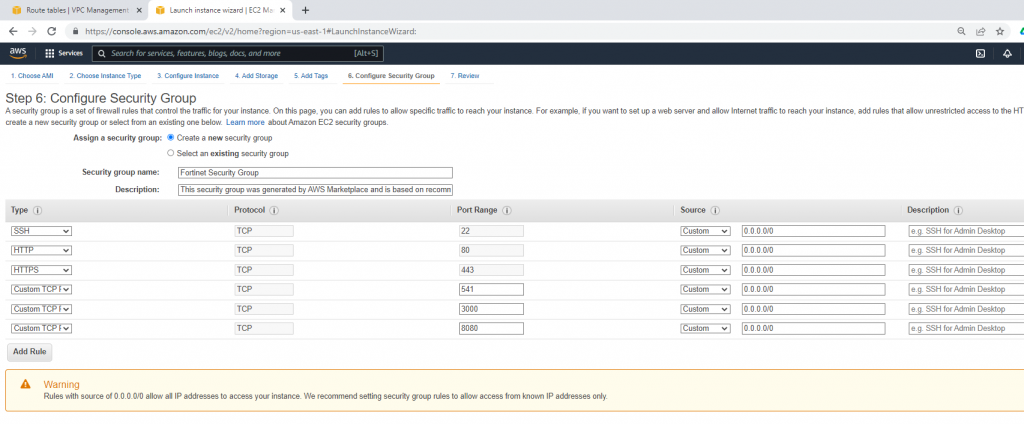
Security Group.

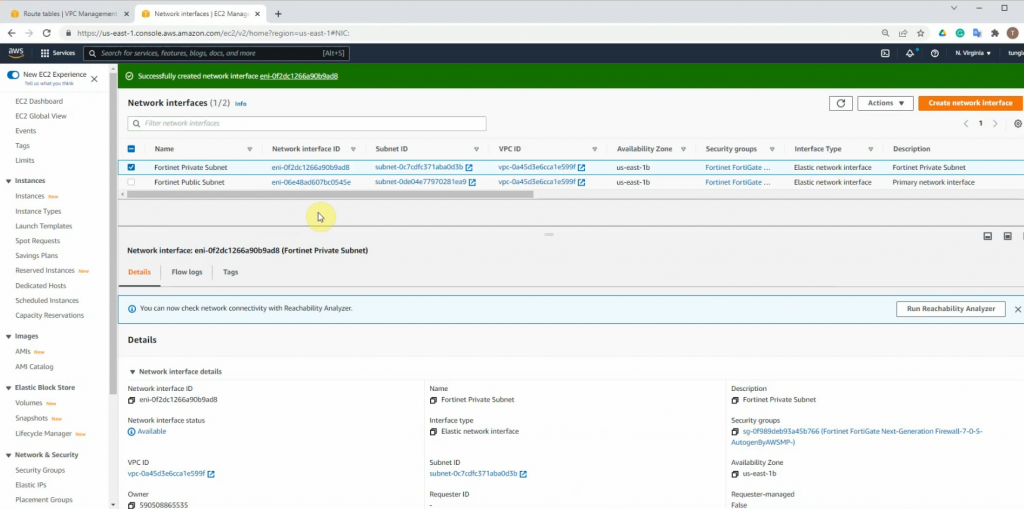
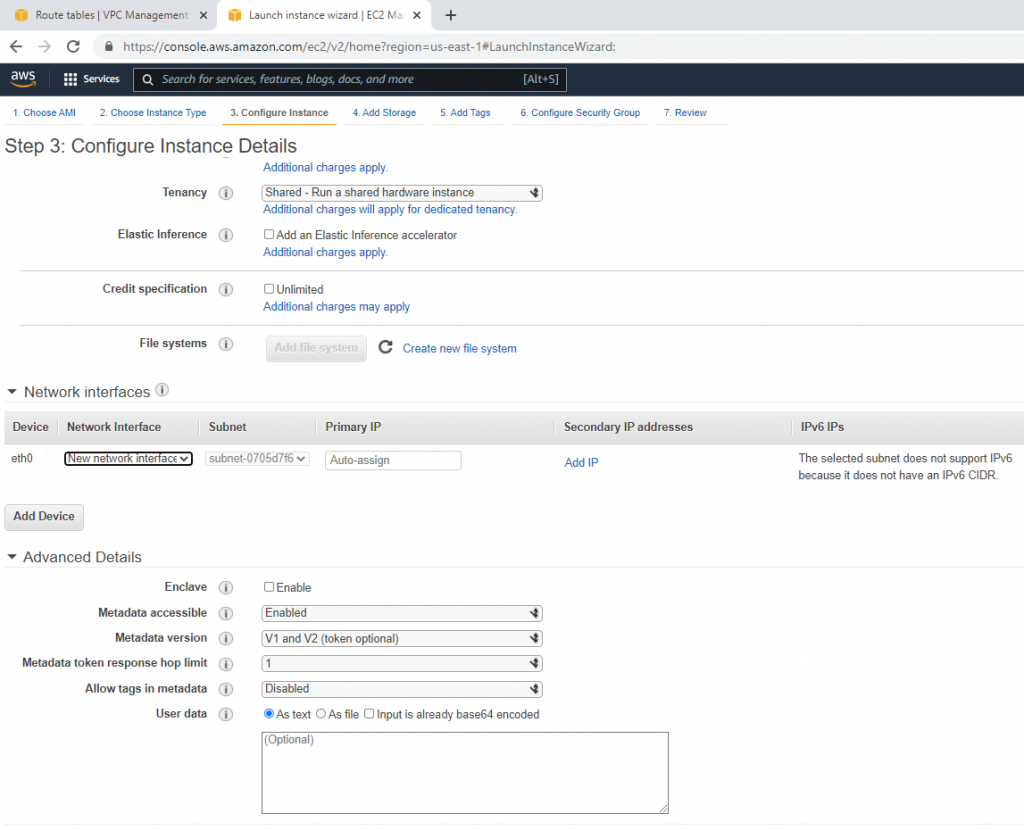
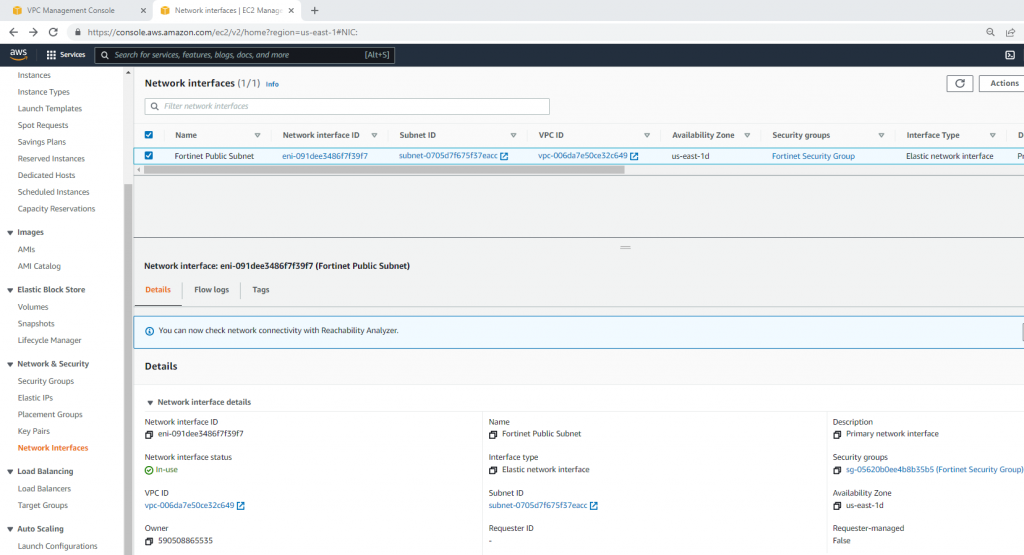
Go to Network interfaces. Change the interface to Fortinet Public Subnet.

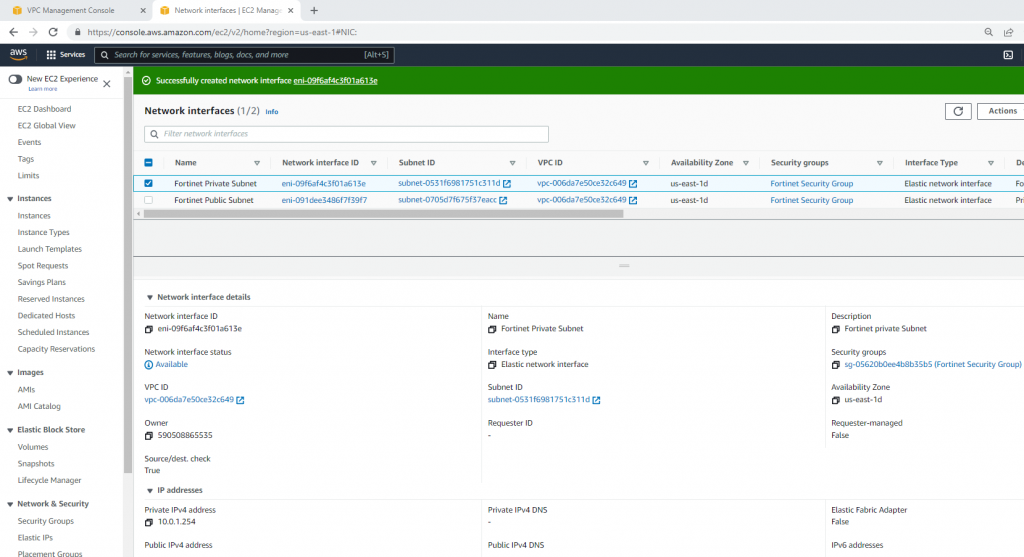
Create a new Fortinet Private subnet.

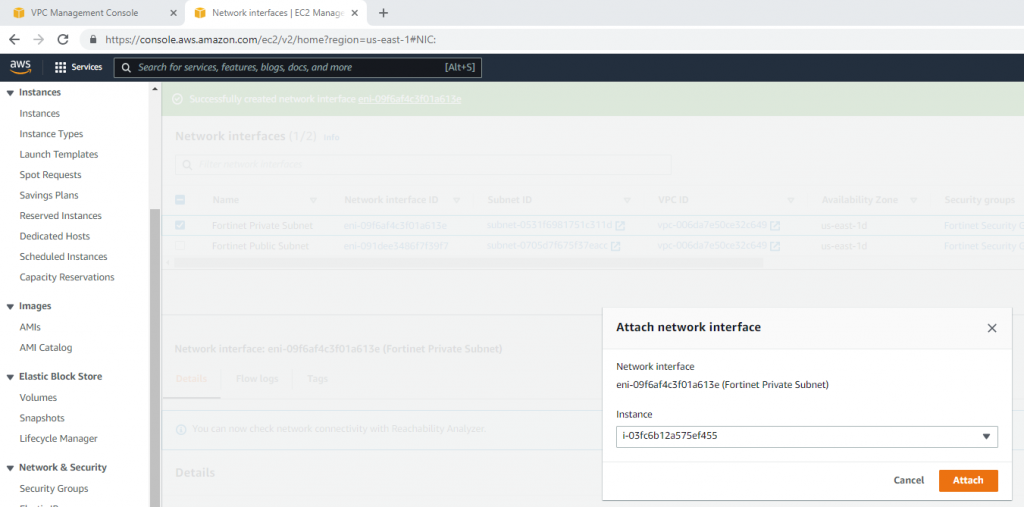
Attach this network interface to Fortinet EC2.

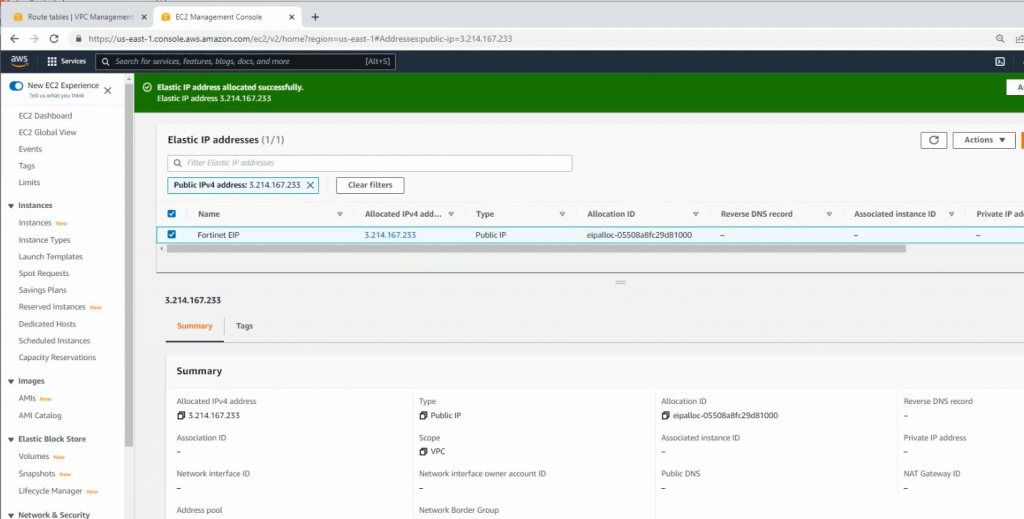
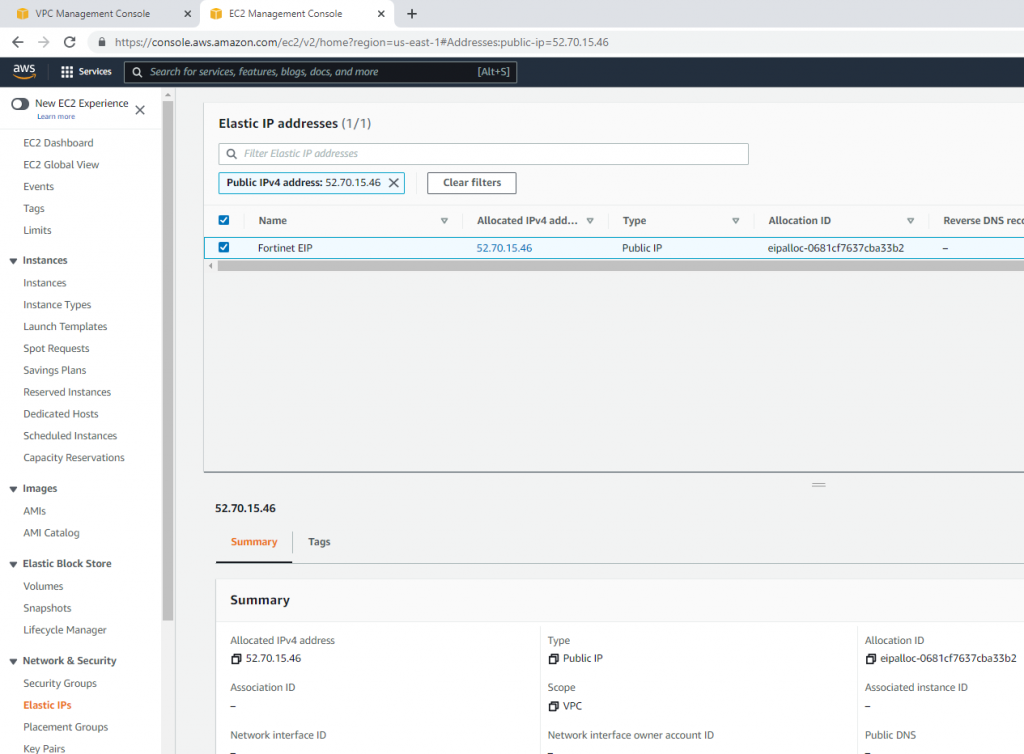
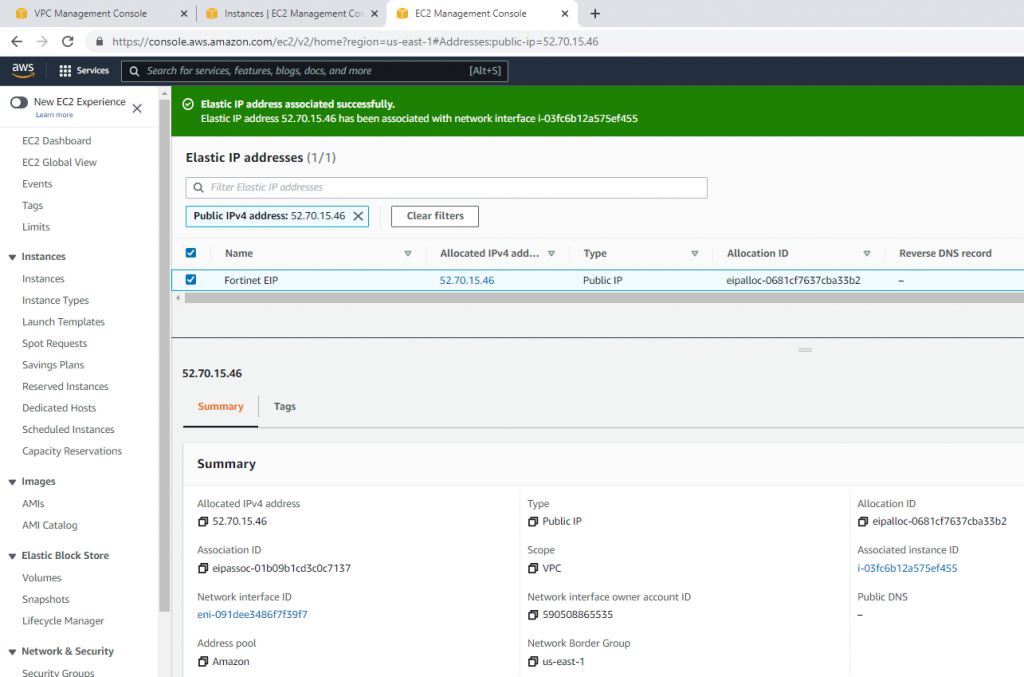
Create a new Elastic IP address.

Change to Fortinet EIP.

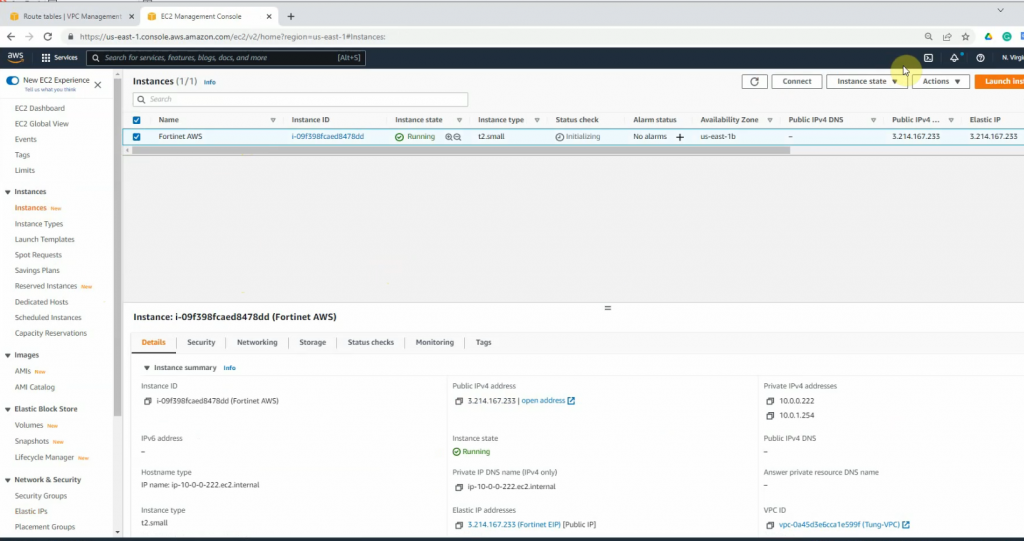
Associate this Elastic IP address to Fortinet EC2.

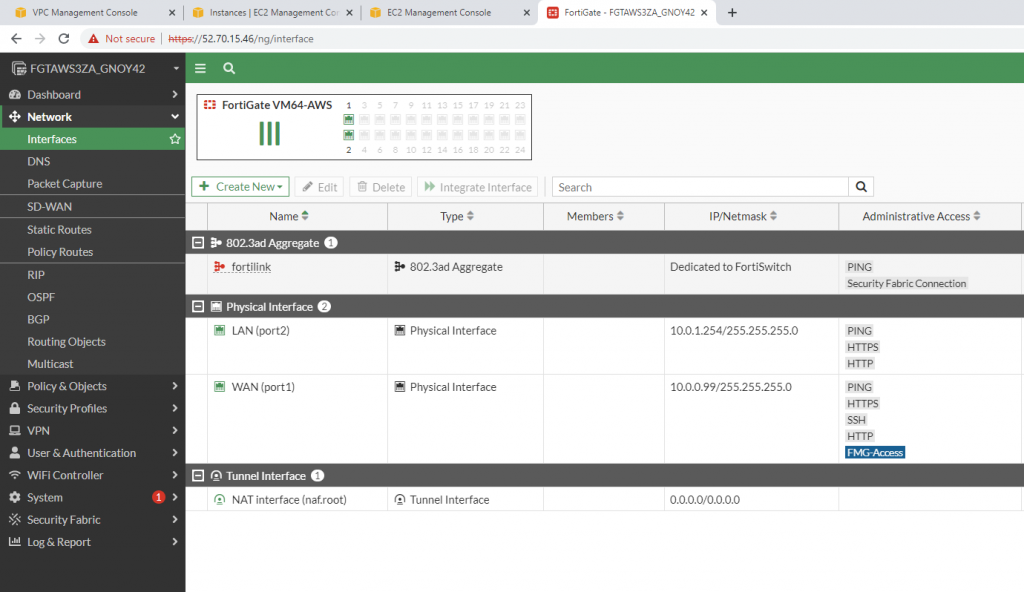
Now, Fortinet has two interfaces. One is Private, and another one is Public.

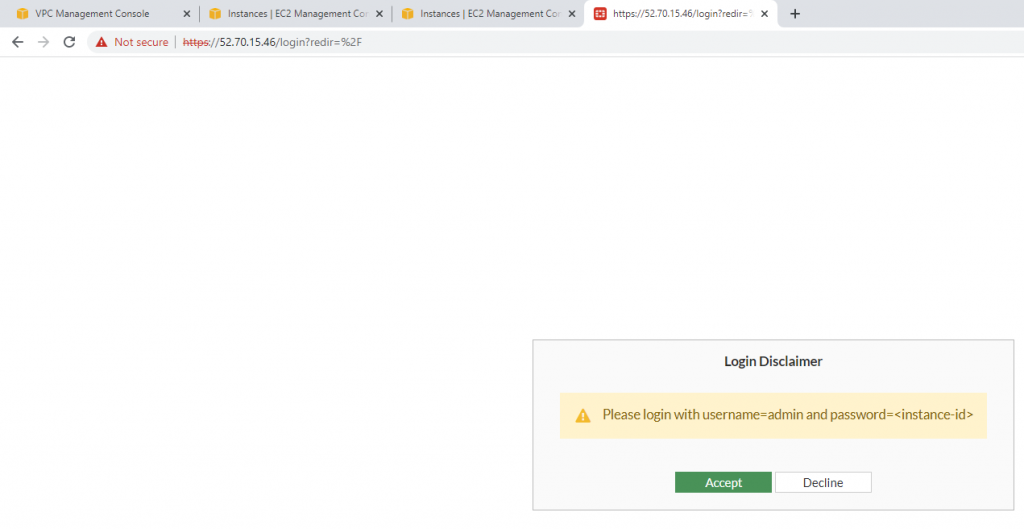
Access Fortinet via the Internet.

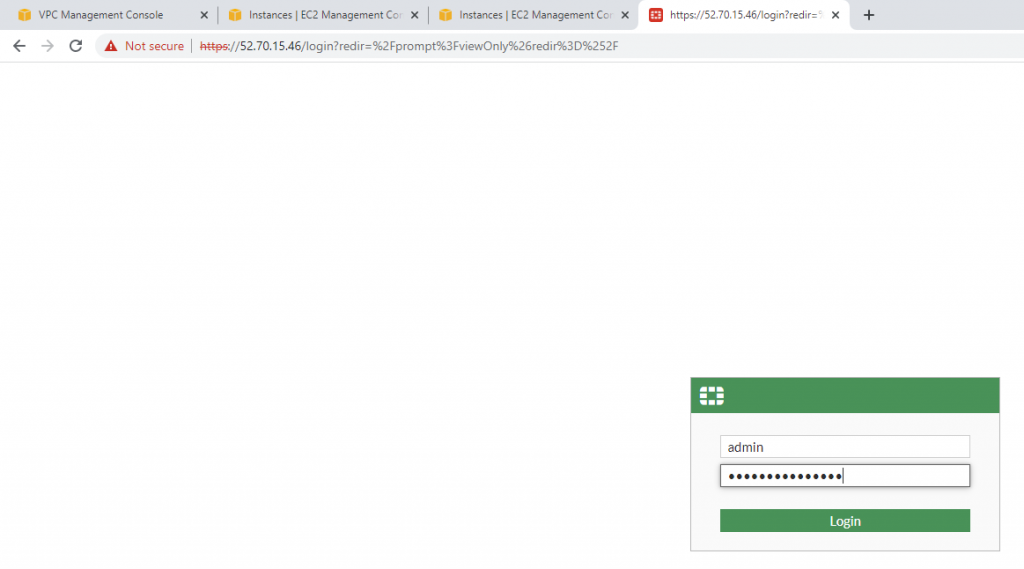
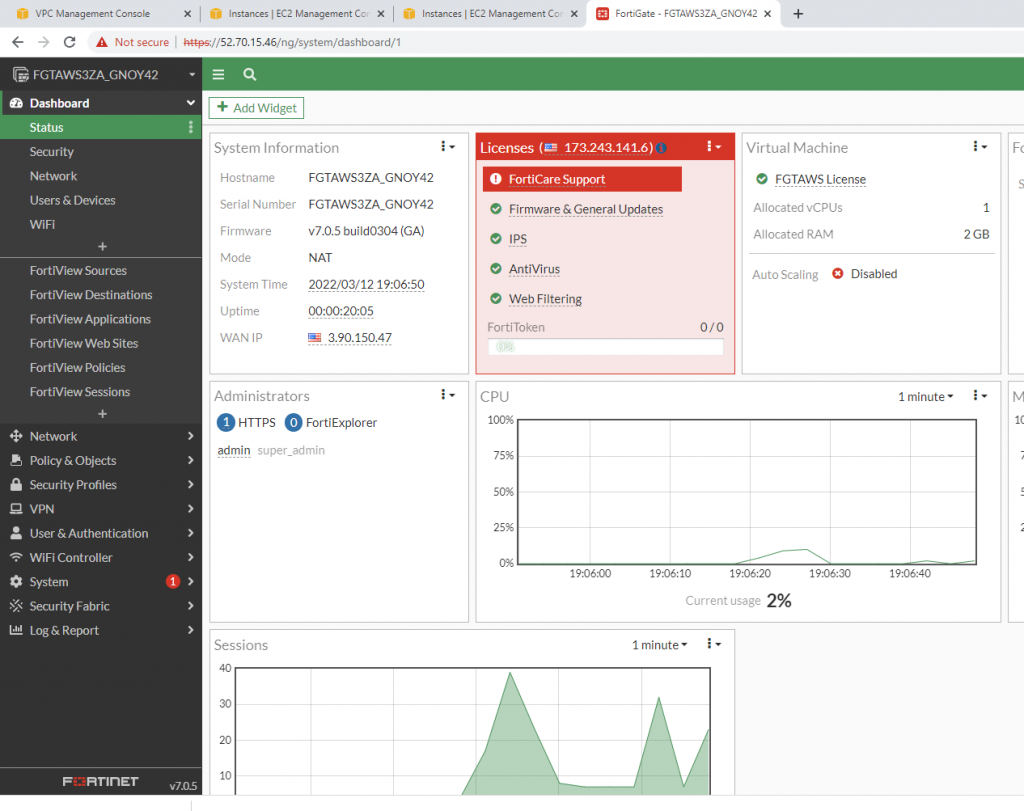
Login to Fortinet.

Change password to login to Fortinet.

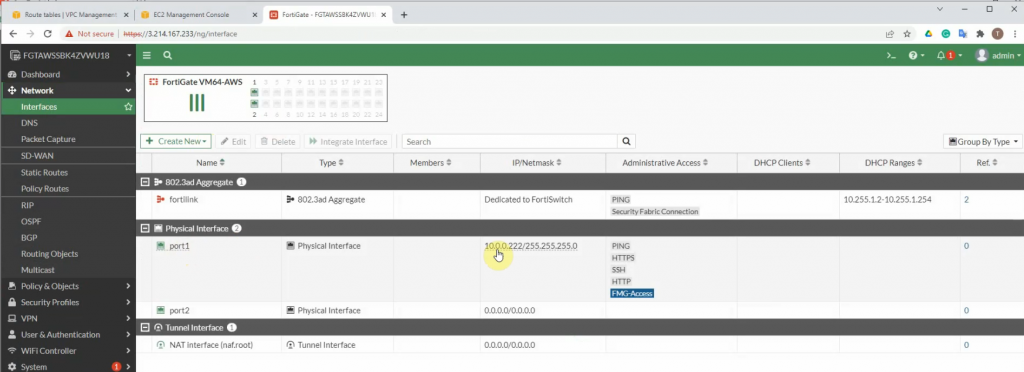
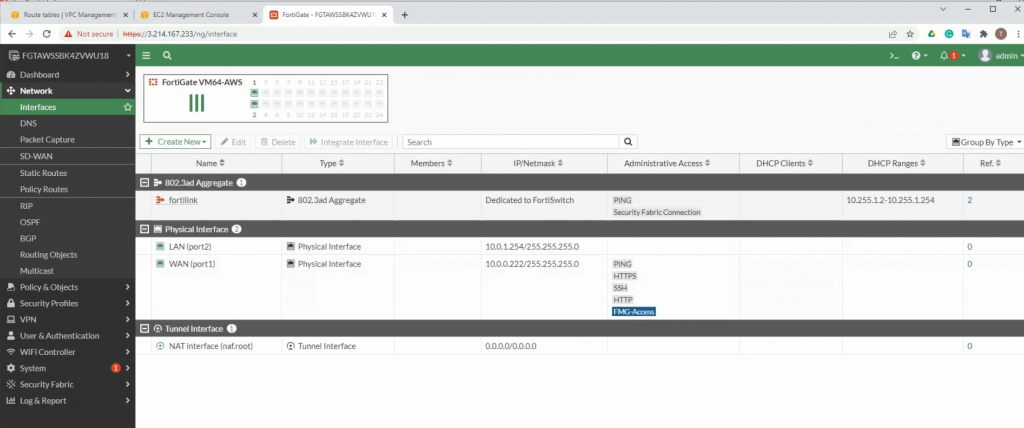
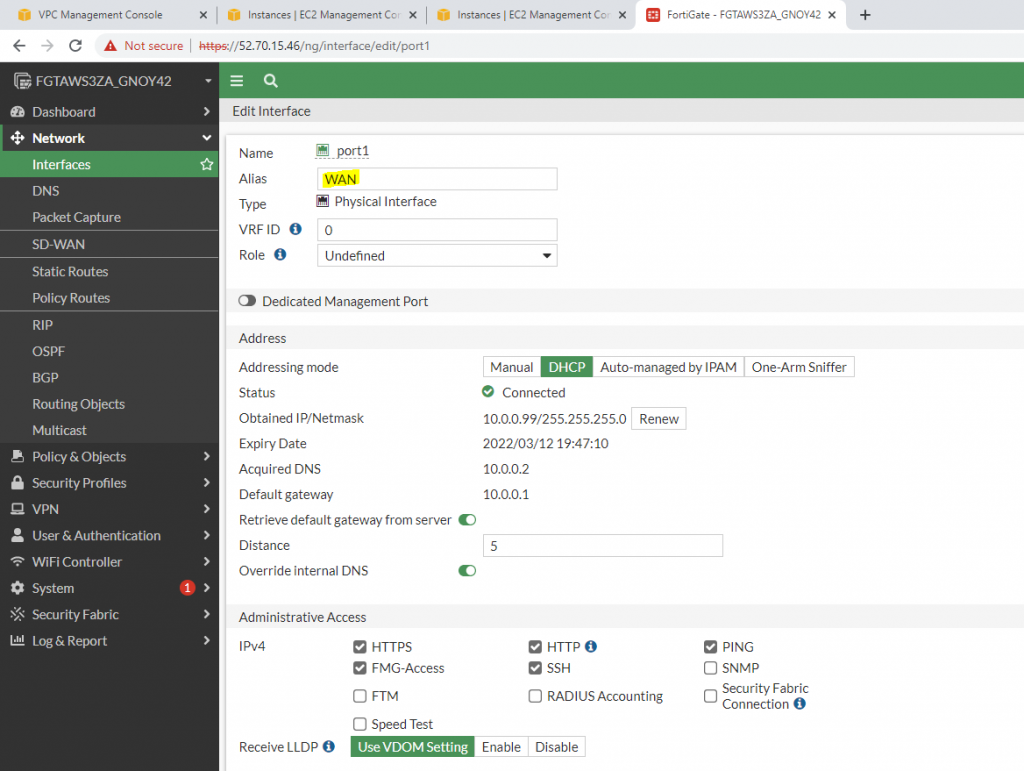
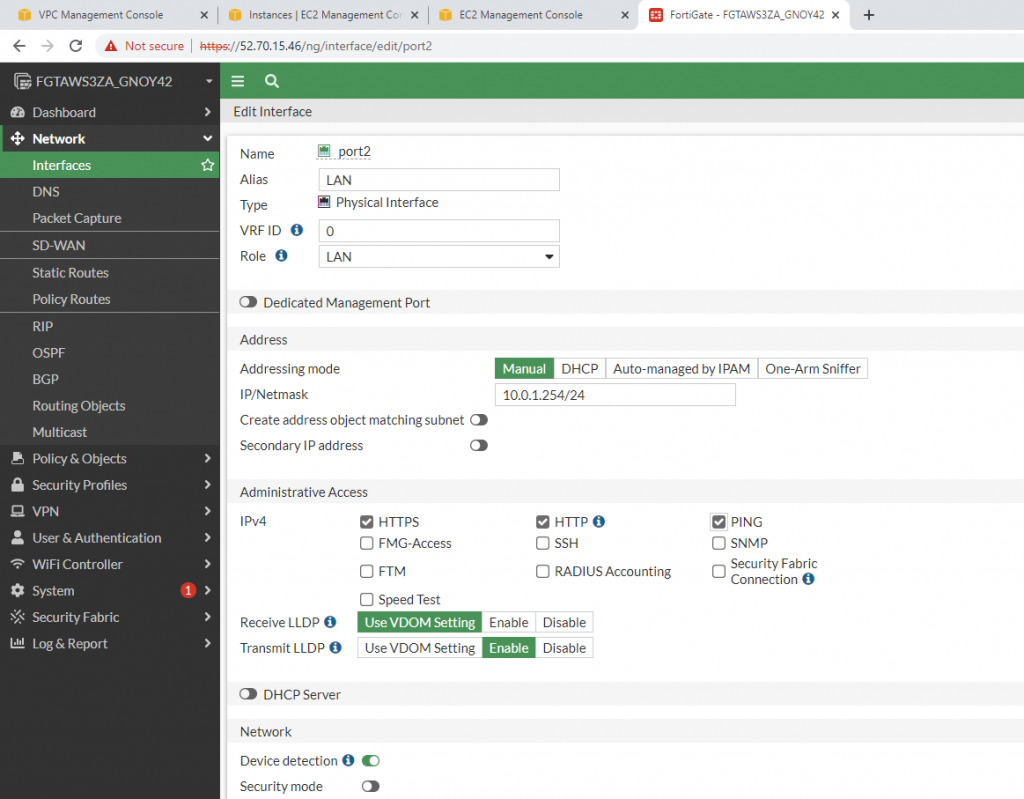
Edit interfaces.

WAN interface.

LAN interface.

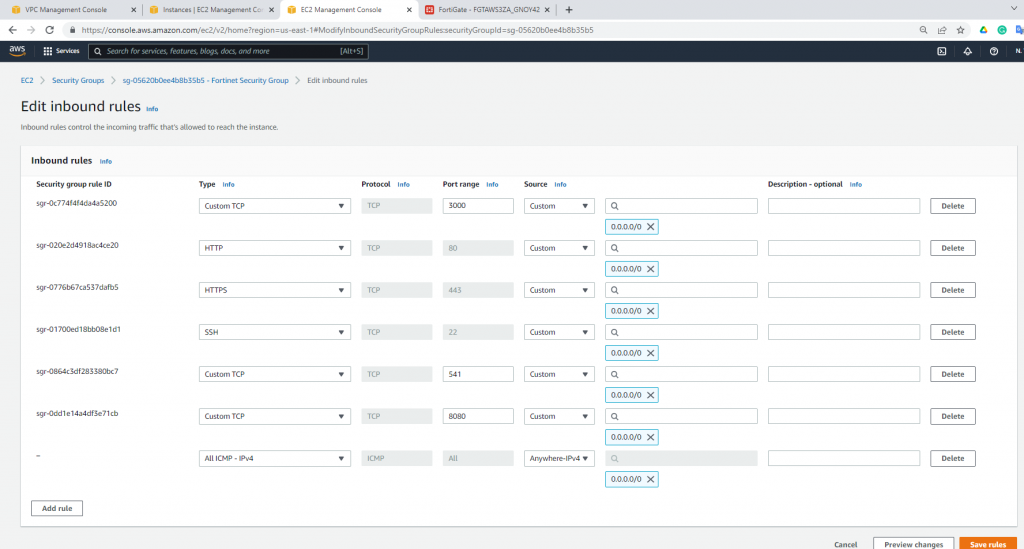
Edit Security Group to allow to ping Fortinet.

Disable Source and Destination Check on “Fortinet Private subnet”.

Now, change the route to route private subnet traffic via Fortinet Private subnet interface.

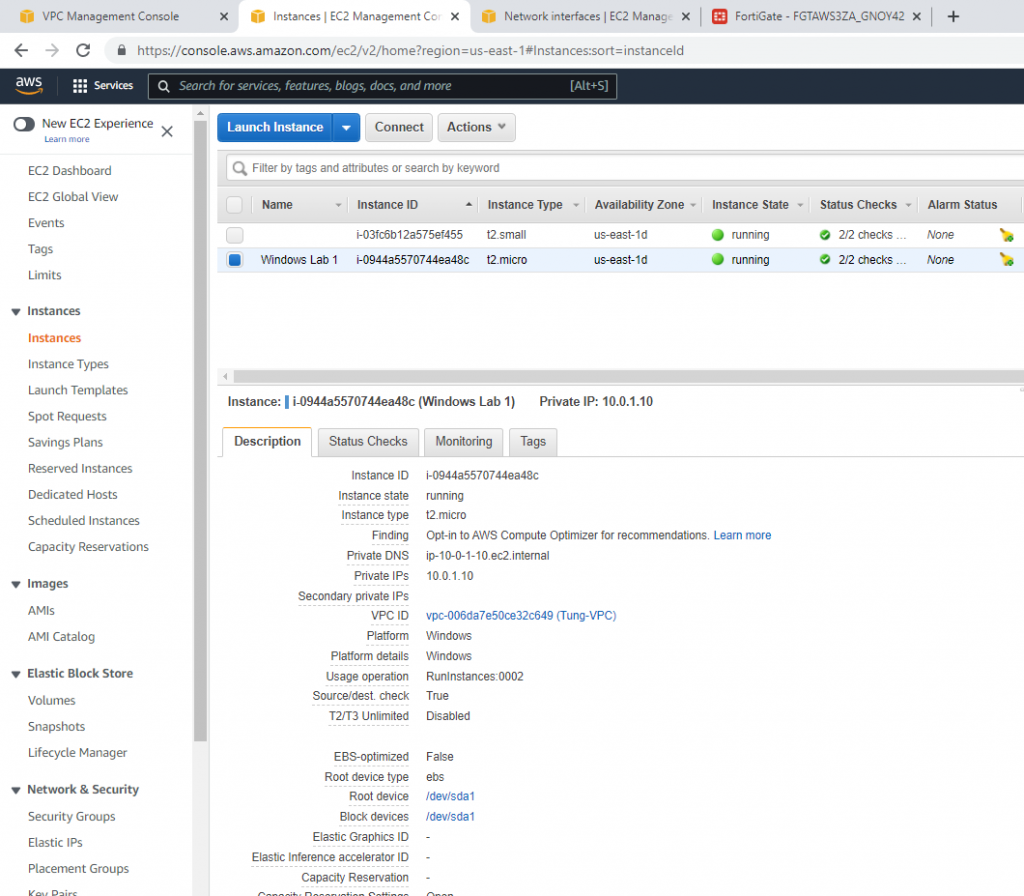
Create a new Windows 2016 VM EC2. The machine is belonged to “Lab private Subnet”.

Create a new Windows Security Group to allow HTTP and RDP traffic.

Back to Fortinet to configure FIrewall Policy to allow traffic from Fortinet Private subnet to access the Internet.

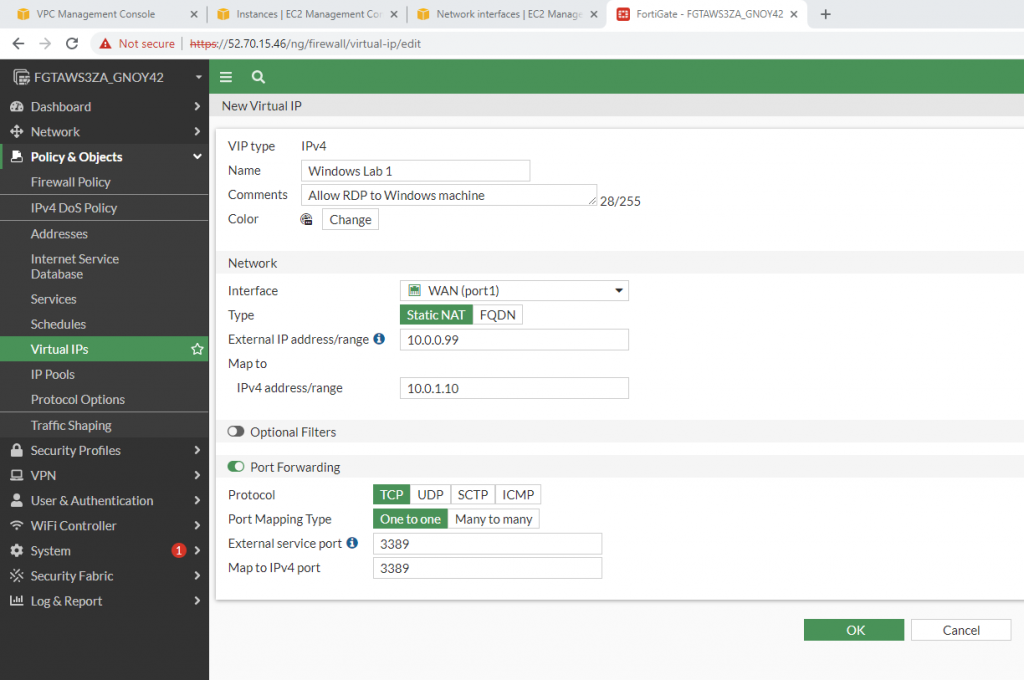
Configure port forwarding to allow traffic.

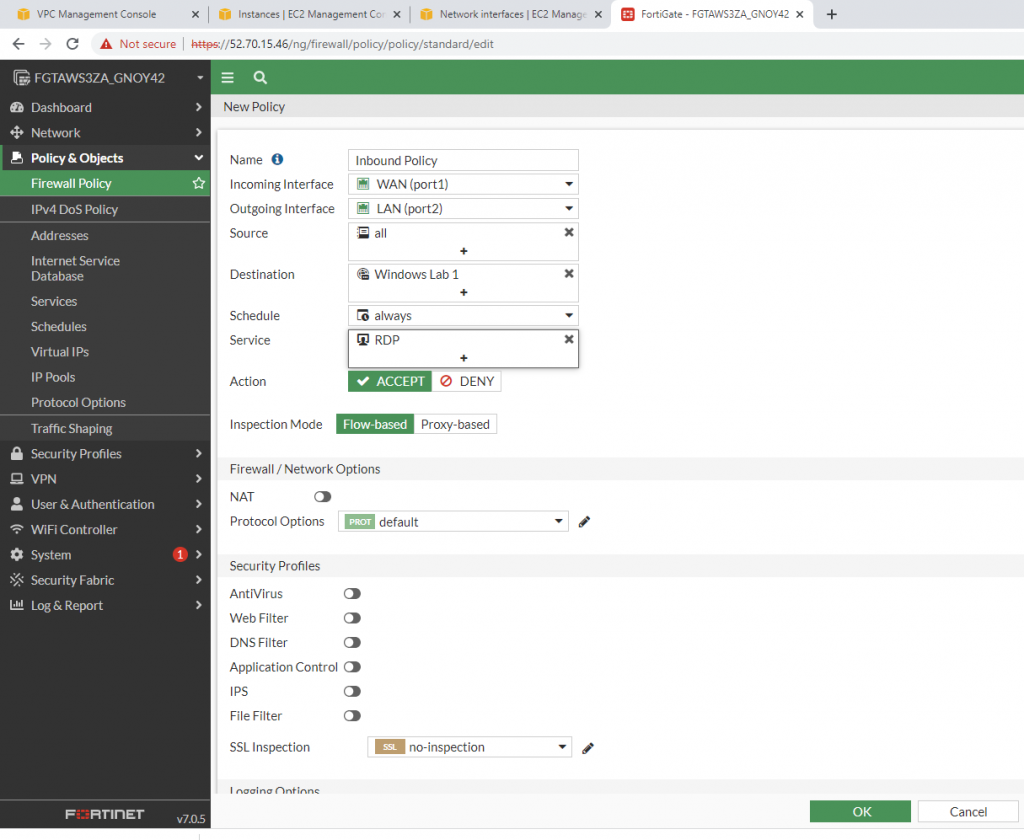
Allow inbound traffic from WAN to this machine.

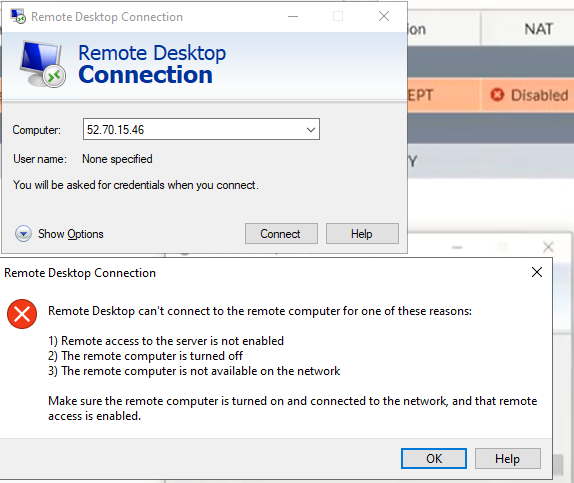
Try to access the machine.

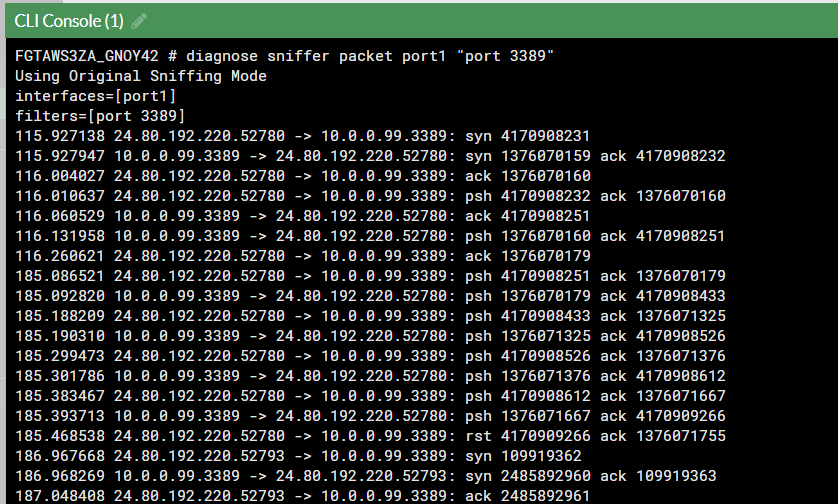
Sniffer traffic on Fortinet.

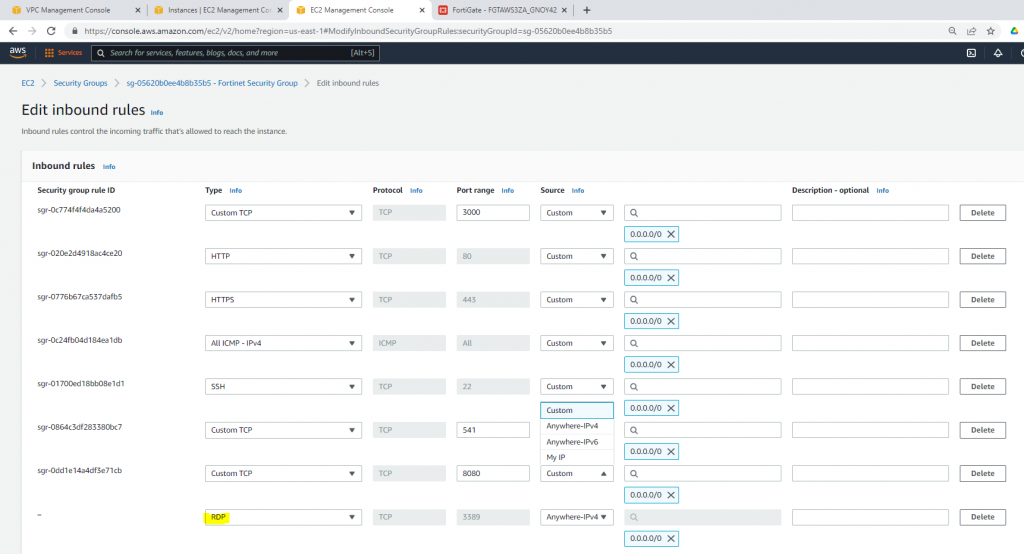
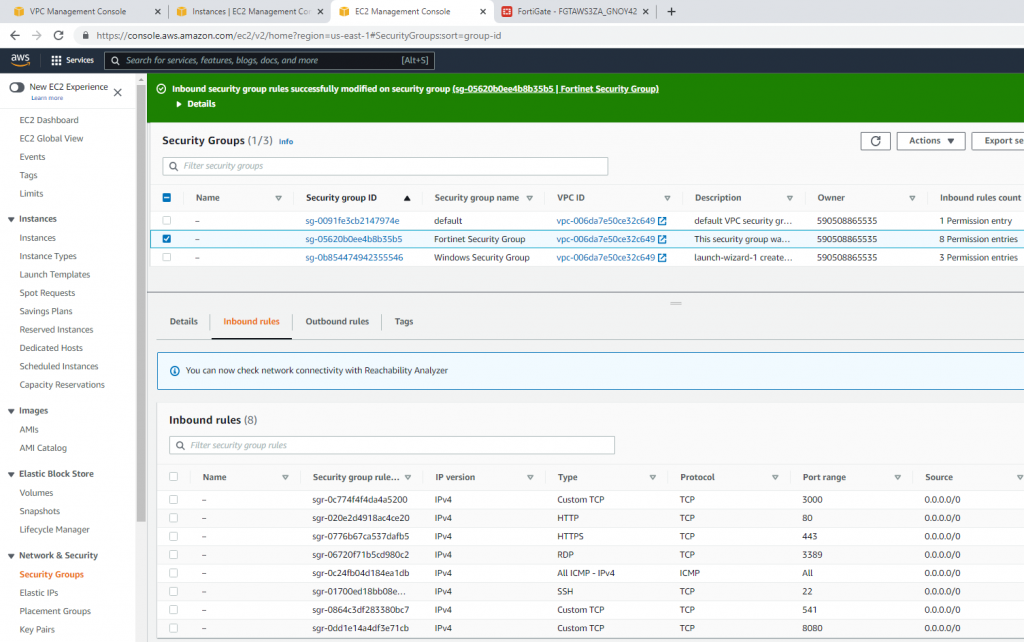
Modify the Security group to allow RDP.

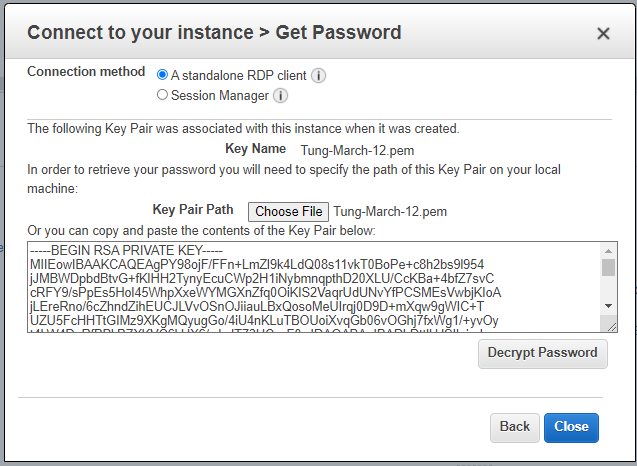
Load private key to decrypt Windows password.

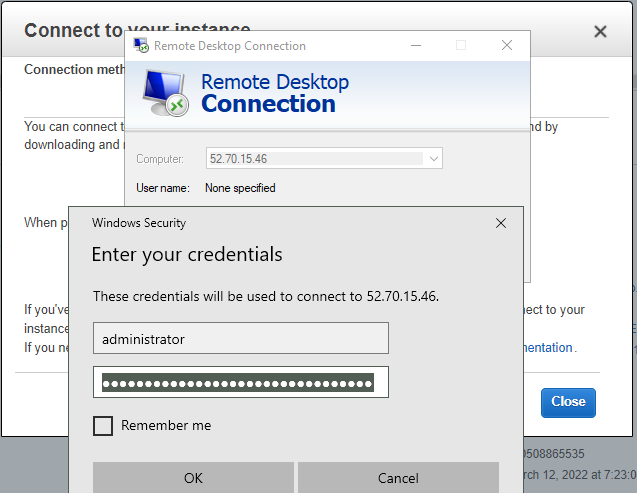
Access RDP to Windows 2016 instance on AWS.

Now we can see the RDP traffic via Fortinet.

diagnose sniffer packet port1 "port 3389"

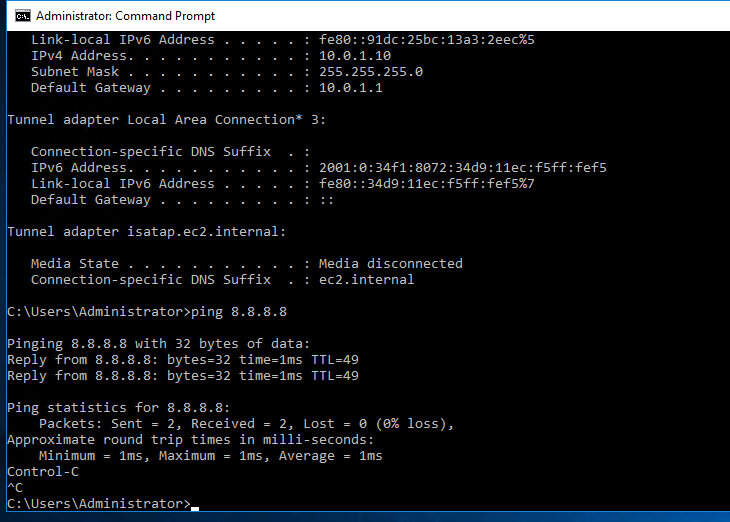
The Windows machine is able to access the Internet.

Send Palo Alto, FortiGate, Cisco Router, and Linux Server logs to Splunk

This is a diagram that I have used to deploy this lab.

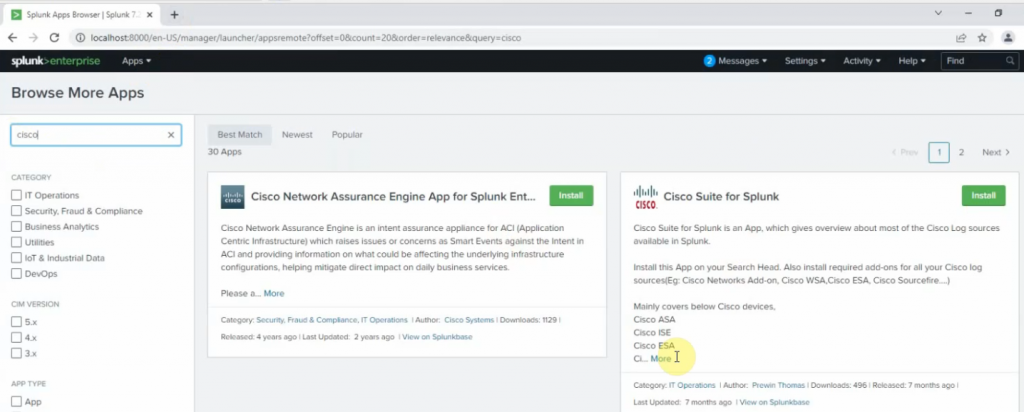
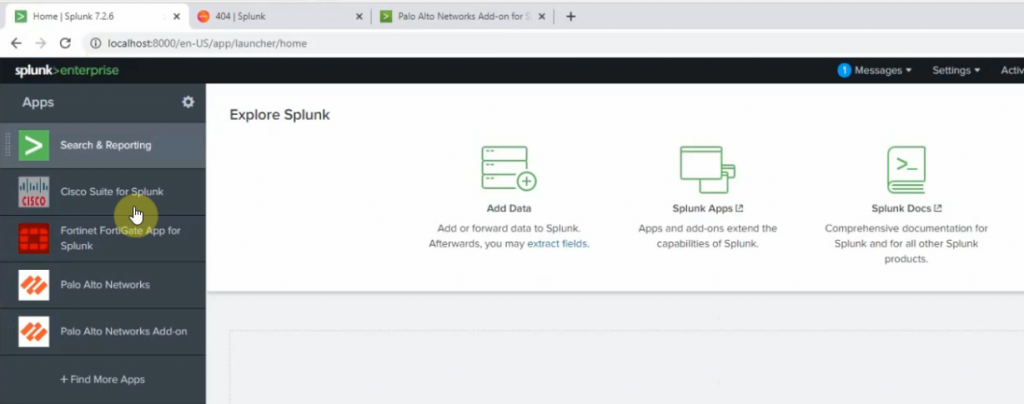
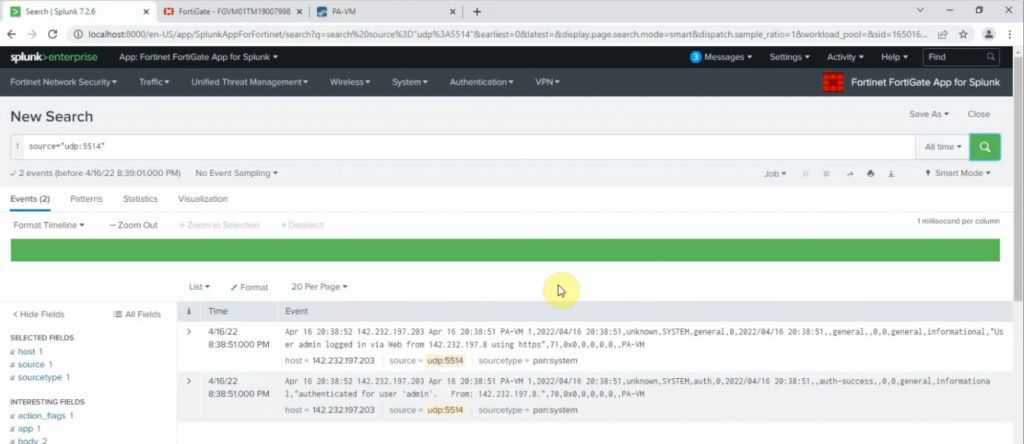
Log in to Splunk, and download Cisco Suite for Splunk, Fortigate, and Palo Alto app for Splunk.

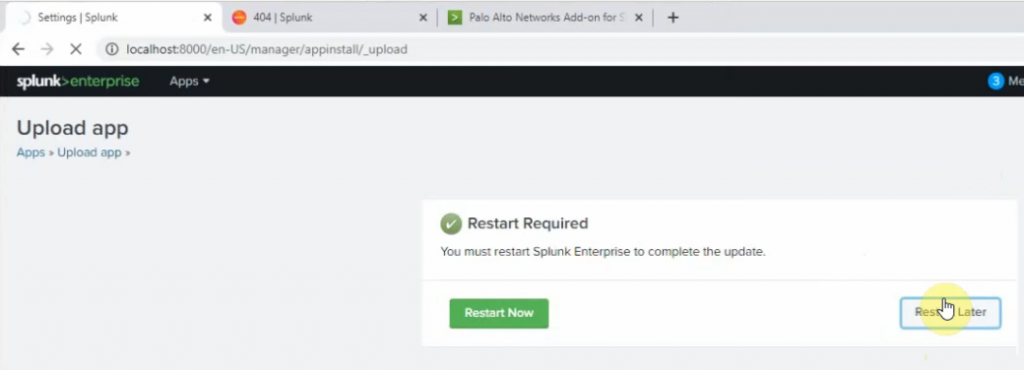
Click Install app from file.

On Splunk.

+ Palo Alto

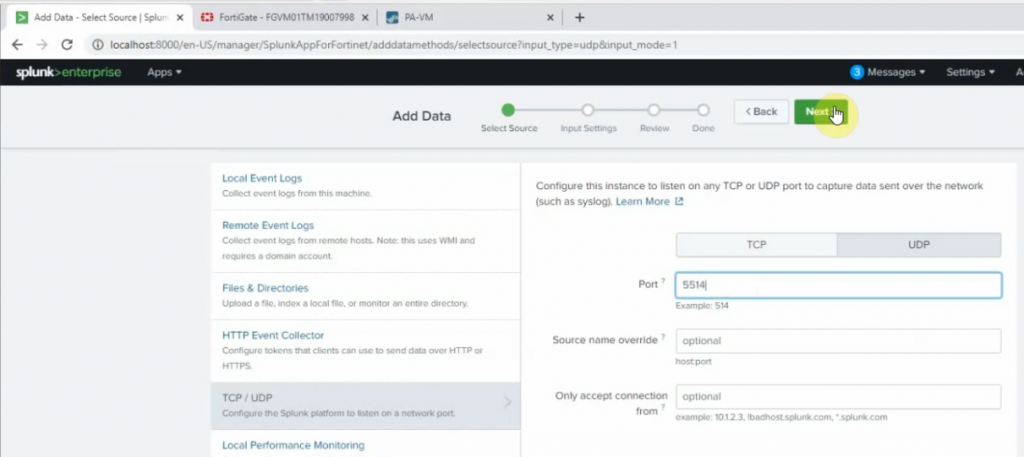
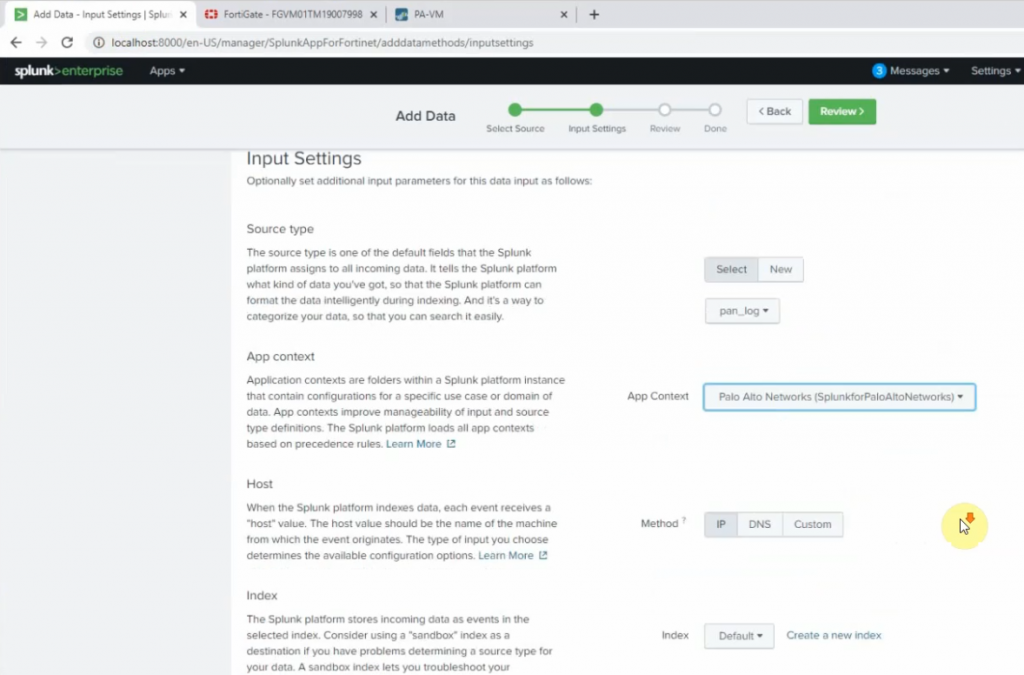
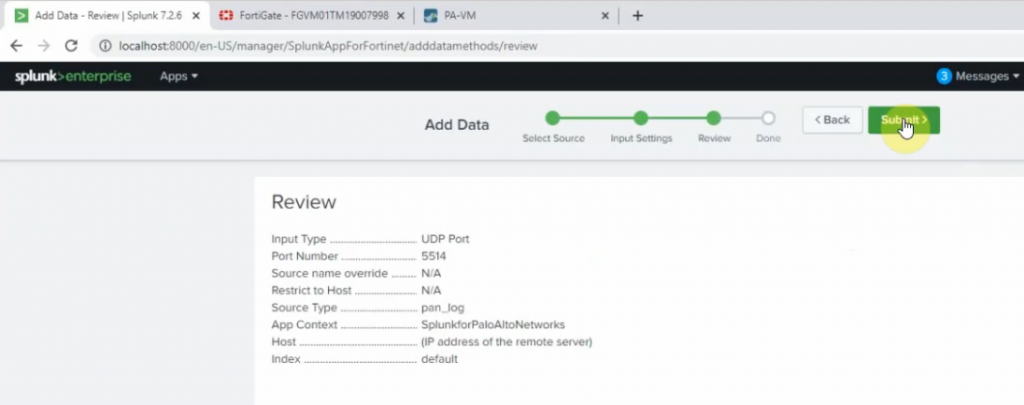
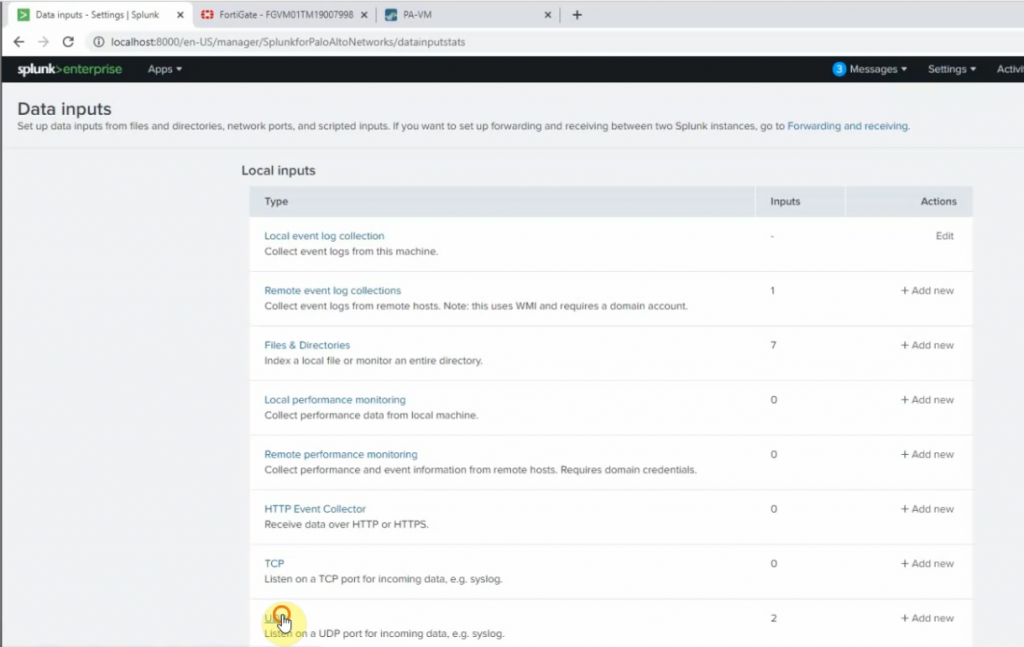
Go to Settings – Data inputs – New Local UDP.

Enter the port 5514 on the Port setting

Source type: pan_log

App Control: Palo Alto Networks

Method: IP

Index: Default

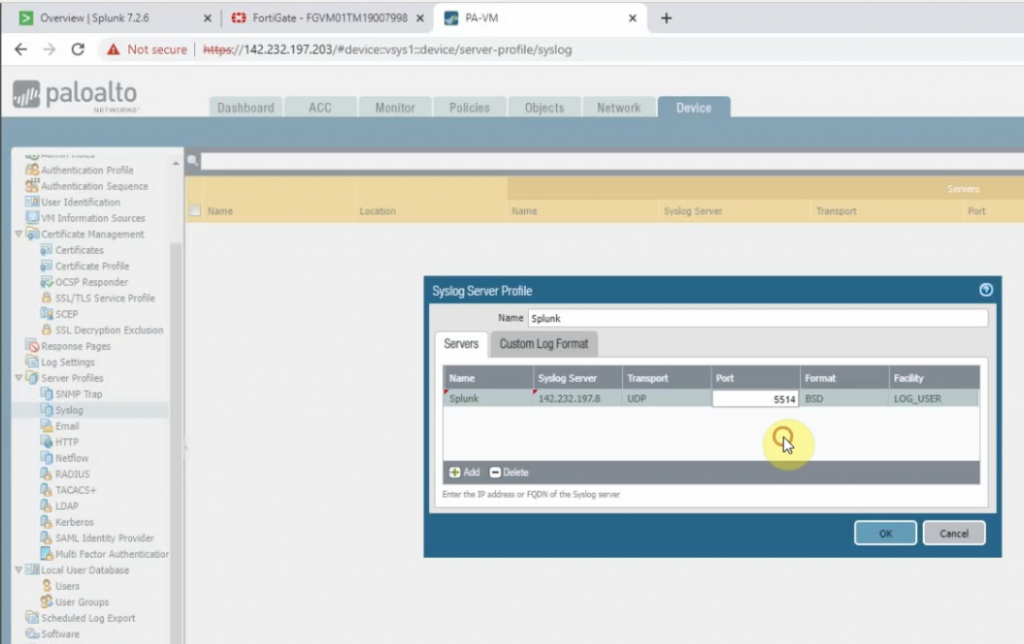
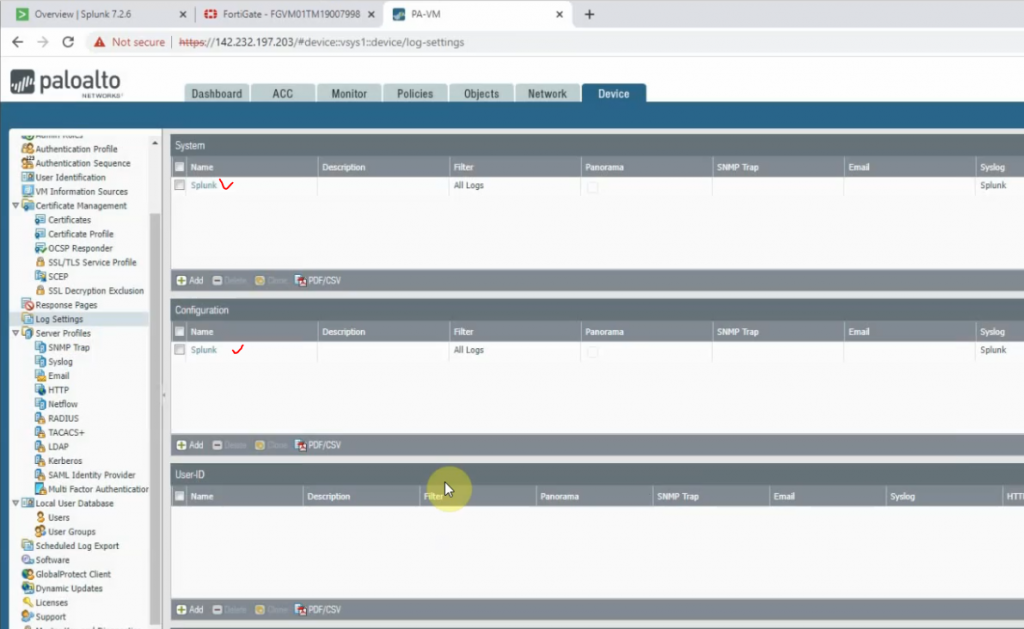
On Palo Alto, configure to send logs to Splunk server with destination port is 5514.

Commit, log off and log on to generate logs.

Back to Splunk.

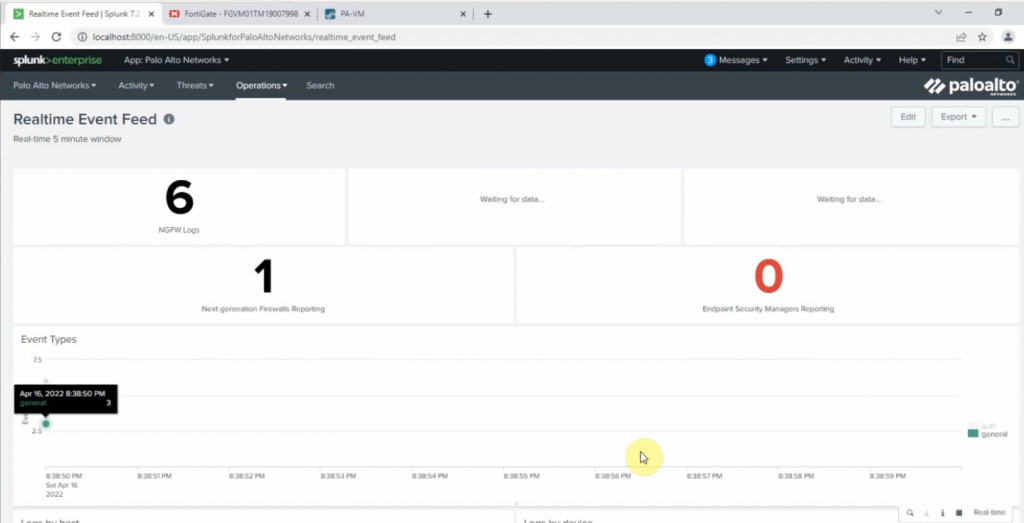
Click Palo Alto App – Operations – Real-time Event Feed.

+ Cisco Router R1.

conf t
logging trap informational
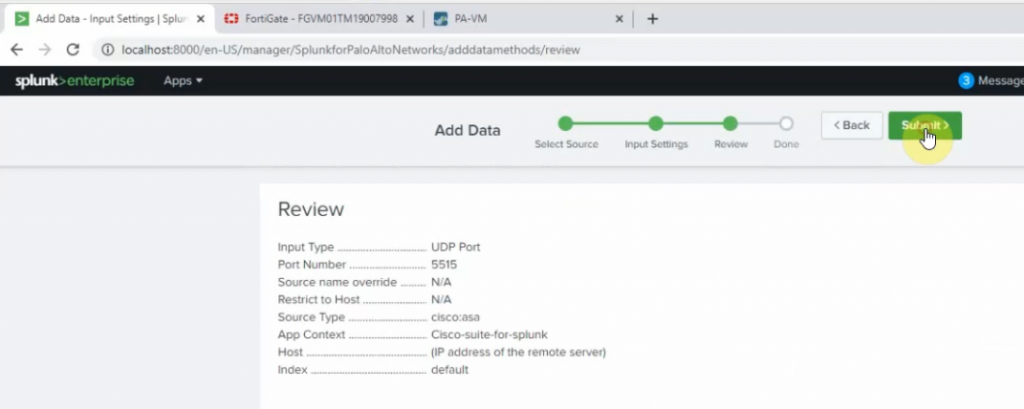
logging host 142.232.197.8 transport udp port 5515 

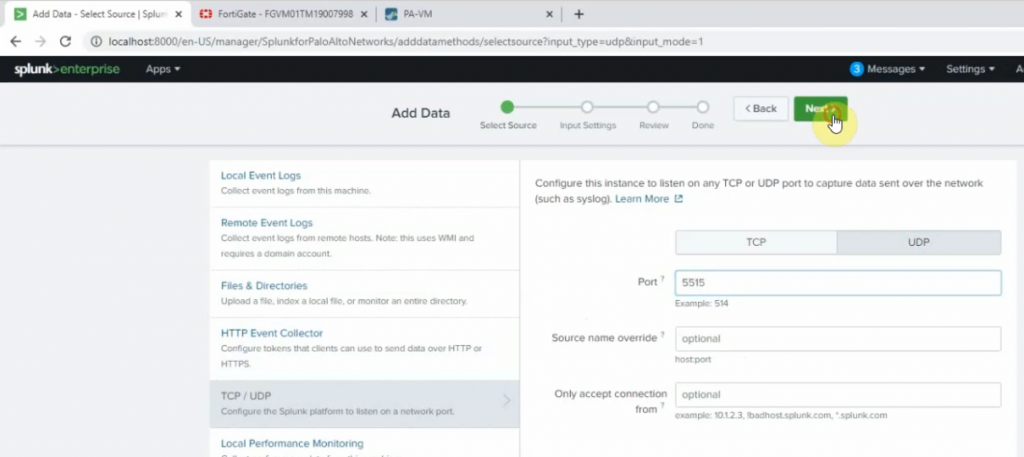
On Splunk.

Port 5515

Source type: cisco:asa

App Context: Cisco Suite for Splunk

Method: IP

Index: default.

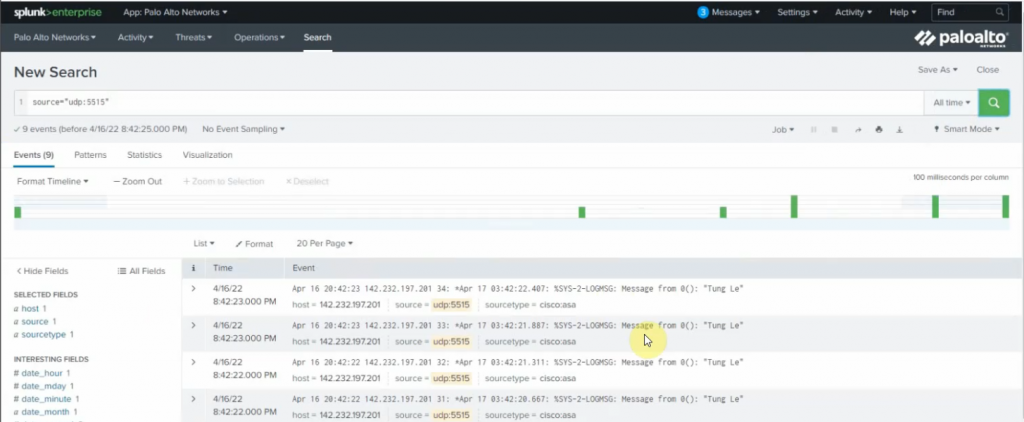
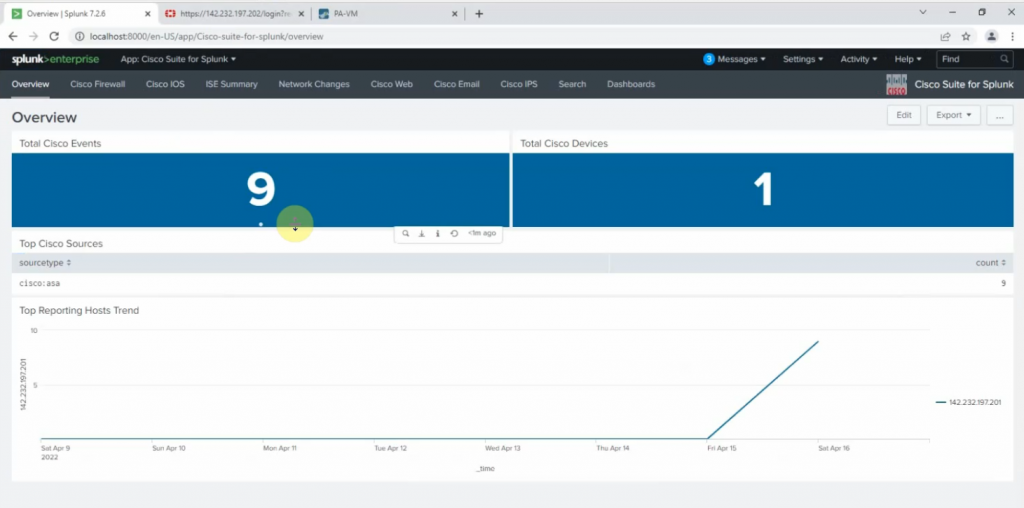
Back to Router, send sample logs to Splunk.

end
send log "Tung Le"
send log "Tung Le"

+ On Kali Linux.

sudo su
nano /etc/rsyslog.conf
##Add the following line to the end of the file. The listening port is 5516.
*.*                @142.232.198.8:5516

Restart rsyslog service.

systemctl restart rsyslog
systemctl status rsyslog

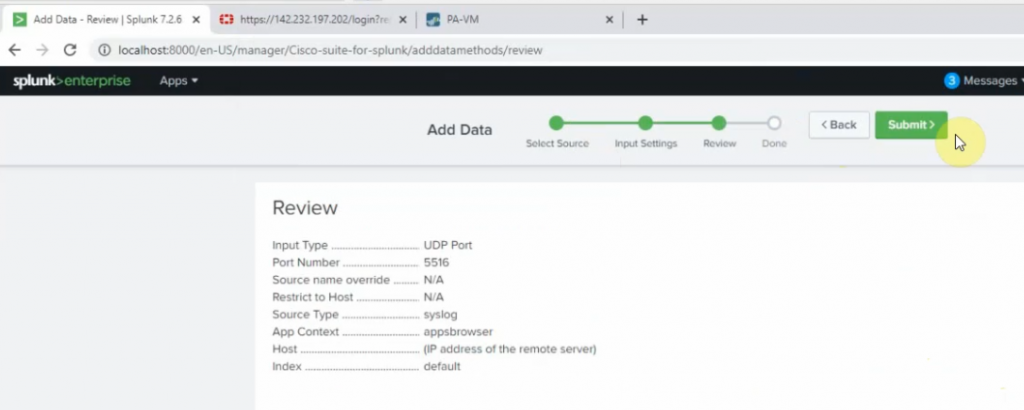
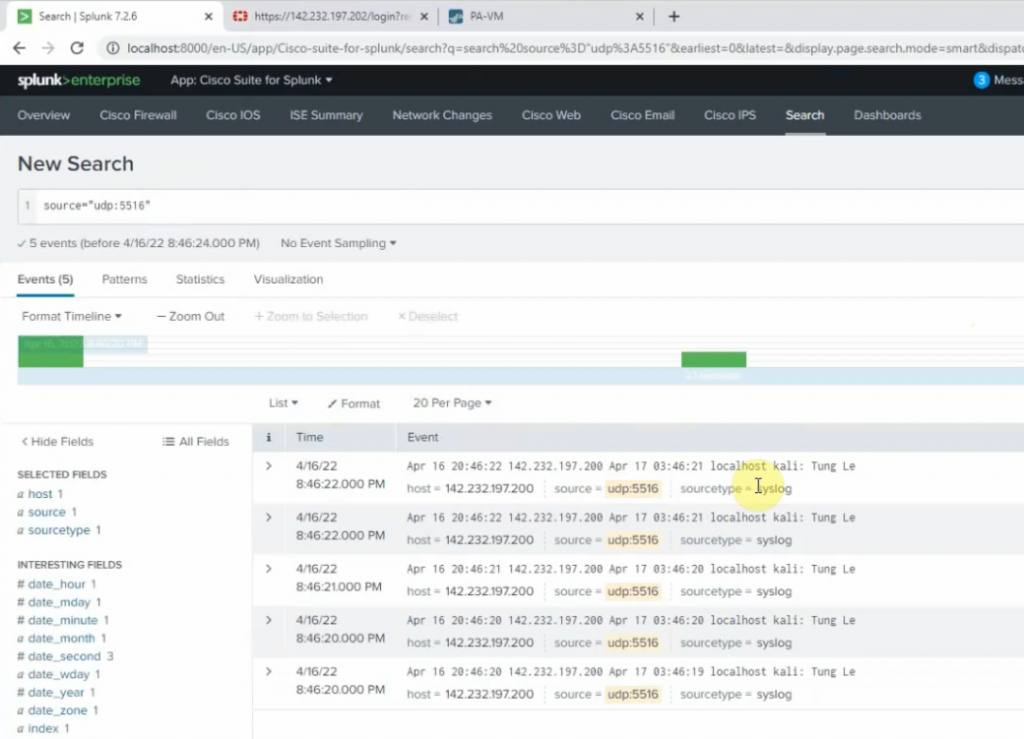
Back to Splunk, configure the listening port for the Linux server is 5516

source type: Syslog

app context: Apps Browser

Back to Kali, type the command below to generate logs to Splunk.

logger "Tung Le"

+ FortiGate:

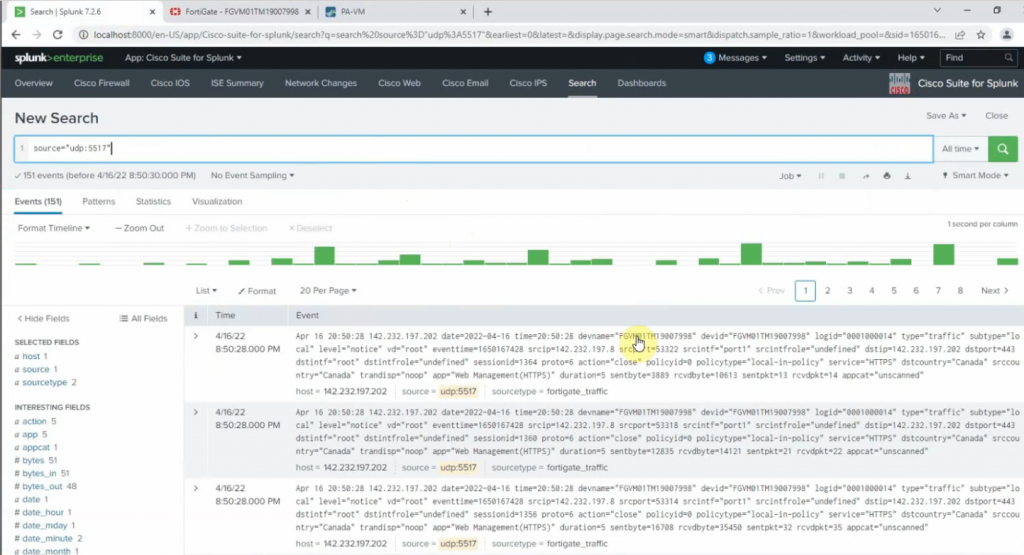
Configure FortiGate to send logs to Splunk via the UDP port 5517.

config log syslogd setting
set status enable
set server 142.232.197.8
set port 5517
end 

Log into FortiGate, and enable the setting below to send logs to Splunk.

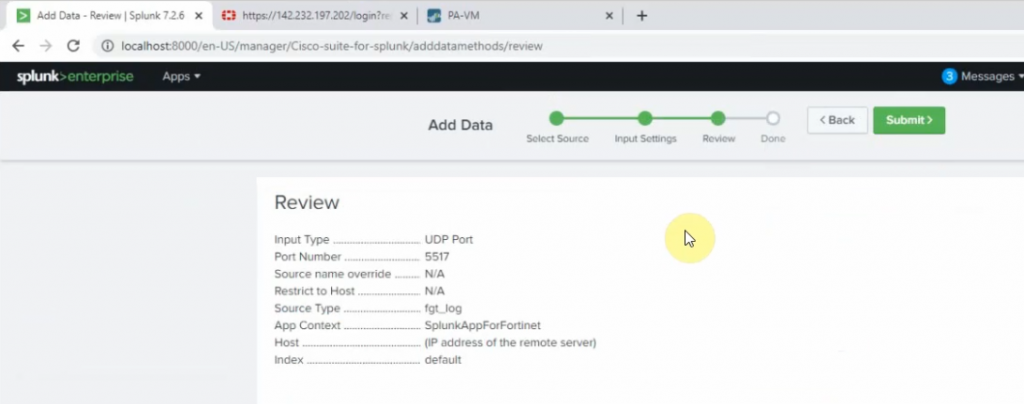
On Splunk, configure port is 5517.

Source type: fgt_log

App Context: FortiGate

Method: IP

Index: Default

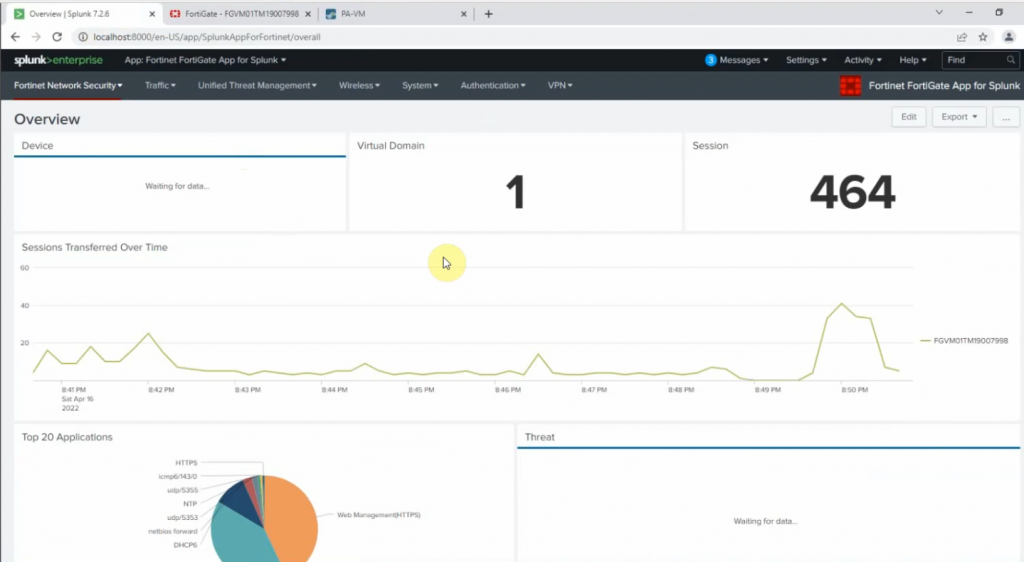
Log off FortiGate, type w wrong password to generate logs.

Implementing OpenVPN server on Debian 10

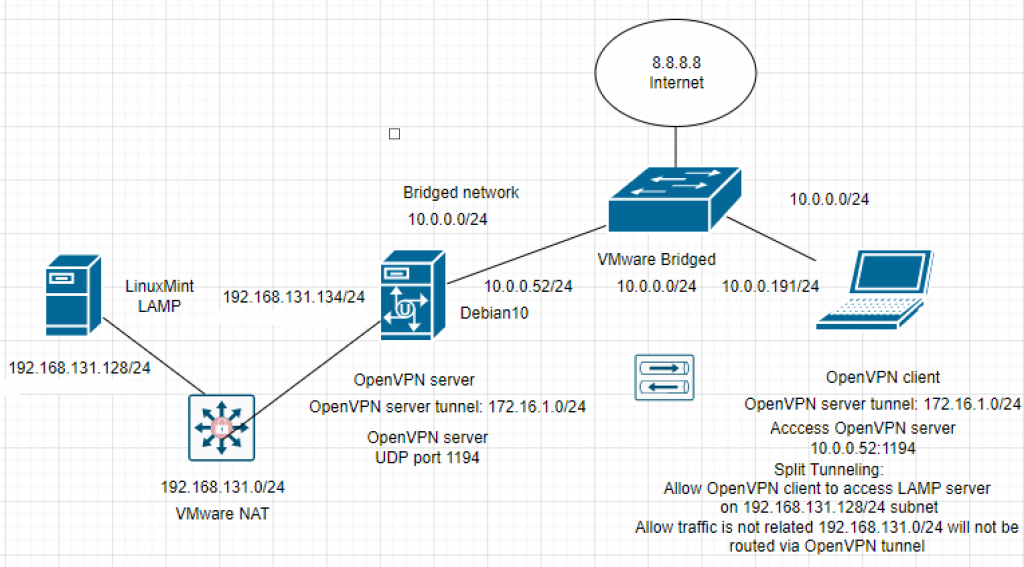
Below is a lab topology to use to implement the OpenVPN solution on Debian 10.

In this lab, we need to make sure clients on the Internet are able to create secure OpenVPN connections to the OpenVPN server. Also, the OpenVPN client is able to access inside the network beside the VPN tunnel (LAMP subnet: 192.168.131.0/24), and still access the Internet. Moreover, the Split tunneling feature should be used to make sure only traffic is related to accessing the LAMP subnet will be routed via the OpenVPN tunnel. All other traffic will use a public network adapter (Internet).

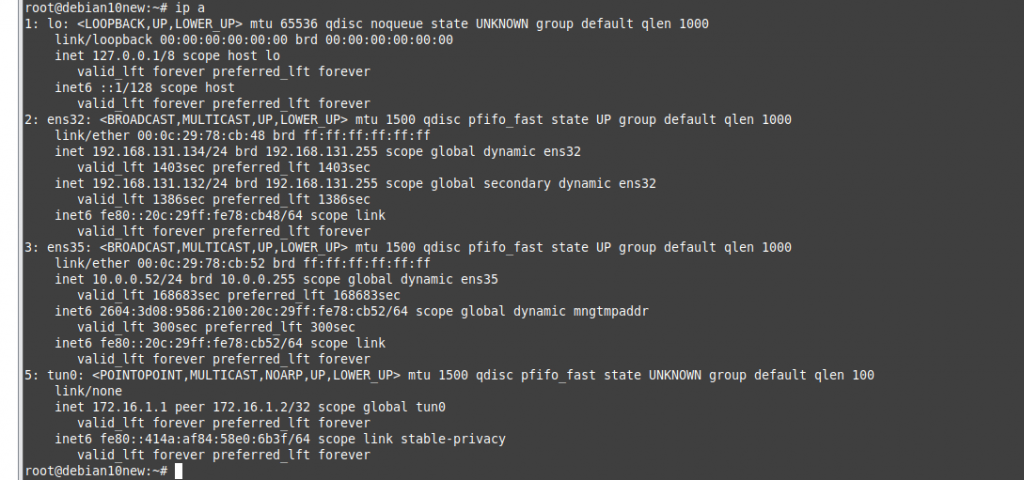
IP addresses of Debian OpenVPN server.

Access SSH from LinuxMint to easy to copy and paste commands.

Upgrade Debian’s machine.

apt-get update -y
apt-get upgrade -y

+ Enable IP Forwarding

Edit the file /etc/sysctl.conf and add the line below at the end of the file.

net.ipv4.ip_forward = 1

+ Enable proxy_arp for arp entry to appear on the OpenVPN server.

echo 1 > /proc/sys/net/ipv4/conf/all/proxy_arp

+ Add a line below into /etc/sysctl.conf to make it permanent.

net.ipv4.conf.all.proxy_arp=1

Run the following command to make the changes work.

sysctl -p

+ Install OpenVPN server.

apt-get install openvpn -y

Copy the easy-rsa directory from /usr/share directory to /etc/openvpn directory.for managing SSL certificates.

cp -r /usr/share/easy-rsa /etc/openvpn/

+ Set up Certificate Authority (CA)

cd /etc/openvpn/easy-rsa
nano vars
#Add information below to the file.
set_var EASYRSA                 "$PWD"
set_var EASYRSA_PKI             "$EASYRSA/pki"
set_var EASYRSA_DN              "cn_only"
set_var EASYRSA_REQ_COUNTRY     "CANADA"
set_var EASYRSA_REQ_PROVINCE    "BC"
set_var EASYRSA_REQ_CITY        "Vancouver"
set_var EASYRSA_REQ_ORG         "BCIT Student"
set_var EASYRSA_REQ_EMAIL	"admin@newhorizon.ca"
set_var EASYRSA_REQ_OU          "BCIT Student"
set_var EASYRSA_KEY_SIZE        2048
set_var EASYRSA_ALGO            rsa
set_var EASYRSA_CA_EXPIRE	7500
set_var EASYRSA_CERT_EXPIRE     365
set_var EASYRSA_NS_SUPPORT	"no"
set_var EASYRSA_NS_COMMENT	"BCIT Student CERTIFICATE AUTHORITY"
set_var EASYRSA_EXT_DIR         "$EASYRSA/x509-types"
set_var EASYRSA_SSL_CONF        "$EASYRSA/openssl-easyrsa.cnf"
set_var EASYRSA_DIGEST          "sha256"

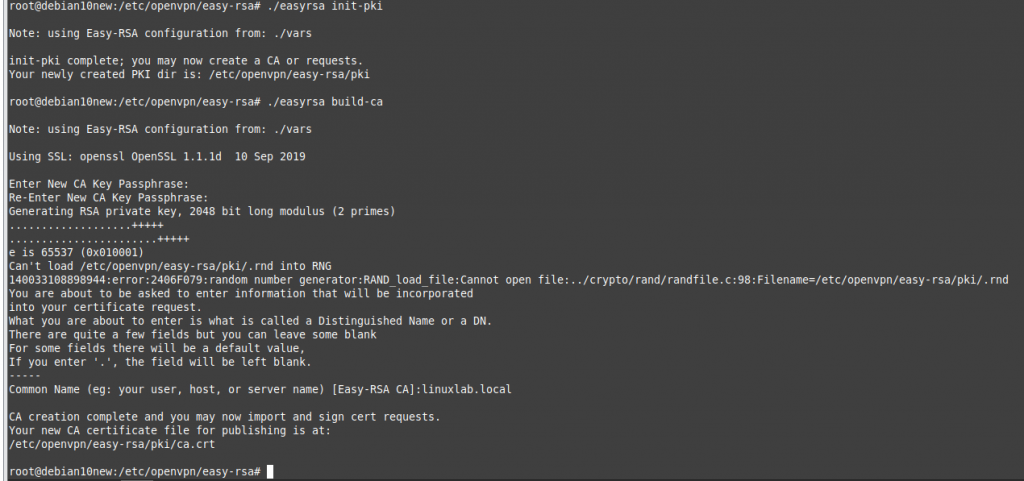
 Run the following command to initiate your own PKI.

./easyrsa init-pki

Build the CA certificates.

./easyrsa build-ca

+ Generate Server Certificate Files.

./easyrsa gen-req tung-server nopass

+ Sign the public key of the Server Using Root CA.

./easyrsa sign-req server tung-server

Verify cert.

openssl verify -CAfile pki/ca.crt pki/issued/tung-server.crt 

+ Create a strong Diffie-Hellman key to use for the key exchange

./easyrsa gen-dh

After creating all certificate files, copy them to the /etc/openvpn/server/ directory.

cp pki/ca.crt /etc/openvpn/server/
cp pki/dh.pem /etc/openvpn/server/
cp pki/private/tung-server.key /etc/openvpn/server/
cp pki/issued/tung-server.crt /etc/openvpn/server/

+ Generate Client Certificate and Key File

./easyrsa gen-req client nopass

Next, sign the client key using your CA certificate.

./easyrsa sign-req client client

Next, copy all client certificate and key file to the /etc/openvpn/client/ directory

cp pki/ca.crt /etc/openvpn/client/
cp pki/issued/client.crt /etc/openvpn/client/
cp pki/private/client.key /etc/openvpn/client/

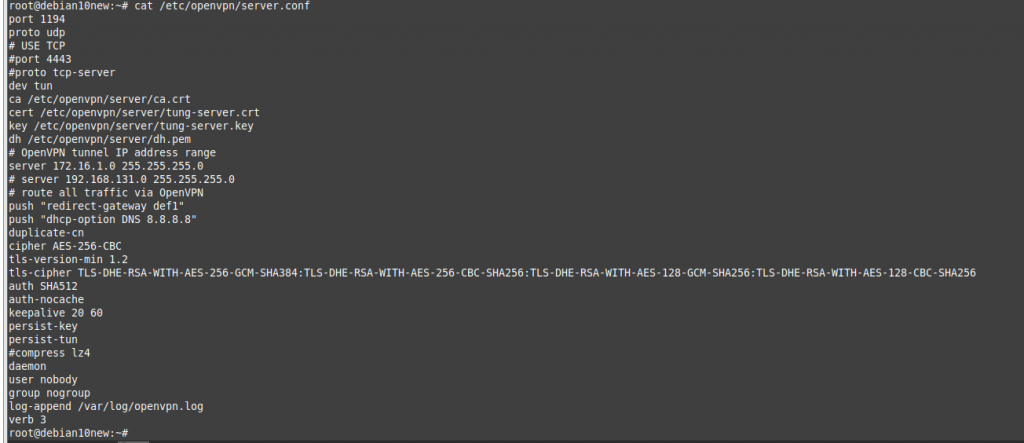
+ Configure OpenVPN Server

nano /etc/openvpn/server.conf
#---
root@debian10new:~# cat /etc/openvpn/server.conf 
port 1194
proto udp
# USE TCP
#port 4443
#proto tcp-server
dev tun
ca /etc/openvpn/server/ca.crt
cert /etc/openvpn/server/tung-server.crt
key /etc/openvpn/server/tung-server.key
dh /etc/openvpn/server/dh.pem
# OpenVPN tunnel IP address range
server 172.16.1.0 255.255.255.0
# server 192.168.131.0 255.255.255.0
# route all traffic via OpenVPN
push "redirect-gateway def1"
push "dhcp-option DNS 8.8.8.8"
duplicate-cn
cipher AES-256-CBC
tls-version-min 1.2
tls-cipher TLS-DHE-RSA-WITH-AES-256-GCM-SHA384:TLS-DHE-RSA-WITH-AES-256-CBC-SHA256:TLS-DHE-RSA-WITH-AES-128-GCM-SHA256:TLS-DHE-RSA-WITH-AES-128-CBC-SHA256
auth SHA512
auth-nocache
keepalive 20 60
persist-key
persist-tun
#disable compress lz4 because of error on OpenVPN client
#compress lz4
daemon
user nobody
group nogroup
log-append /var/log/openvpn.log
verb 3
root@debian10new:~# 
#---

+ Start OpenVPN service.

systemctl start openvpn@server
systemctl enable openvpn@server
systemctl status openvpn@server

Show OpenVPN tunnel.

ip a show tun0

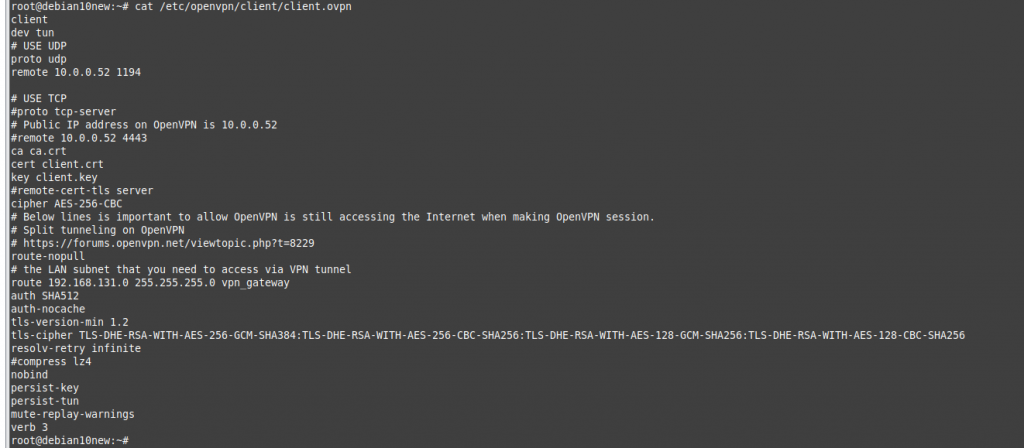
+ Generate client configuration.

nano /etc/openvpn/client/client.ovpn
#---
client
dev tun
# USE UDP
proto udp
remote 10.0.0.52 1194

# USE TCP
#proto tcp-server
# Public IP address on OpenVPN is 10.0.0.52
#remote 10.0.0.52 4443
ca ca.crt
cert client.crt
key client.key
#remote-cert-tls server
cipher AES-256-CBC
# Below lines is important to allow OpenVPN is still accessing the Internet when making OpenVPN session.
# Split tunneling on OpenVPN
# https://forums.openvpn.net/viewtopic.php?t=8229
route-nopull
# the LAN subnet that you need to access via VPN tunnel
route 192.168.131.0 255.255.255.0 vpn_gateway
auth SHA512
auth-nocache
tls-version-min 1.2
tls-cipher TLS-DHE-RSA-WITH-AES-256-GCM-SHA384:TLS-DHE-RSA-WITH-AES-256-CBC-SHA256:TLS-DHE-RSA-WITH-AES-128-GCM-SHA256:TLS-DHE-RSA-WITH-AES-128-CBC-SHA256
resolv-retry infinite
#compress lz4
nobind
persist-key
persist-tun
mute-replay-warnings
verb 3
#---

+ Configure routing using UFW.

By default, the UFW firewall is not installed in Debian 10.

apt-get install ufw -y

Configure UFW to accept the forwarded packets.

nano /etc/default/ufw
# Change the following line:

DEFAULT_FORWARD_POLICY="ACCEPT"
nano /etc/ufw/before.rules

Note: Replace ens3 with the name of your public network interface in Debian OpenVPN server is ens35.

Allow the default OpenVPN port 1194 and OpenSSH. Then, reload the UFW firewall.

ufw allow 1194/udp
ufw allow OpenSSH
ufw disable
ufw enable

+ Connect OpenVPN from a client.

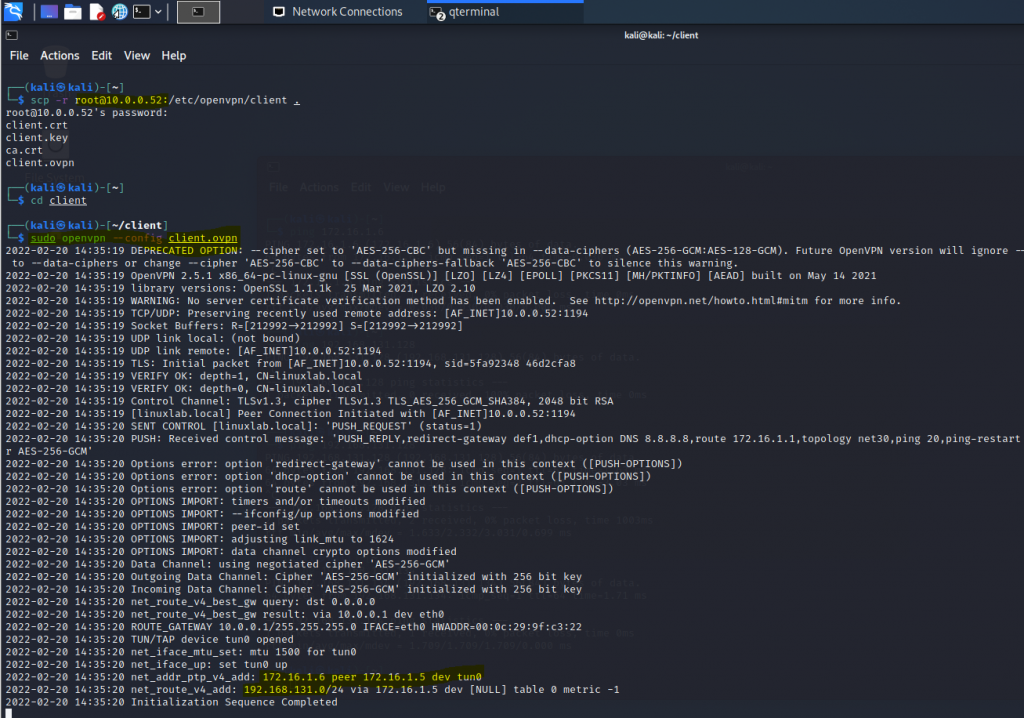
Install OpenVPN from the Kali machine.

apt-get install openvpn -y

On the client machine, run the command below to download all the client configuration files.

# public-vpn-server-ip: is 10.0.0.52
scp -r root@public-vpn-server-ip:/etc/openvpn/client .

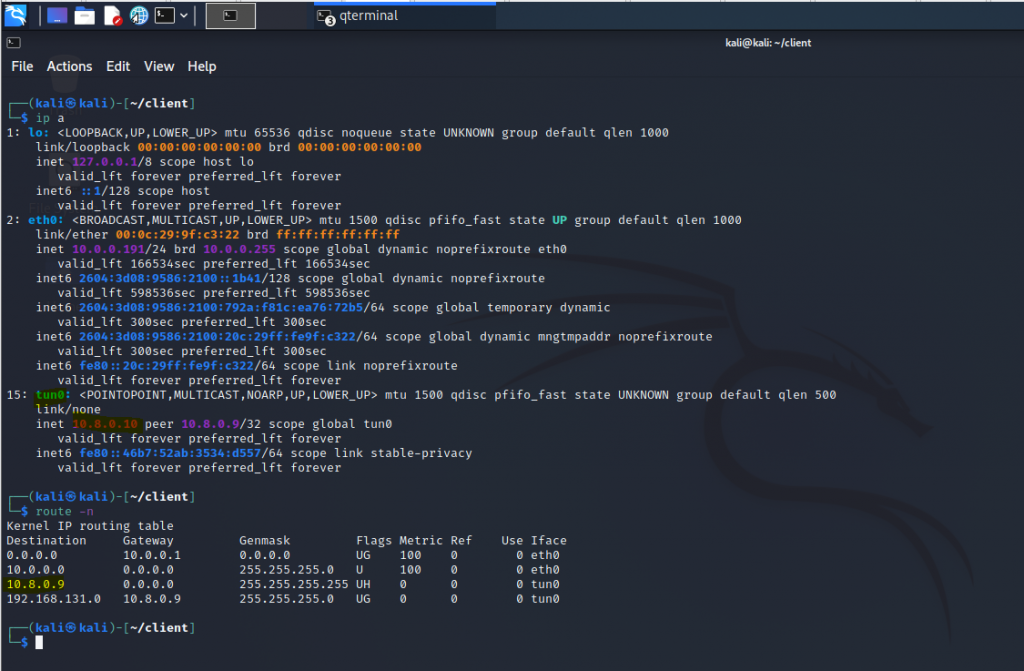
Check OpenVPN tunnel.

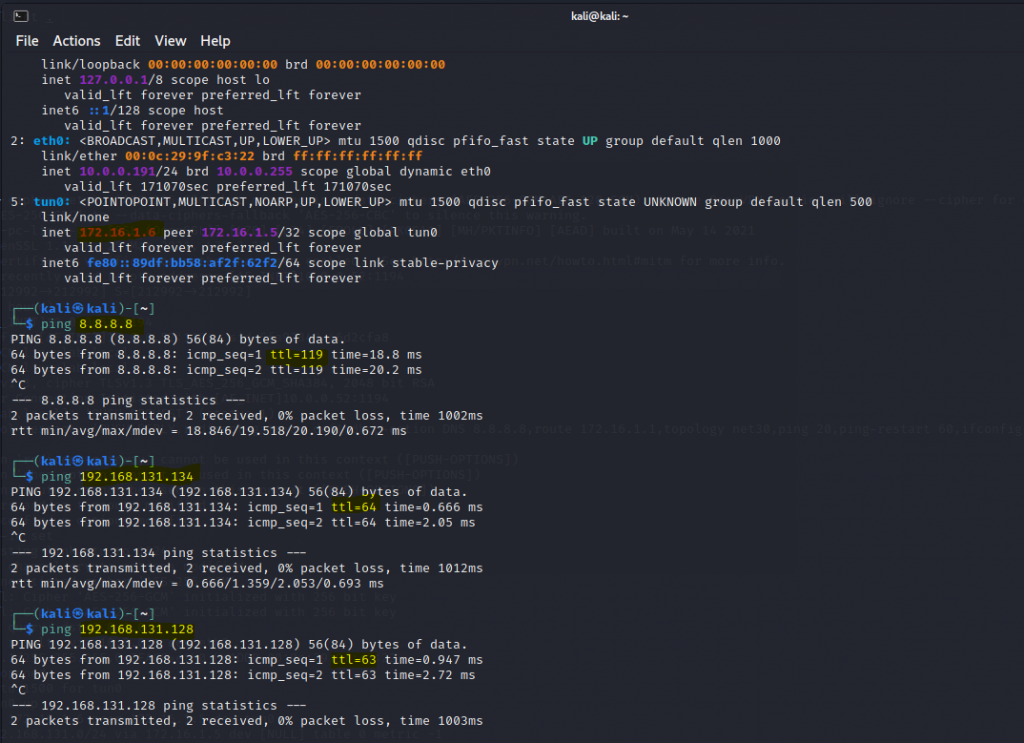
On OpenVPN client.

ping 8.8.8.8 (Internet)

ping 192.168.131.134 (OpenVPN gw tunnel)

ping 192.168.131.128 (LAMP server behind OpenVPN server)

We can see split tunneling is working well on OpenVPN.

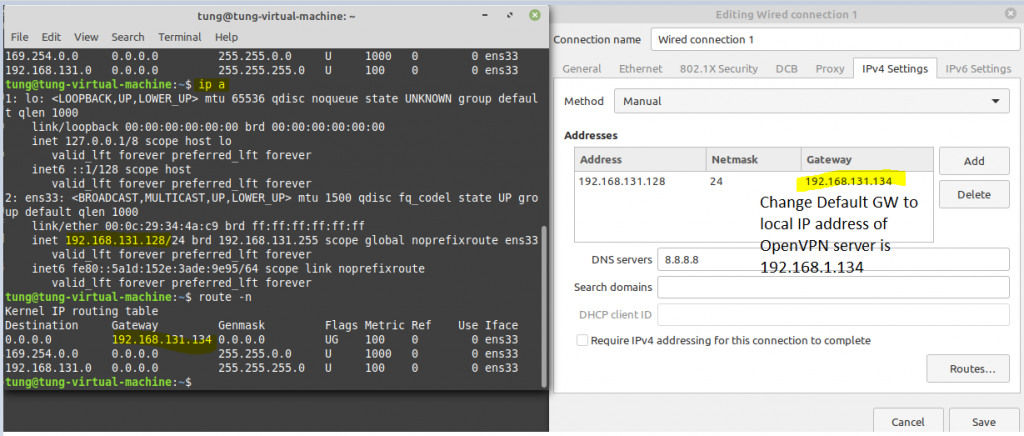
Access LAMP server.

On Debian OpenVPN server.

Check routing table on OpenVPN server.

Check OpenVPN logs on the OpenVPN server.

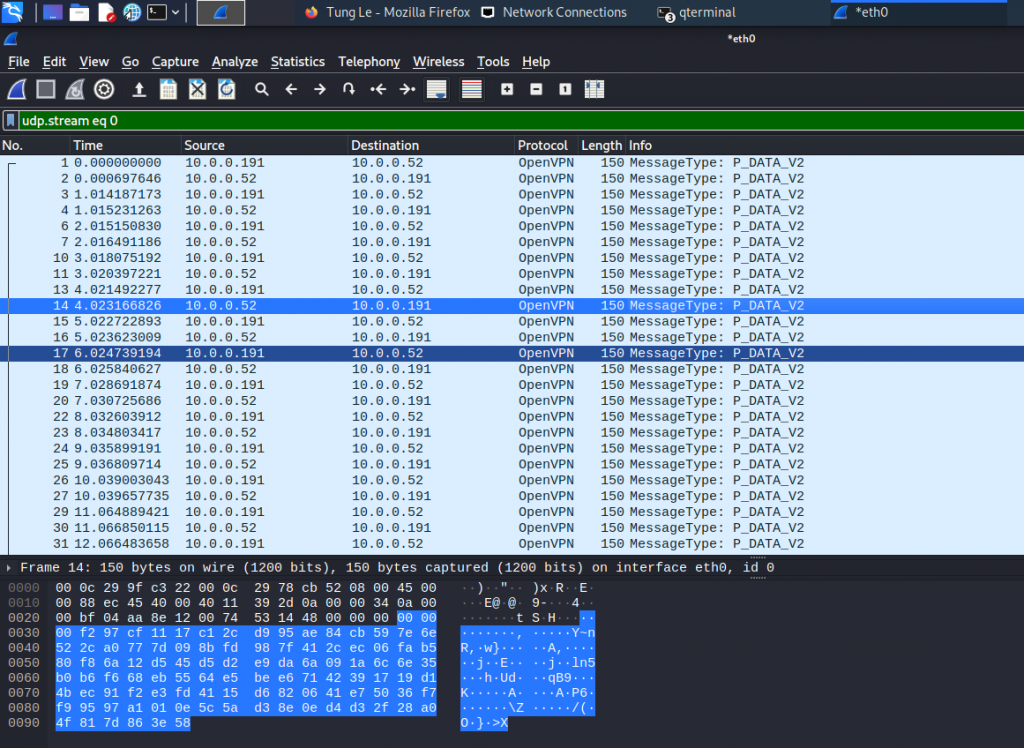
Monitor traffic on the OpenVPN server. OpenVPN traffic is using port 1194 UDP. OpenVPN traffic is encrypted using this tunnel.

Create an IPSEC site-to-site tunnel between Palo Alto And FortiGate.

This is the lab to use to set up the IPSEC site-to-site tunnel between both devices.

On Palo Alto.

IKE Crypto.

IPSEC Crypto.

IKE Gateway.

IPSec tunnel.

Create a virtual route from PA to Fortinet.

Create two Security Policies to allow traffic from the “Trusted Zone” of PA to the “Trusted Zone” of Fortinet.

Configure Fortinet.

config system interface
edit port1
set mode dhcp
set allowaccess ping httpd http fgfm
next
end
show system interface 
# show system interface to get IP Address from DHCP

Go to Webterm to configure Fortinet.

Configure a custom VPN Tunnel with the following information.
Configure a static route to allow traffic from Trusted Zone (192.168.20.0/24) on Fortinet to the Trusted Zone (192.168.10.0/24) on PA.
Create two Security policies to allow traffic from VPN to Trusted Zone and vice versa.

Ping and traceroute from a VM on Fortinet to another VM on Palo Alto.

Monitor IPSEC tunnel on Fortinet.

Monitor IPSEC tunnel on PA.

Create a VPN IPSEC site to site between Palo Alto and Cisco Router

This is a lab to set up a VPN site-to-site tunnel between both devices.

Configure interfaces and enable IPSEC VPN site to site on Cisco Router.

R1(config)#int g0/0
R1(config-if)#ip add 192.168.20.1 255.255.255.0
R1(config-if)#no shut


R1(config)#int g1/0
R1(config-if)#des "Connect to PA""
R1(config-if)#ip add 10.10.10.1 255.255.255.0
R1(config-if)#no shut

Create an ACL for VPN.
R1(config)#ip access-list extended ACL
R1(config-ext-nacl)#permit ip 192.168.20.0 0.0.0.255 192.168.10.0 0.0.0.255


Create ISAKMP phase 1 of the tunnel.


R1(config)#crypto isakmp policy 1
R1(config-isakmp)#encr aes
R1(config-isakmp)#hash md5
R1(config-isakmp)#authentication pre-share
R1(config-isakmp)#group 5
R1(config-isakmp)#lifetime 86400
# Assign authentication-key for remote peer.
R1(config)#crypto isakmp key cisco123 address 10.10.10.2


# Create IPSEC transfrom set for phase 2
R1(config)#crypto ipsec transform-set TSET esp-aes esp-sha-hmac

# Create cryoto map to apply the phase 2 settings to the interface
crypto map PA1 10 ipsec-isakmp
set peer 10.10.10.2
set transform-set TSET
match address ACL

# Applly crypto map to an interface.

R1(config-crypto-map)#int g1/0
R1(config-if)#crypto map PA1

# Create a static route to route traffic between both sites.
R1(config)#ip route 0.0.0.0 0.0.0.0 10.10.10.2

Access Palo Alto Web management.

Assign an IP address for interface e1/1 and e1/2.

Create a new tunnel 1 on PA.

Configure a static route between PA and Cisco Router and set next hop is “None”.

Configure IKECrypto as on Cisco Router.

Configure IKE Gateway.

Configure IPSEC Tunnel.

Configure Proxy ID.

Create both Security policies to allow traffic from the Trusted zone to the VPN zone and vice versa.

From Webterm2 (192.168.10.2) pings Webterm 3 (192.168.20.2).

Check PA, the IPSEC tunnel is up.

Install Graylog open-source log management on Linux server

Graylog is an open-source log management system. Graylog centrally captures, collects, enhances, stores, and analyzes log data. It is an affordable alternative to Splunk.

Below are a couple of steps to install Graylog on CentOS 7.

Edit interface, change ONBOOT from “no” to “yes”, and restart network service.

Step #1: Update your system and install needed packages.

hostnamectl set-hostname graylog
yum update -y
yum install epel-release
yum install pwgen vim

Step #2: Install JAVA

yum install java-1.8.0-openjdk-headless.x86_64

Check the java version.

java -version

Create a repository file. Then add the content below to this repository.

vim /etc/yum.repos.d/mongodb-org.repo
--
[mongodb-org-4.2]
name=MongoDB Repository
baseurl=https://repo.mongodb.org/yum/redhat/$releasever/mongodb-org/4.2/x86_64/
gpgcheck=1
enabled=1
gpgkey=https://www.mongodb.org/static/pgp/server-4.2.asc

Install MongoDB

yum install mongodb-org

Enable and start mongoDB service on system.

sudo systemctl daemon-reload
sudo systemctl enable mongod.service
sudo systemctl start mongod.service
sudo systemctl --type=service --state=active | grep mongod

Check MongoDB service port.

netstat -antp | grep 27017

Step #4: Installing Elasticsearch

Graylog can be used with Elasticsearch 6x, 7.x, In this lab, I have used version 6x of Elasticsearch.

Install the Elastic GPG key.

rpm –import https://artifacts.elastic.co/GPG-KEY-elasticsearch

Create a repository, then add the following contents to the file.

vim /etc/yum.repos.d/elasticsearch.repo

[elasticsearch-6.x]
name=Elasticsearch repository for 6.x packages
baseurl=https://artifacts.elastic.co/packages/oss-6.x/yum
gpgcheck=1
gpgkey=https://artifacts.elastic.co/GPG-KEY-elasticsearch
enabled=1
autorefresh=1
type=rpm-md

Install the open-source version of Elasticsearch.

yum install elasticsearch-oss

Modify the Elasticsearch configuration file. Set the cluster name to graylog and add “action.auto_create_index: false” to the file.

vim /etc/elasticsearch/elasticsearch.yml

Save and exit the file.

Enable, start and check the status of elastic search on the system.

sudo systemctl daemon-reload
sudo systemctl enable elasticsearch.service
sudo systemctl restart elasticsearch.service
sudo systemctl --type=service --state=active | grep elasticsearch

Check elastic search health.

curl -XGET 'http://localhost:9200/_cluster/health?pretty=true'

Step #5: Installing the Graylog

Now install the Graylog repository configuration with the following commands:

rpm -Uvh https://packages.graylog2.org/repo/packages/graylog-4.2-repository_latest.rpm

Install Graylog-server.

yum install graylog-server

Configure Graylog:

Add “password_secret” and “root_password_sha2” to server.conf file.

Generate password_secret.

pwgen -N 1 -s 96

Generate root_password_sha2.

echo -n foss@dan123 | sha256sum | cut -d” ” -f1

Edit etc/graylog/server/server.conf file.

vim /etc/graylog/server/server.conf

Uncomment the following line.

http_bind_address = 127.0.0.1:9000

and add http_bind_address = 10.0.0.33:9000

Enable and Start service.

systemctl enable graylog-server.service
systemctl start graylog-server.service

Monitor server logs.

tail -f /var/log/graylog-server/server.log

Copy Geo-IP database to Graylog server.

Check log again.

Check Graylog Server listening port.

netstat -antp | grep 9000

Check the port is opened on a remote host.

Allow Graylog service on Firewall.

Access Graylog web interface on another machine.

Deploy Ublock Origin Ad blocker via a GPO

According to (https://github.com/gorhill/uBlock), Ublock Origin is an efficient blocker add-on for various browsers. Fast, potent, and lean. uBlock Origin is NOT an “ad blocker”: it is a wide-spectrum blocker — which happens to be able to function as a mere “ad blocker”. The default behavior of uBlock Origin when newly installed is to block ads, trackers, and malware sites.

+ Create a central store for GPO

Copies Chrome, Firefox, MS Edge Policy templates under C:\Windows\SYSVOL\sysvol\cisalab.local\Policies\PolicyDefinitions (copy to C:\Windows\SYSVOL\sysvol rather than \\SERVER\SYSVOL folder)

Google Chrome:

https://support.google.com/chrome/a/answer/187202?hl=en#zippy=%2Cwindows

Firefox:

https://support.mozilla.org/en-US/kb/customizing-firefox-using-group-policy-windows

MS Edge:

https://www.microsoft.com/en-us/edge/business/download

+ Create a new Ublock Origin GPO.

+ Configure UBlock Origin GPO.

Google Chrome. Control which extensions are installed silently – Enabled cjpalhdlnbpafiamejdnhcphjbkeiagm;https://clients2.google.com/service/update2/crx

Firefox:

Extensions to Install – Enabled

https://addons.mozilla.org/firefox/downloads/file/3886236/ublock_origin-1.40.2-an+fx.xpi

MS Edge:

Control which extensions are installed silently – Enabled odfafepnkmbhccpbejgmiehpchacaeak;https://edge.microsoft.com/extensionwebstorebase/v1/crx

+ Link UBlock Origin GPO to Domain computers group.

+ Restart Windows 10 domain-joined client to test.

Ublock Origin has been installed automatically on Windows 10 domain clients.

Configure host-check for SSLVPN connections on FortiGate

This is a diagram to do a host-check SSLVPN connections lab.

Enable tunnel-mode SSLVPN

Enable host-check for Antivirus and Firewall enabled on Fortinet.

Windows machine is up to date and Windows Firewall is enabled.

Setup Forticlient on Windows machine.

Move to unpatched and disabled Windows firewall’s machine.

SSLVPN connection is failed.

Enabled Windows Firewall

Windows OS is not up to date.

Creating an SSLVPN connection again, it was failed.

Checking on Forticlient log and Fortinet Web management console.