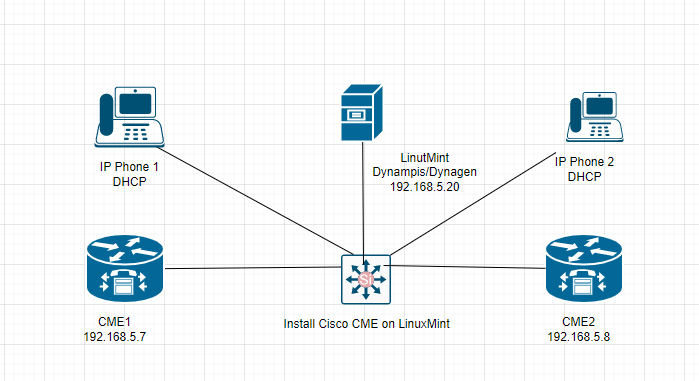
[[ROUTER r2]] model = 7200 console = 2222 aux = 2119 #wic0/0 = WIC-1T #wic0/1 = WIC-1T #wic0/2 = WIC-1T
f0/0 = nio_tap:tap2 x = 22.0 y = -351.0
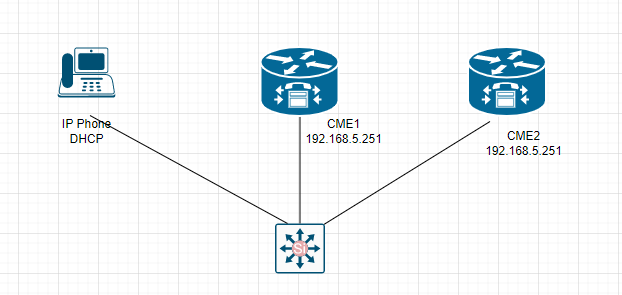
+ Run dynamips program and start both CME Routers sudo dynamips -H 2000&
list start /all
Check port 2000, 2221, 2222 are running on LinuxMint.
Open a new tab to console R1. telnet localhost 2221
Open a new tab to console R2. telnet localhost 2222
+ Install TFTP service on LinuxMint Open new terminal sudo apt install tftpd
sudo nano /etc/xinetd.d/tftp
service tftp { protocol =udp socket_type =dgram wait =yes user =nobody server =/usr/sbin/in.tftpd server_args =/tftpboot disable =no }
sudo mkdir /tftpboot to contain CME image file sudo cp cme.tar /tftpboot to copy the CME image to /tftpboot folder Change permission on tftp folder sudo chmod 777 -R /tftpboot/ Restart xinetd service sudo systemctl restart xinetd Check TFTP service is running netstat -anup | grep 69
+ Configure CME Router On R1: enable conf t hostname R1 int fa0/0 ip address 192.168.5.7 255.255.255.0 no shut end
On R2: enable conf t hostname R2 int fa0/0 ip address 192.168.5.8 255.255.255.0 no shut end
+ Now we need to configure LinuxMint network interface to communicate with both CME Routers Open new tab sudo brctl addif br0 tap1 tap2 sudo ifconfig tap1 up sudo ifconfig tap2 up
Enter ip a command to see all interfaces are up. Test to ping from LinuxMint to R1 and R2.
+ Back to R1 and R2 to load CME image. This process will take time around 1 hour to finish flashing the Router CME image.
On R1: R1#archive tar /xtract tftp://192.168.5.20/cme.tar disk0:
On R2: R2#archive tar /xtract tftp://192.168.5.20/cme.tar disk0:
+ Enable telephone service on CME Routers.
On R1: !!! enable CME GUI on CME Router ip http server ip http path disk0:/gui ip http authentication local !!! create user and password to manage CME telephony-service web admin system name admin password cisco dn-webedit time-webedit
sets max amount of phones
max-ephones 5 ip source-address 192.168.5.7 port 2000 !sets max amount of numbers max-dn 25 system message TUNGLE VOIP create cnf-files
On R2: !!! enable CME GUI on CME Router ip http server ip http path disk0:/gui ip http authentication local !!! create user and password to manage CME telephony-service web admin system name admin password cisco dn-webedit time-webedit
sets max amount of phones
max-ephones 5 ip source-address 192.168.5.8 port 2000 !sets max amount of numbers max-dn 25 system message TUNGLE VOIP create cnf-files
Back to LinuxMinit, open Firefox to access both CMEs via web interface. http://192.168.5.7/ccme.html http://192.168.5.8/ccme.html
+ Open Windows VM1 and VM2, then install the Cisco IP communicator on VM1 and VM2. + Next, configure Cisco IP Communicator on VM1 point to CME on R1 and VM2 point to CME on R2. Wait for a few minutes, we can see IP phone has successfully registered on CME R1 and R2.
Using Firefox on LinuxMint to configure IP phones. Adding phone and extension number 7822 for R1, and 7922 for R2.
Assign ephone with button 2 for R1 and R2, then restart two Cisco IP phones via command restart on CME R1 and R2 ephone 1 button 2:1
Now configure dial-peer between two CMEs to allow both Cisco IP communicators to communicate together.
R1: R1(config)#dial-peer voice 2 voip R1(config-dial-peer)#destination-pattern 79.. R1(config-dial-peer)#session target ipv4:192.168.5.8
R2: R2(config)#dial-peer voice 1 voip R2(config-dial-peer)#destination-pattern 78.. R2(config-dial-peer)#session target ipv4:192.168.5.7
Back to Windows VM and test to call from DN 7822 to DN 7922. It works.
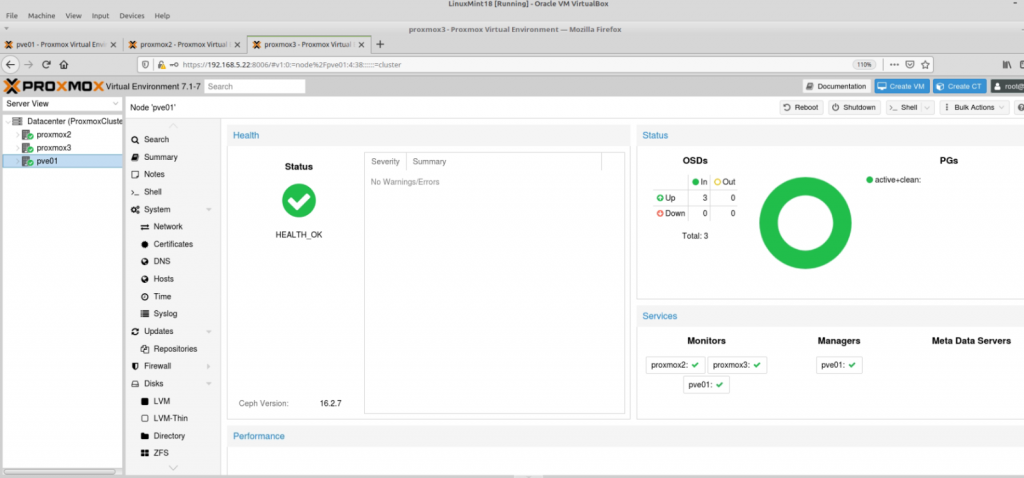
Ceph is an open-source distributed software solution. It is designed to serve block, file, and object workloads for a cluster system. There are a lot of advantages when using Ceph. Ceph supports distributed object storage on multiple cluster nodes, provides redundancy between cluster nodes and is able to scale out cluster storage nodes with Ceph.
Ceph is able to run on commodity hardware without vendor lock-in. Moreover, Ceph is also a unified storage infrastructure that supports storage clusters that may grow or shrink and allows to add and remove hardware while the Ceph cluster is online.
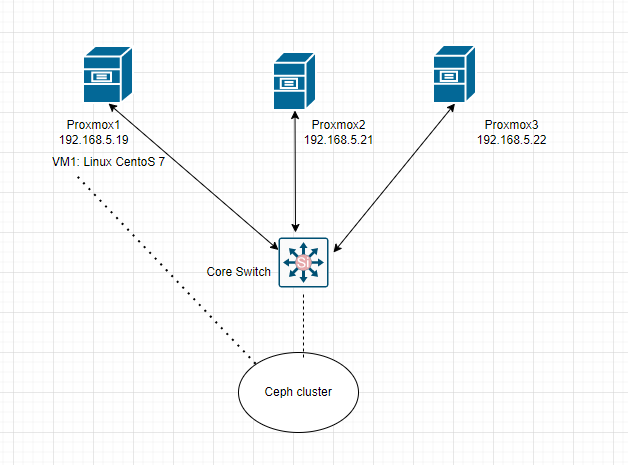
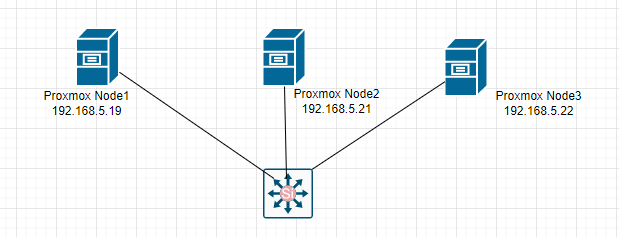
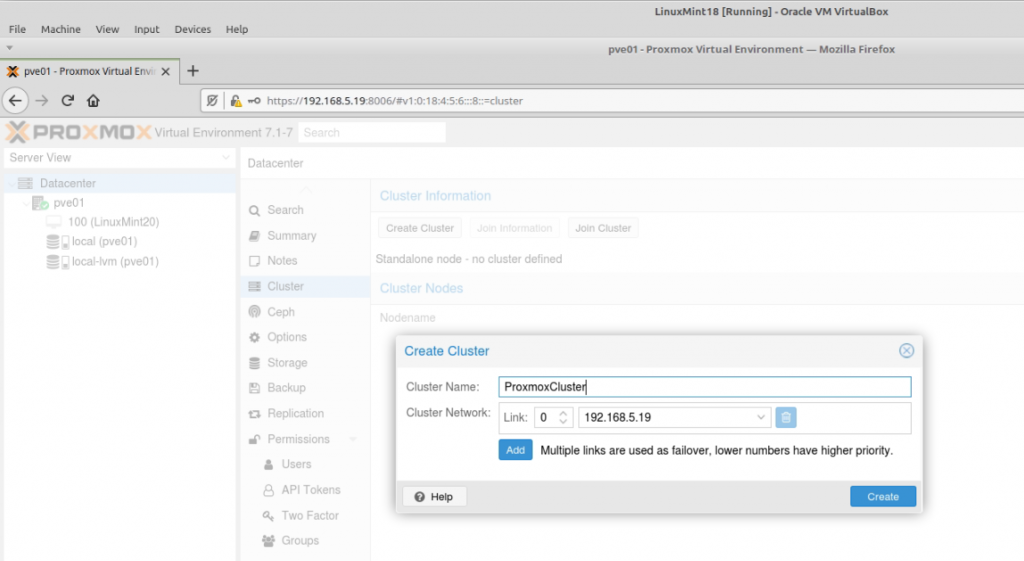
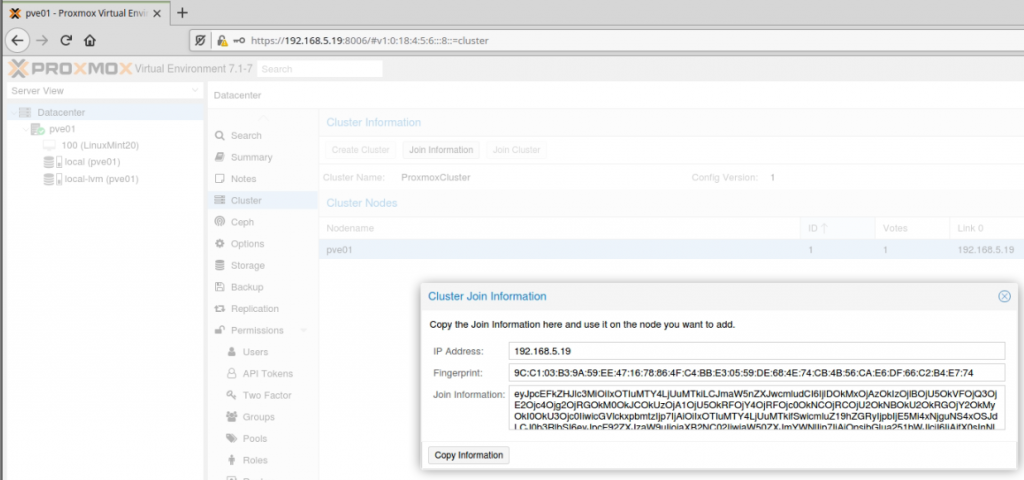
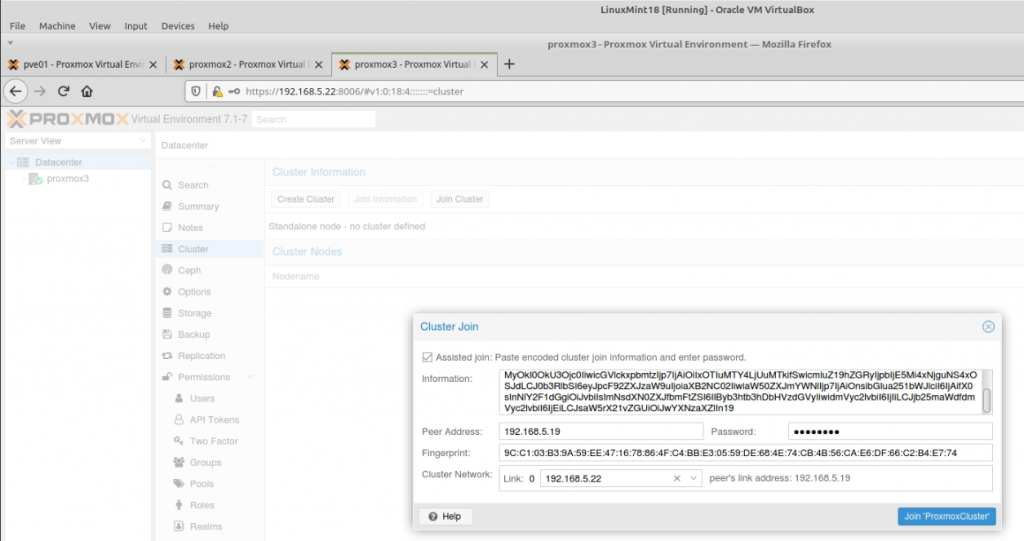
This lab below is used to deploy three Proxmox nodes on the Ceph clsuter.
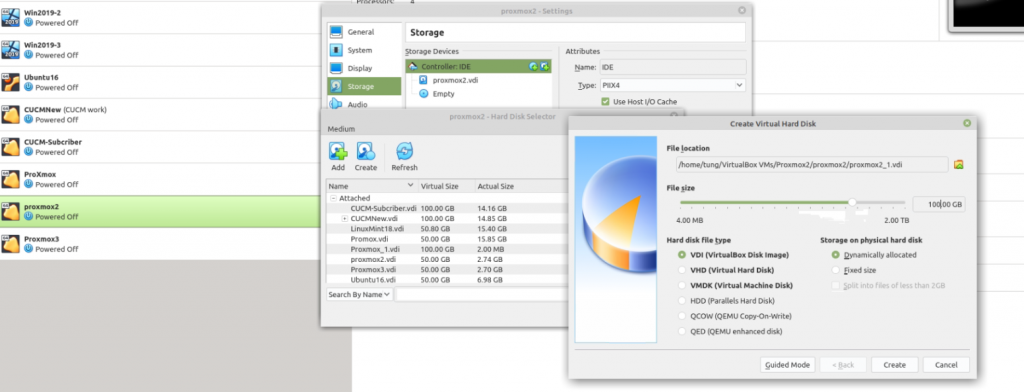
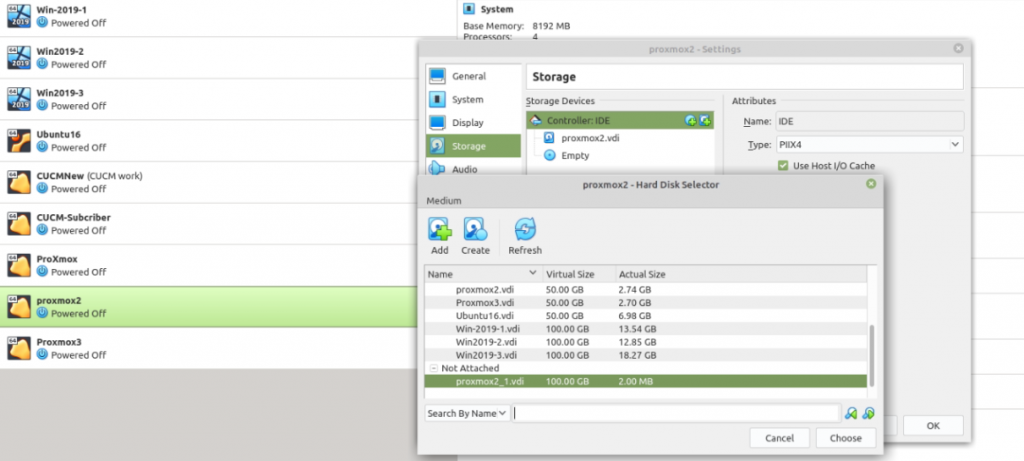
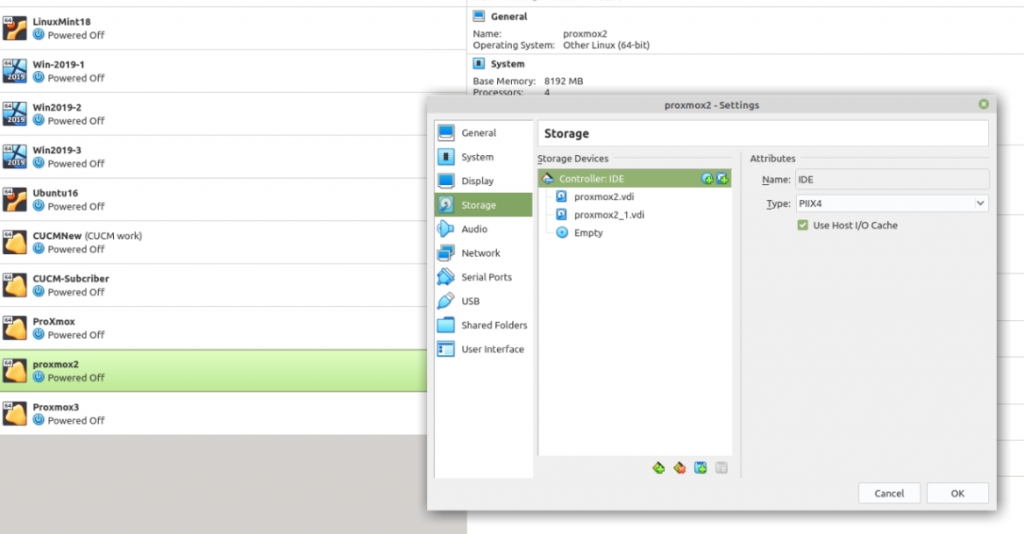
Add a new second hard drive on Proxmox1, Proxmox2, and Proxmox3 nodes.
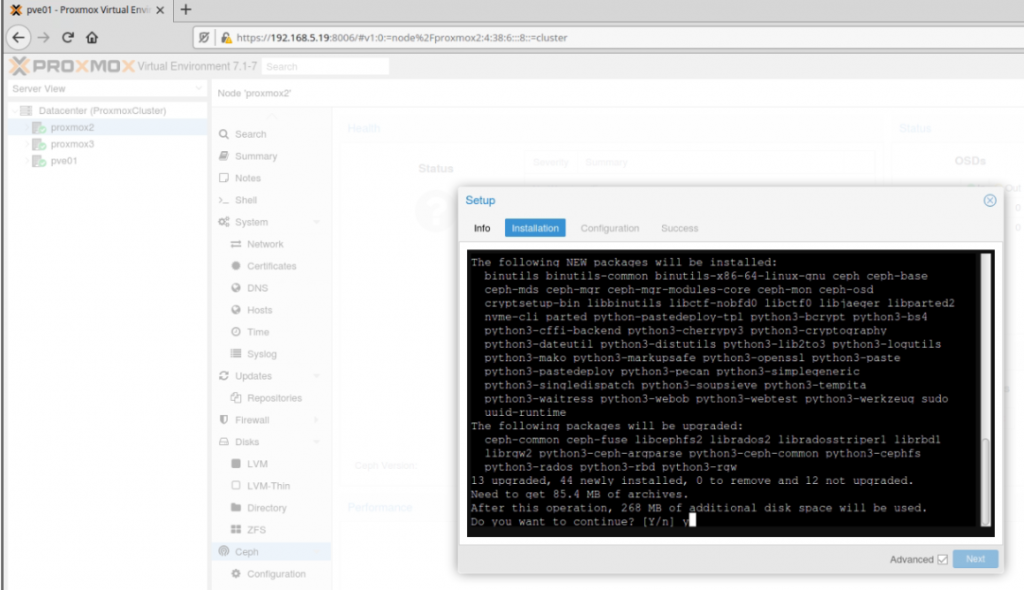
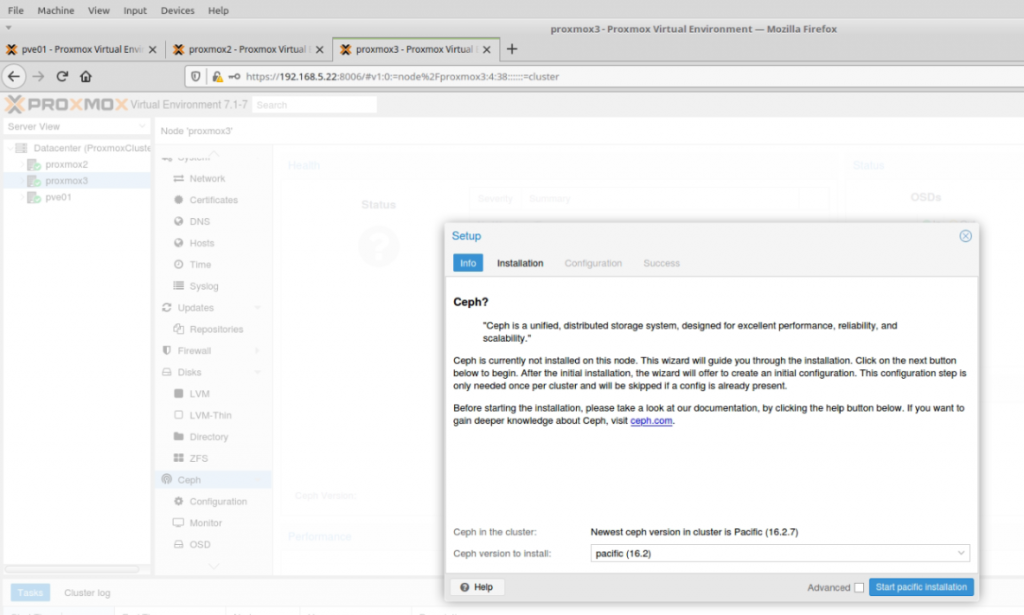
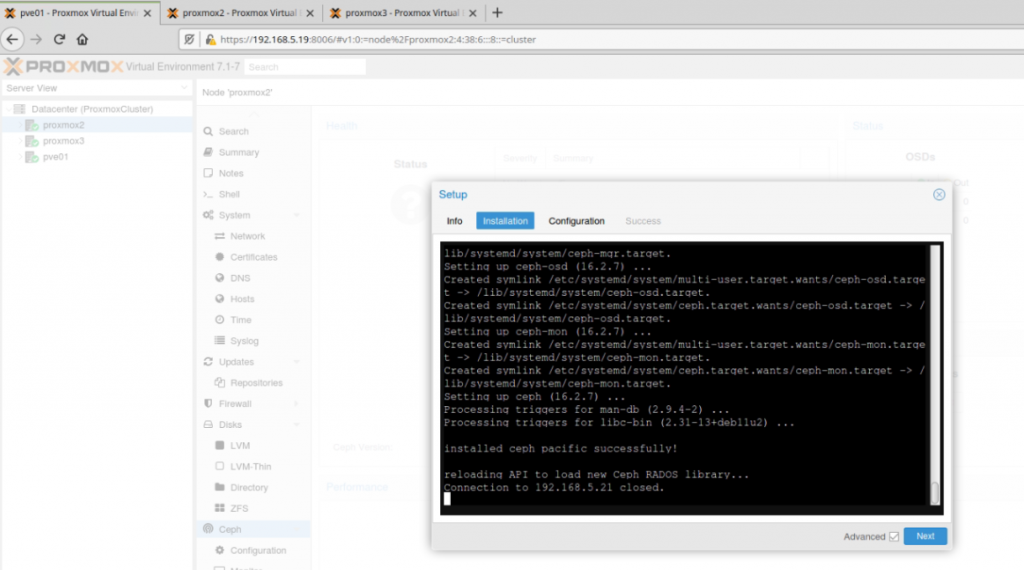
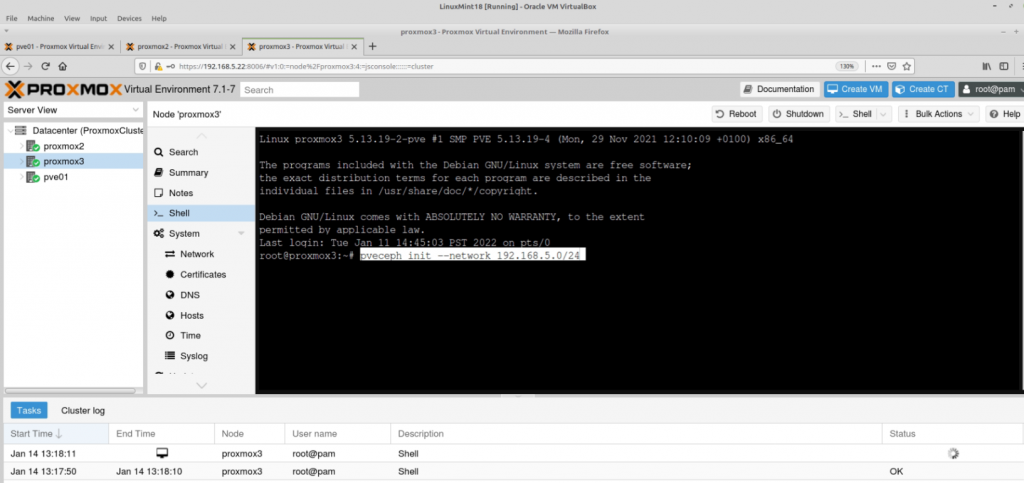
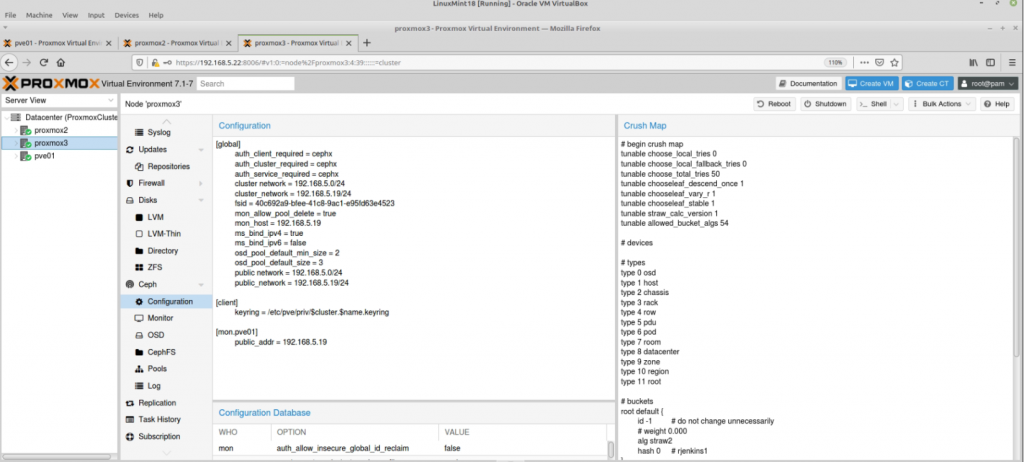
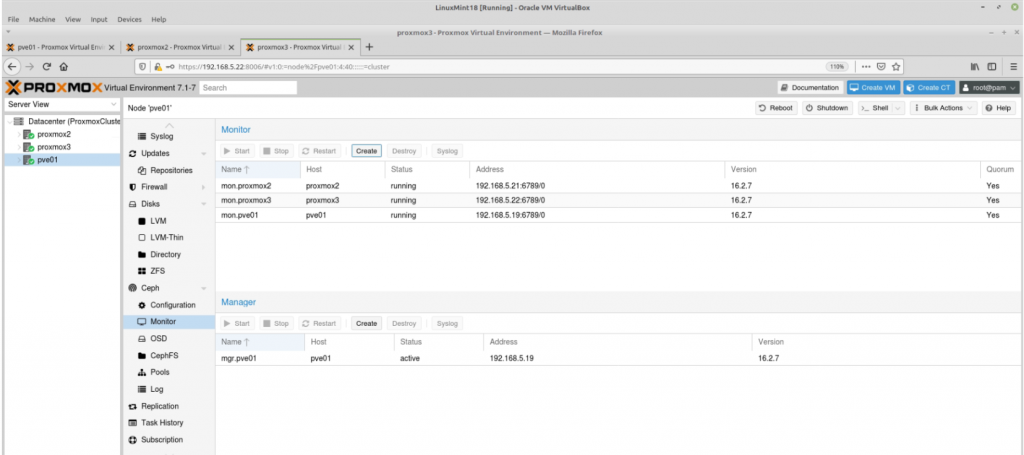
Install Ceph cluster on node 1.
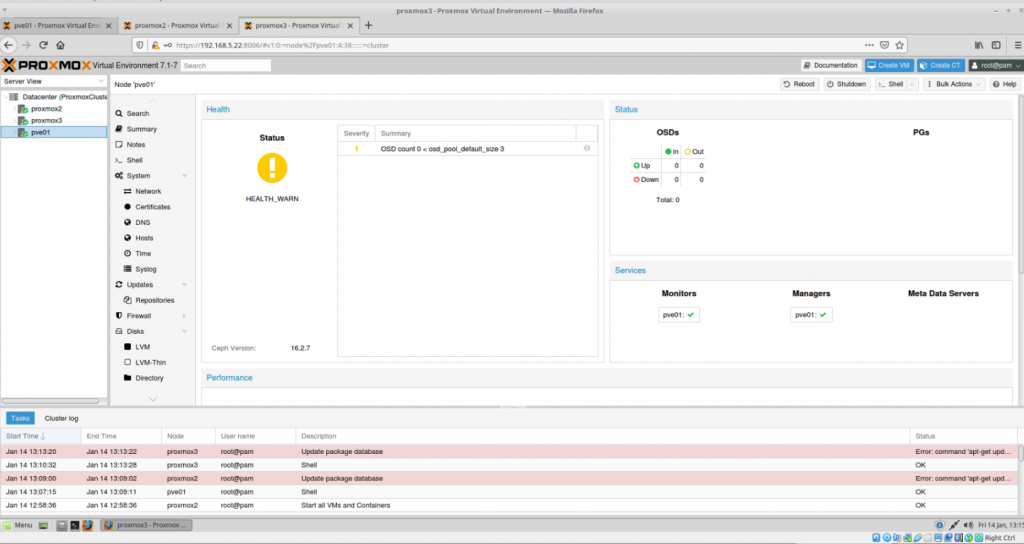
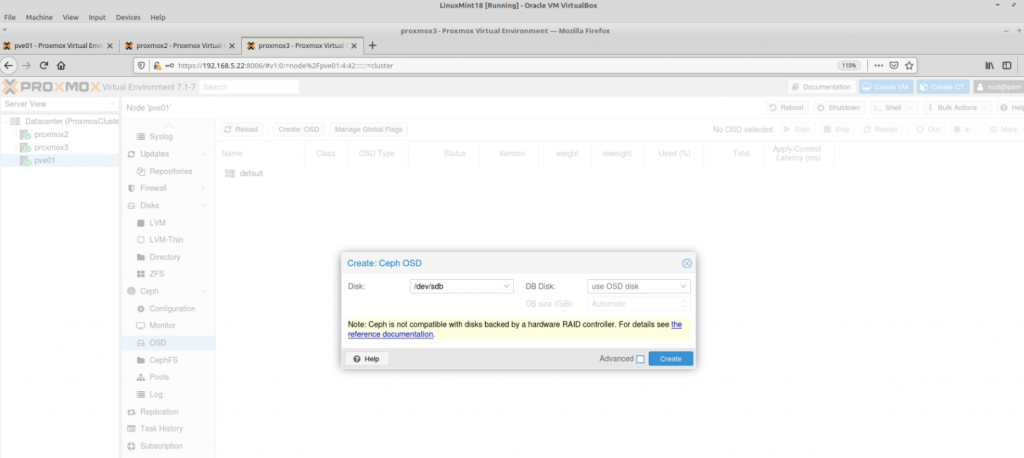
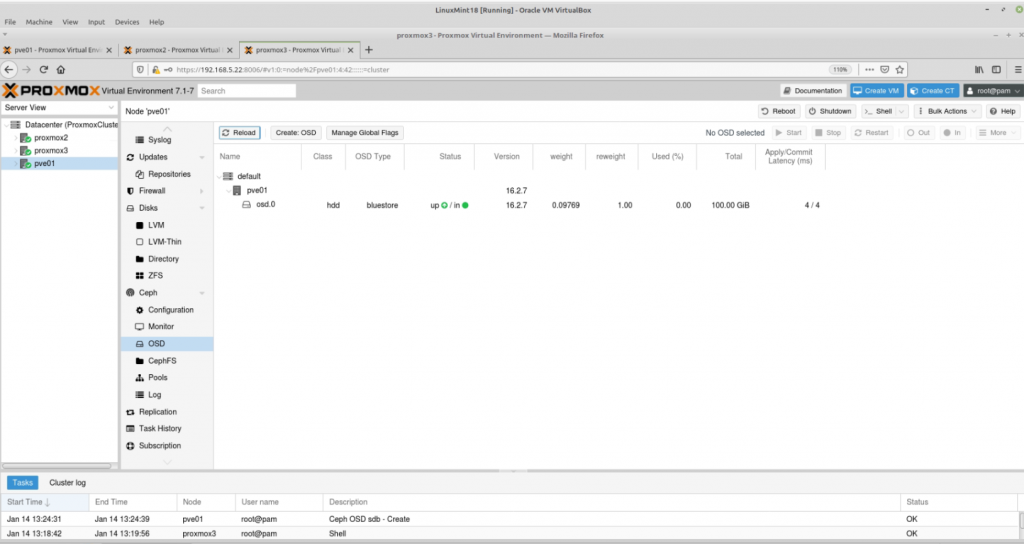
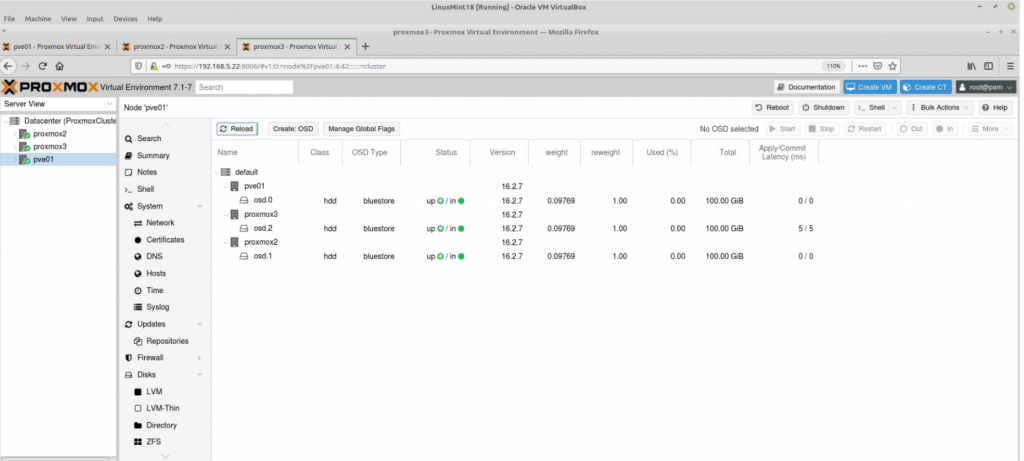
Create an OSD on Proxmox node 1, node 2 and node 3.
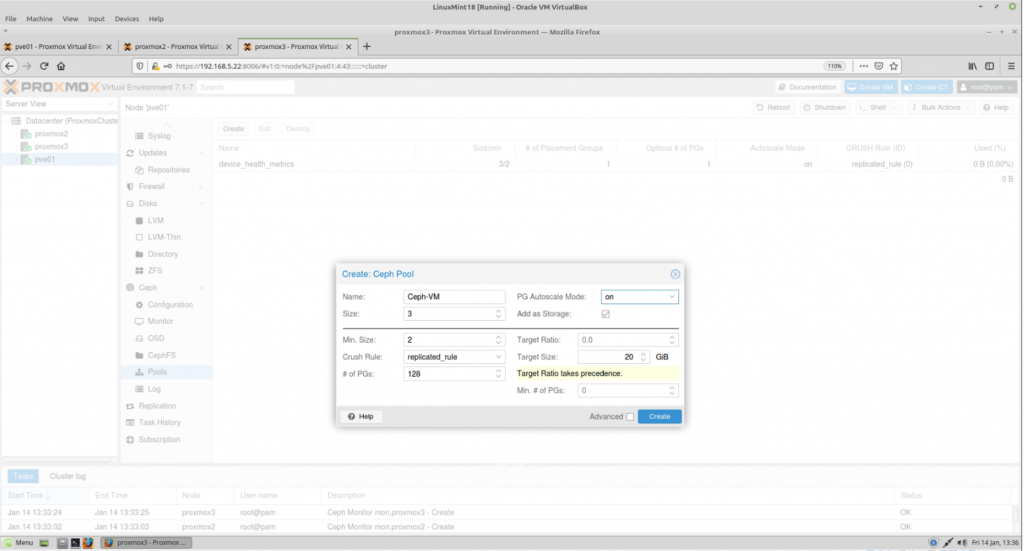
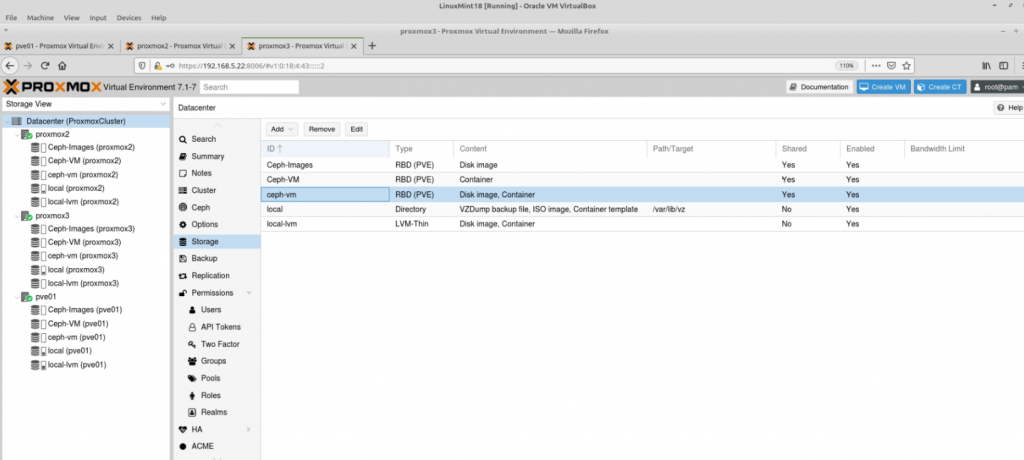
Create Ceph Pool on Ceph storage.
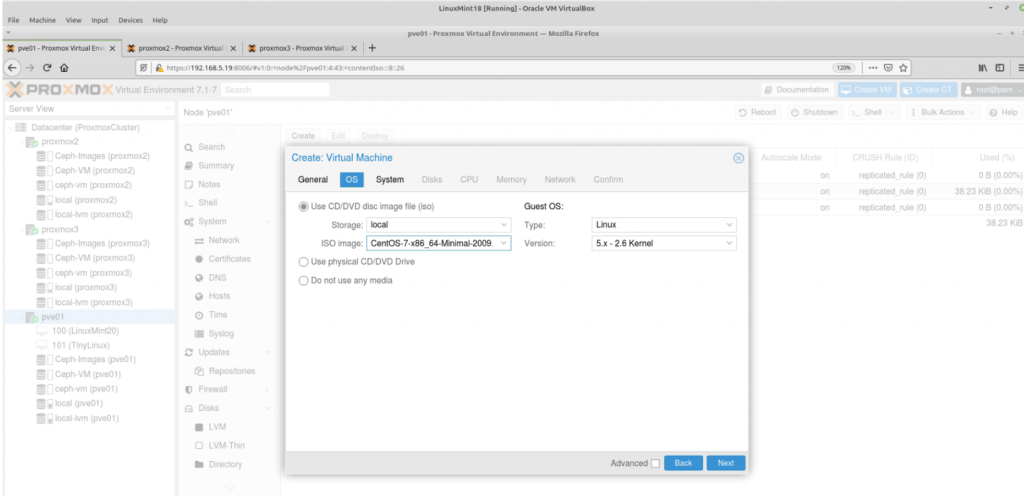
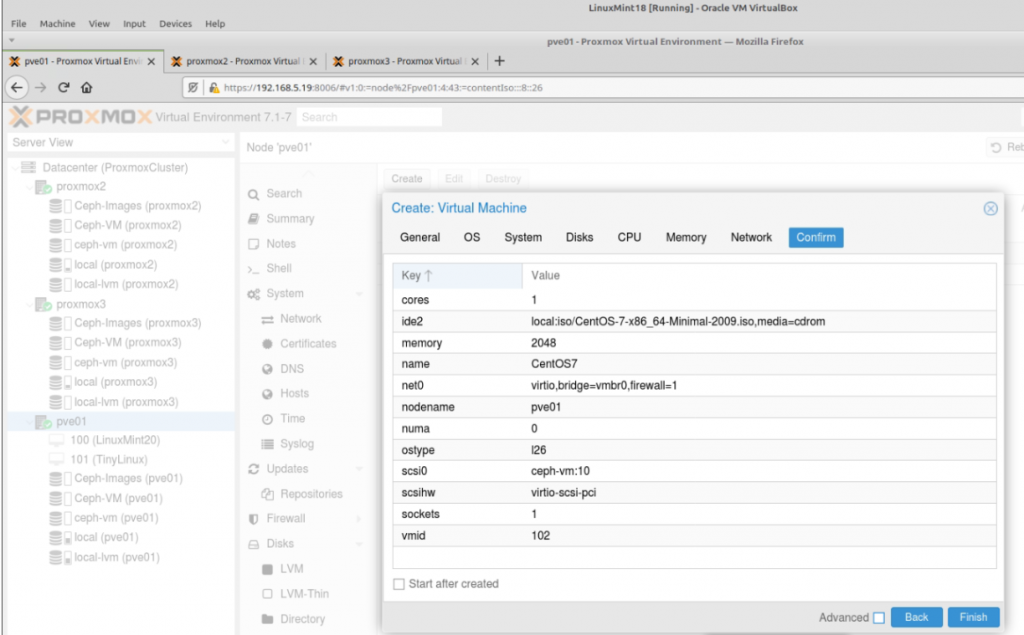
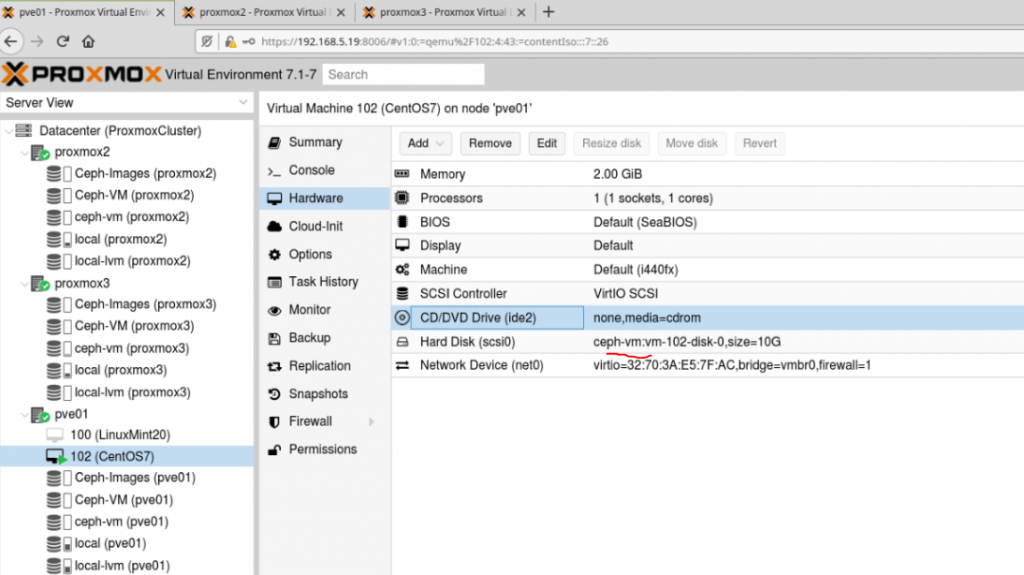
Create a new Linux VM on Ceph.
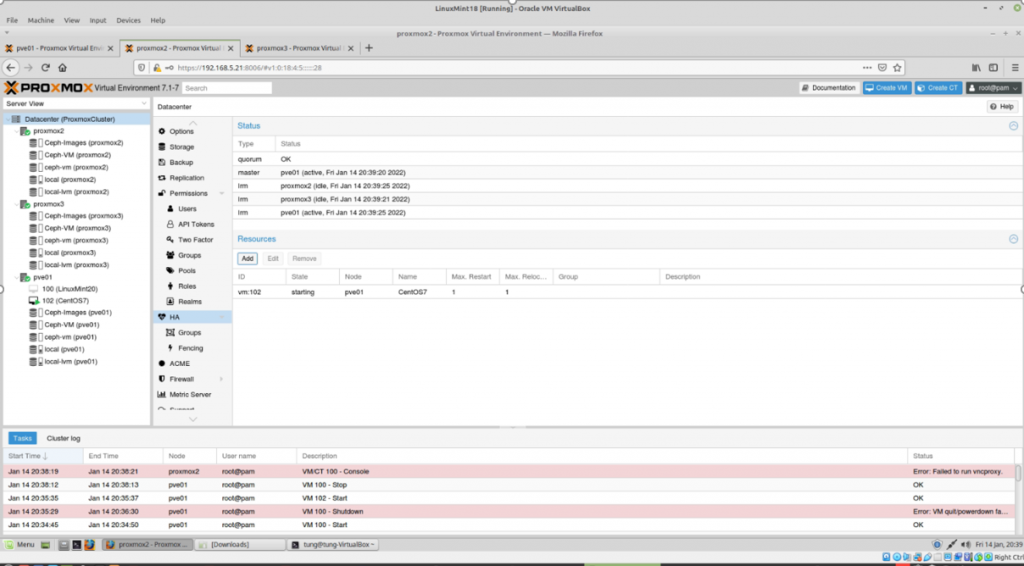
Add this machine to the HA Ceph.
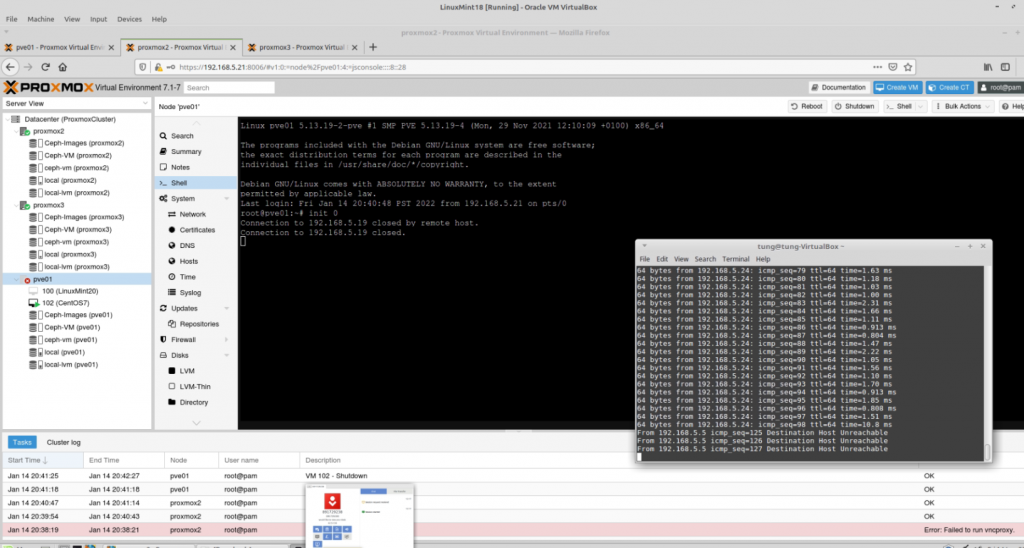
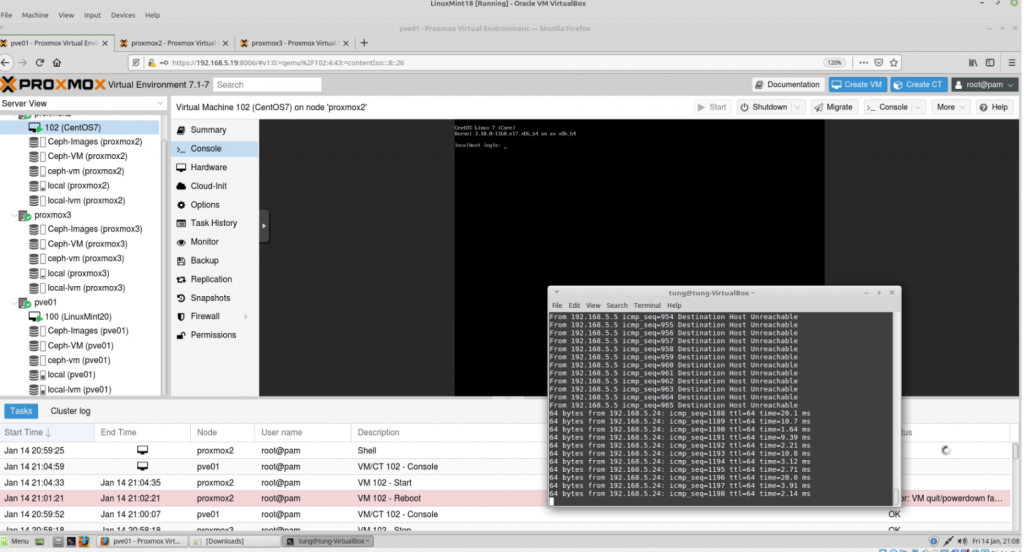
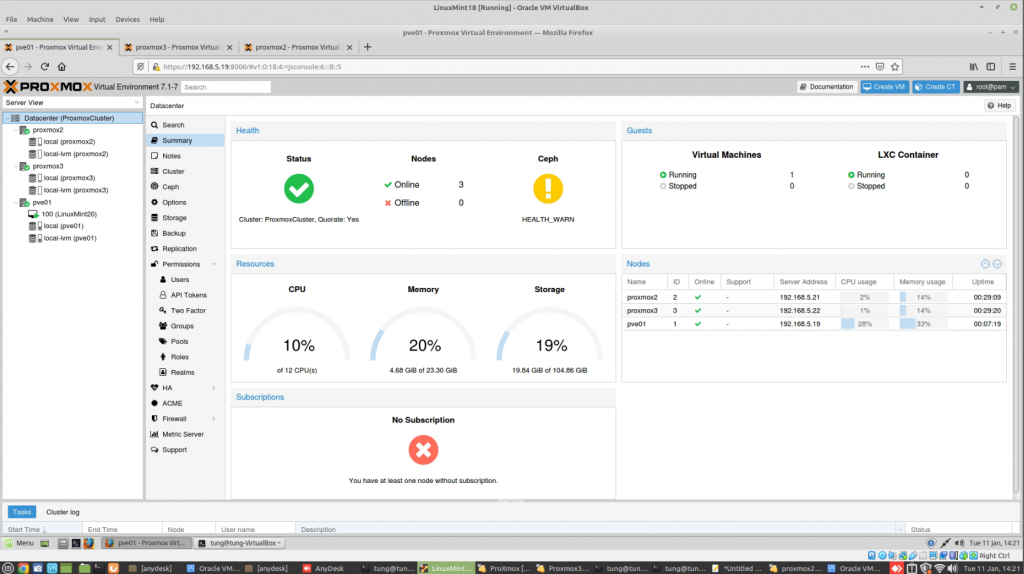
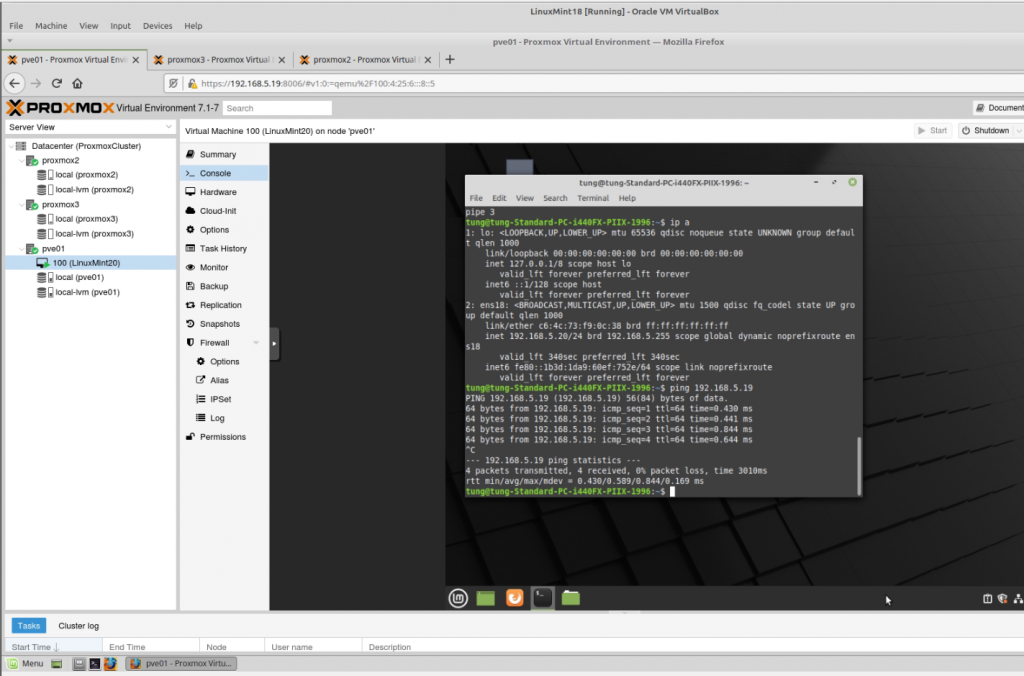
Hard turn off the Proxmox node1.
Linux VM has been migrated to Proxmox node2 with a couple of minutes of downtime.
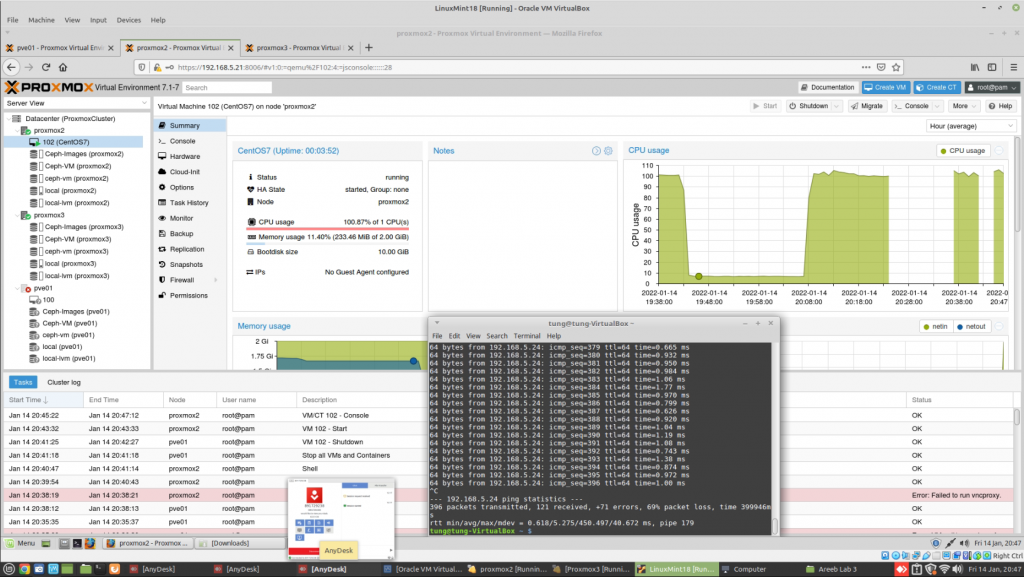
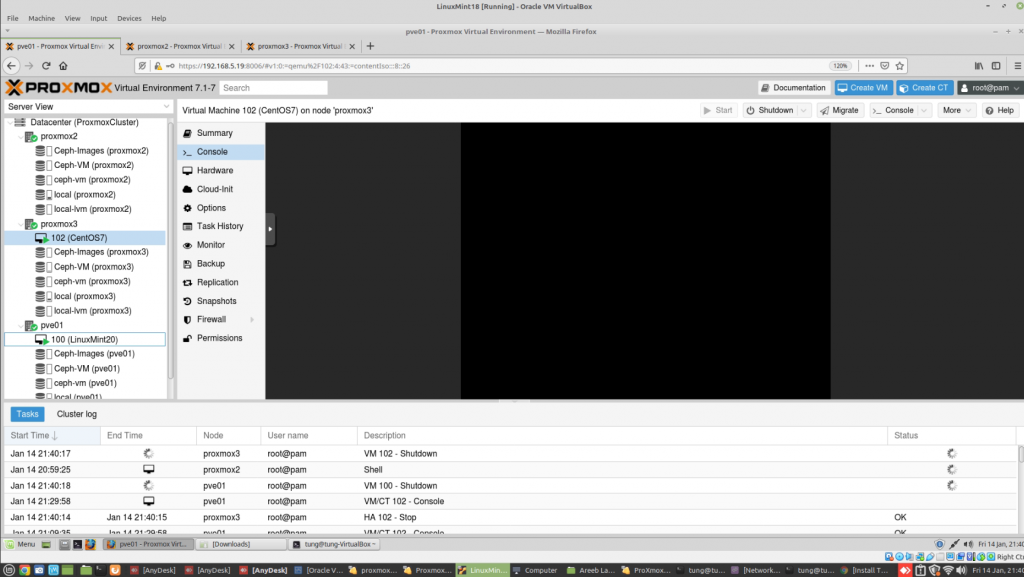
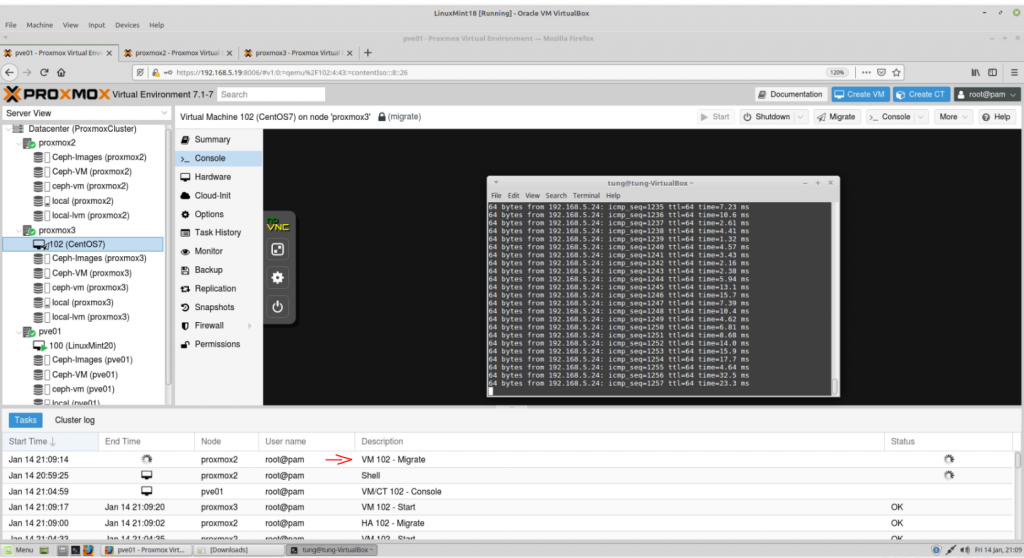
Doing live migration the VM2 on Proxmox node 2 to node 3.
It is interesting to see there is no downtime when doing live migration VM2 on Proxmox node 2 to node 3 in the Ceph cluster.
# This is PowerShell script to force on installing Windows Updates via PSWindowsUpdate on Windows machines
# https://www.powershellgallery.com/packages/PSWindowsUpdate/2.2.0.2
# It is created on 2021-10-21
# Allow PowerShell to be run on Windows machines with PSWindowsUpdate module
Set-ExecutionPolicy RemoteSigned
# Installs everything (newest version) along with required modules.
Install-Module PSWindowsUpdate
# Import Module PSWindowsUpdate before running the script
Import-Module -Name PSWindowsUpdate
# Force Windows updates are completely downloaded, installed and then restarted. Will check if we have a WSUS server
Install-WindowsUpdate -AcceptAll -AutoReboot
# Send an email after running PSWindowsUpdate command
# Will send email if the last previous command is successful.
if ($? -eq $True){
        # Use this command for TLS requirement
        [Net.ServicePointManager]::SecurityProtocol = [Net.SecurityProtocolType]::Tls12
        # Get machine name
        $machinename = get-content env:computername
        # Get current date and time
        $currentdate = get-date
        # Get current date and time
        $currentdate = get-date
        # SMTP server of Xyz.com</p>
        $SMTP = "smtp-mail.xyz.com"
        # Mail from<
        $From = "youremail@xyz.com"
        # Rcpt to
        $To = "youremail@xyz.com"# Subject line
        $Subject = "Windows updates on $cname"
        # Email body
        $Body = "Finising running Windows updates on $machinename on $currentdate"
        #Create a connection to SMTP Outlook via the port 587</p>
        $Email = New-Object Net.Mail.SmtpClient($SMTP, 587)
        # Enable SSL for the connection
        Email.EnableSsl = $true
        #Log in to xyz mail server with your credential
        $Email.Credentials = New-Object System.Net.NetworkCredential("youremail@xyz.com", "yourpassword");
        # Send email syntax
        $Email.Send($From, $To, $Subject, $Body)
}
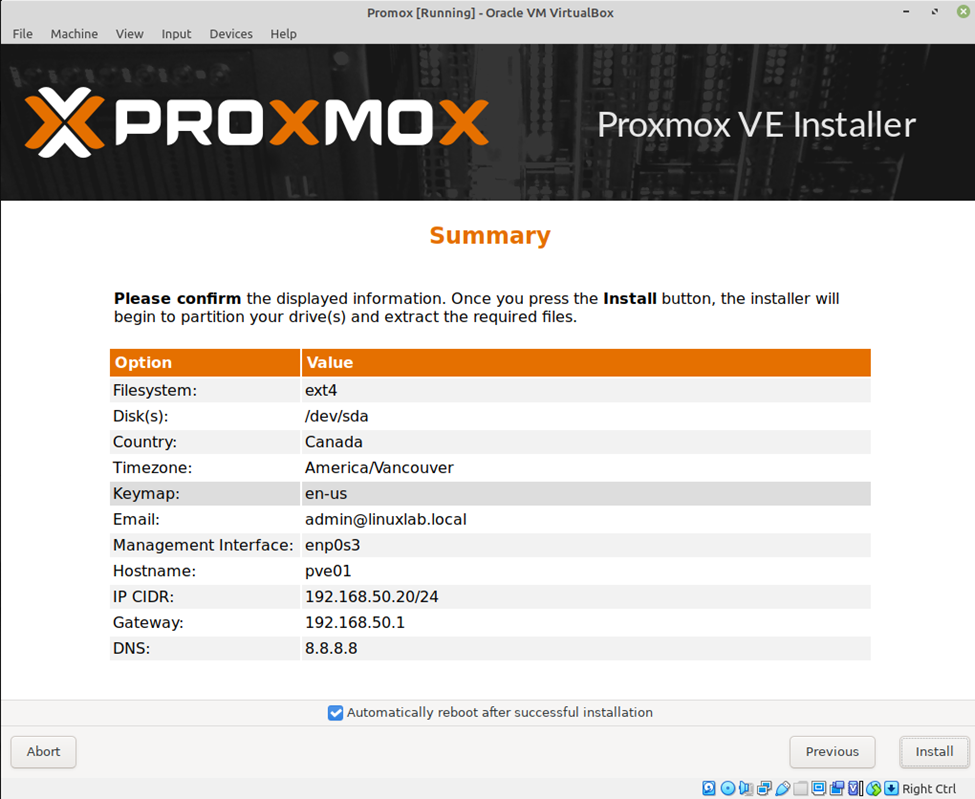
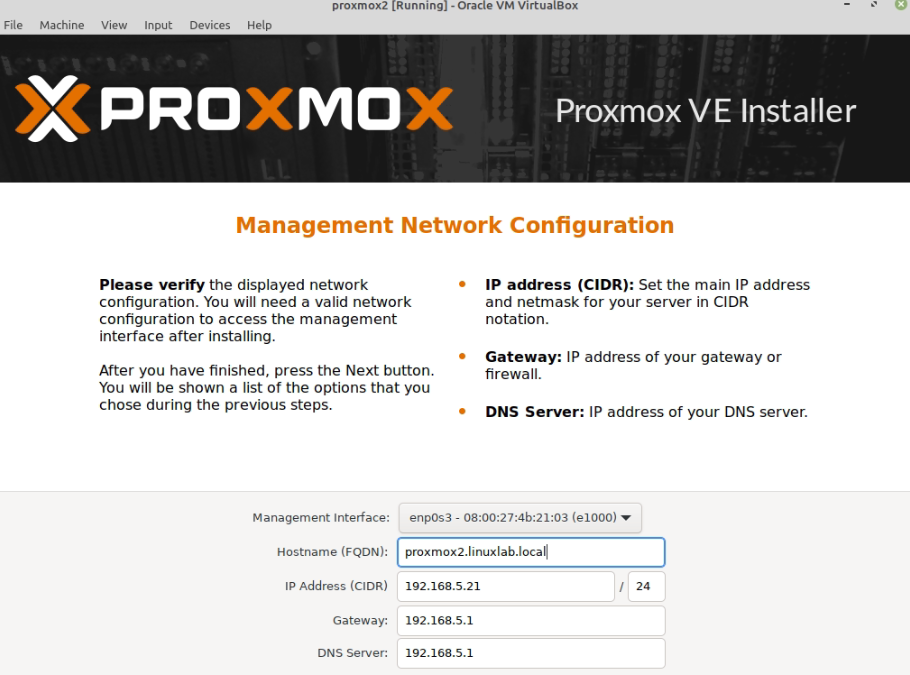
Proxmox Virtual Environment is an open-source server virtualization management solution based on QEMU/KVM and LXC. It is an affordable virtualization solution for small businesses
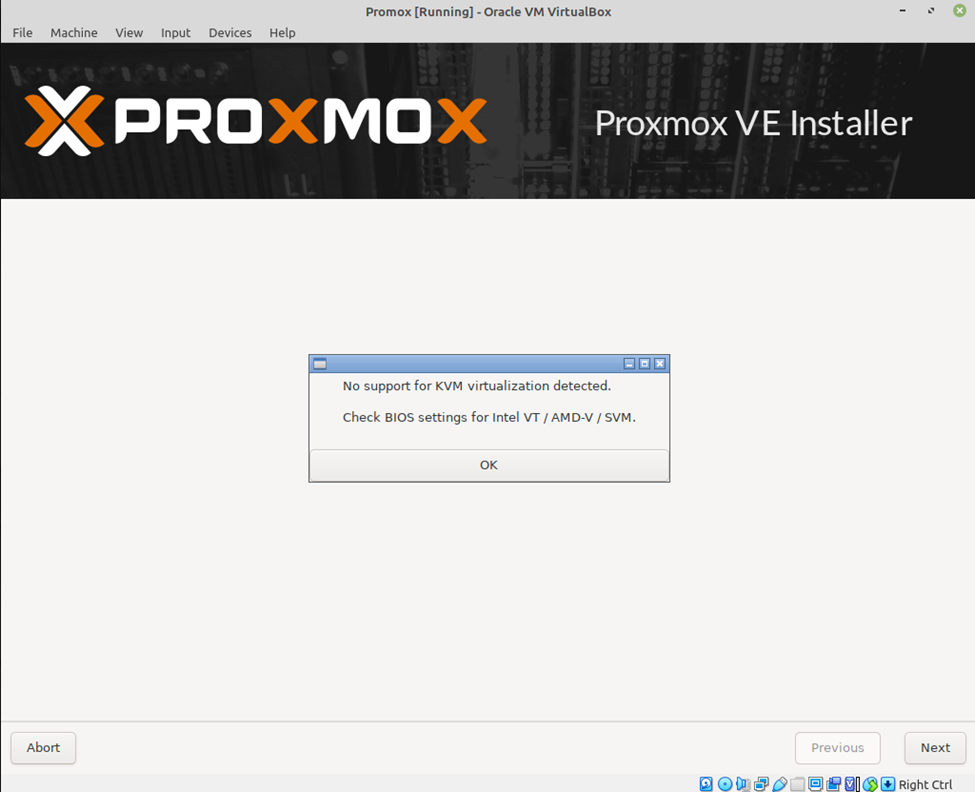
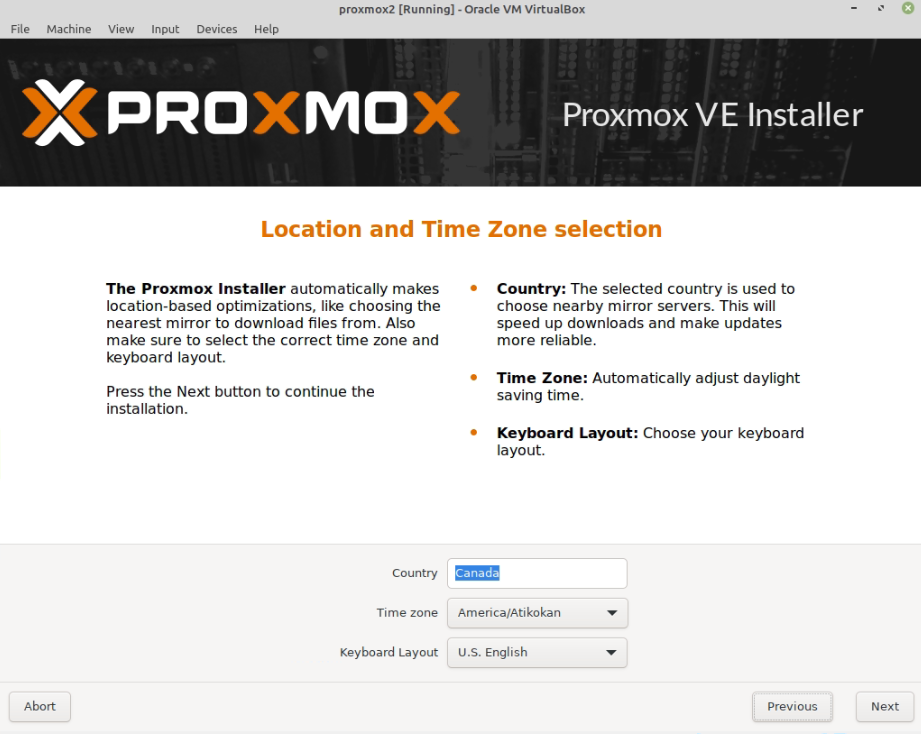
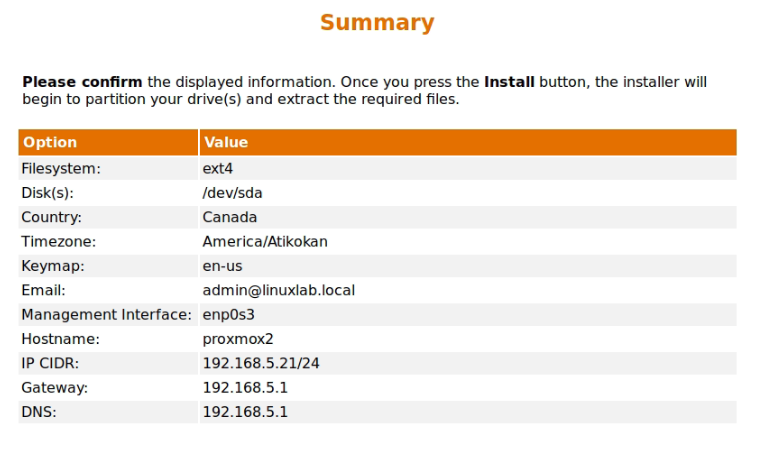
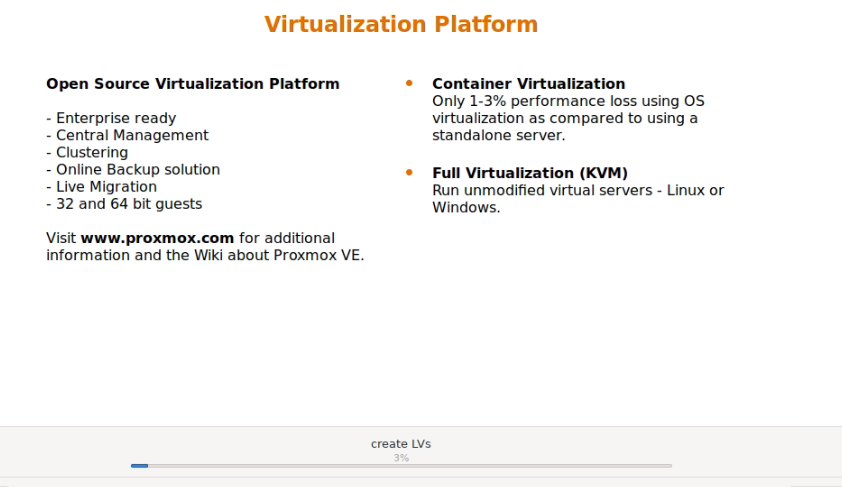
Create a new Linux VM on Virtualbox to install Proxmox. Click the link below to downloadProxmox VE 7.1 ISO Installer, then mount the iso to the VM to install Proxmox.
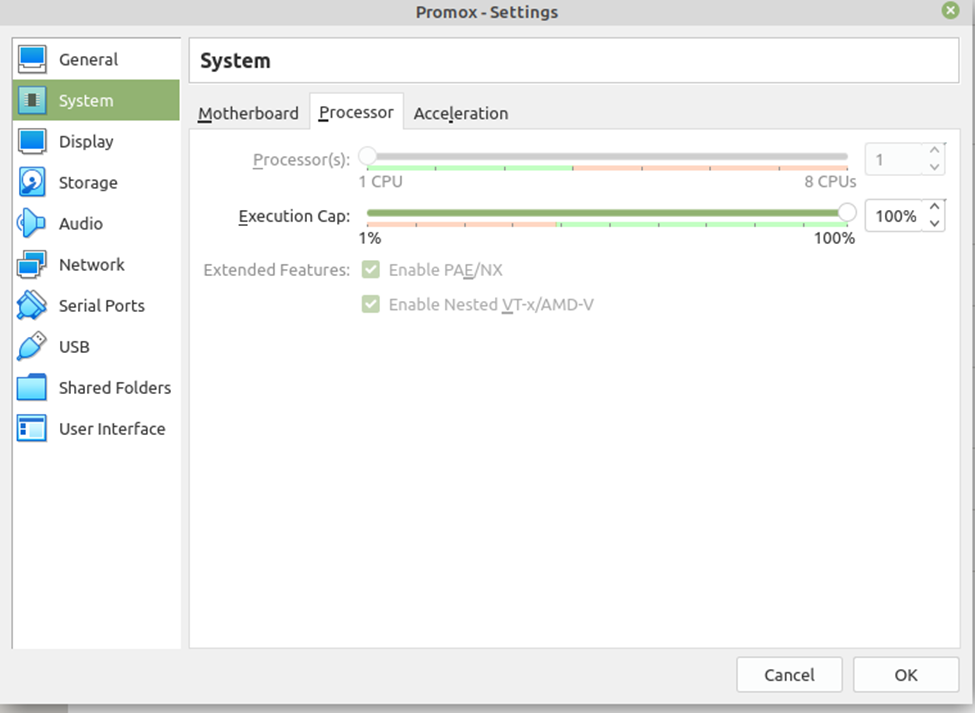
To enable “Nested VT-x/AMD-V” function on Proxmox, open a terminal console and type the command below.
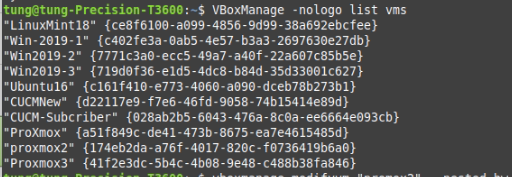
VBoxManage -nologo list vms
vboxmanage modifyvm "Virtual machine name of Proxmox" –nested-hw-virt on
vboxmanage modifyvm "proxmox1" --nested-hw-virt on
vboxmanage modifyvm "proxmox2" --nested-hw-virt on
vboxmanage modifyvm "proxmox3" --nested-hw-virt on
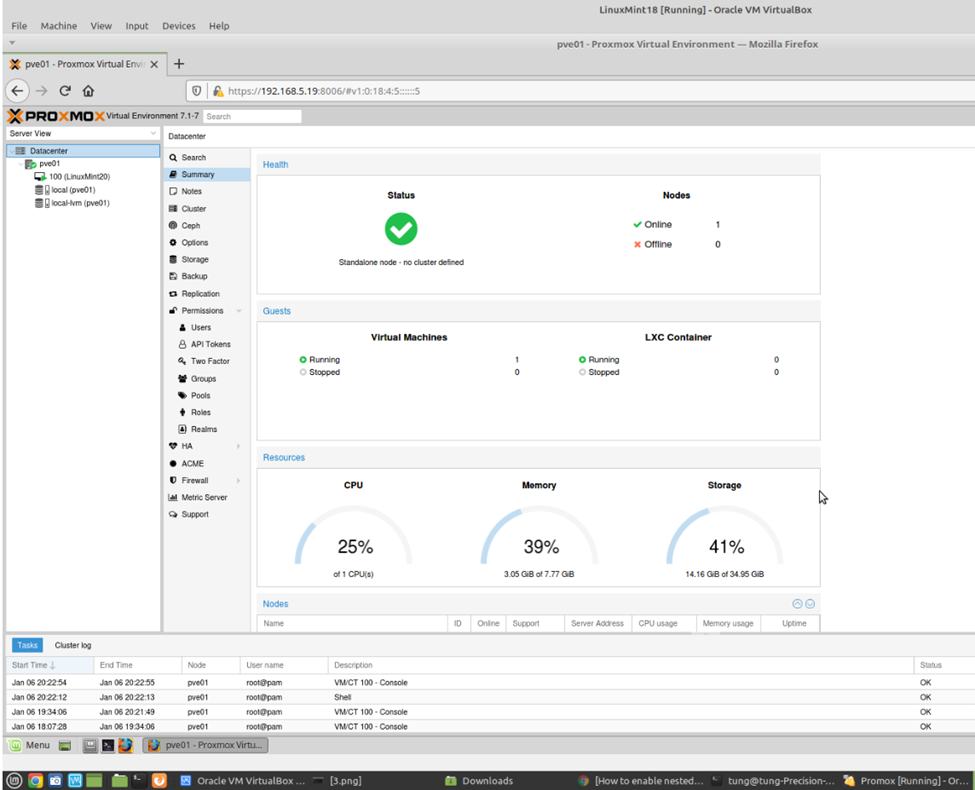
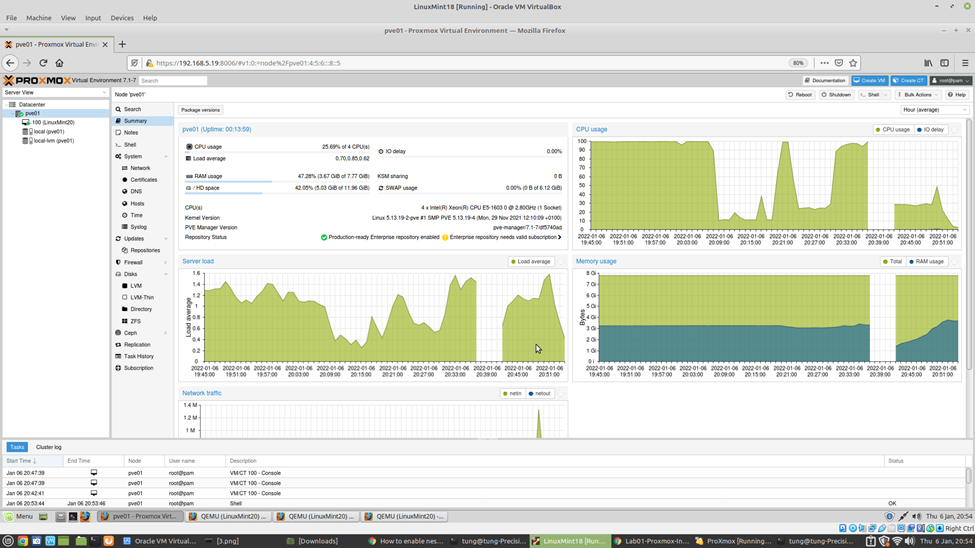
After installing Proxmox, open any web browser (such as Firefox on LinuxMint), access Proxmox web management interface (https://IPaddressofProxmox:8006).
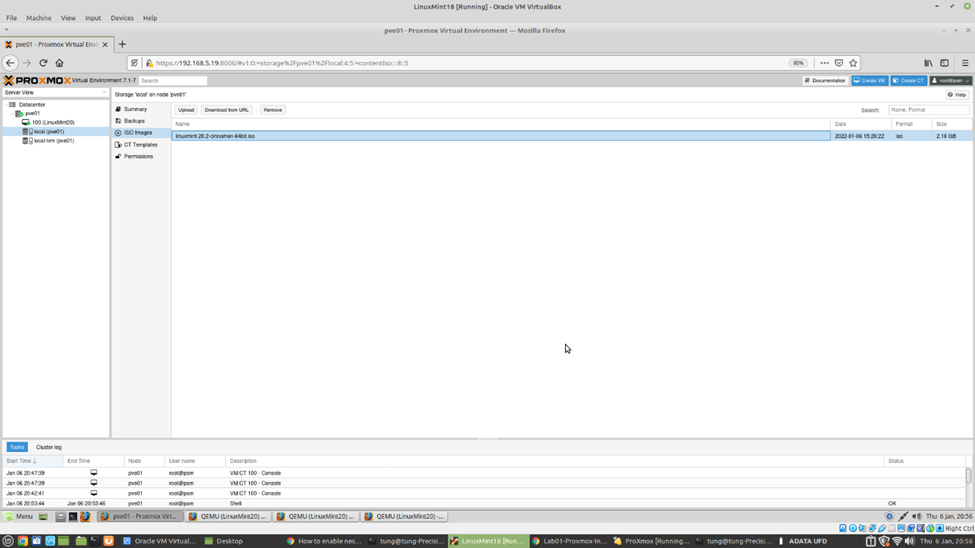
Upload source installation such as LinuxMint, Windows OS iso files to install Linux and MS Windows VMs.
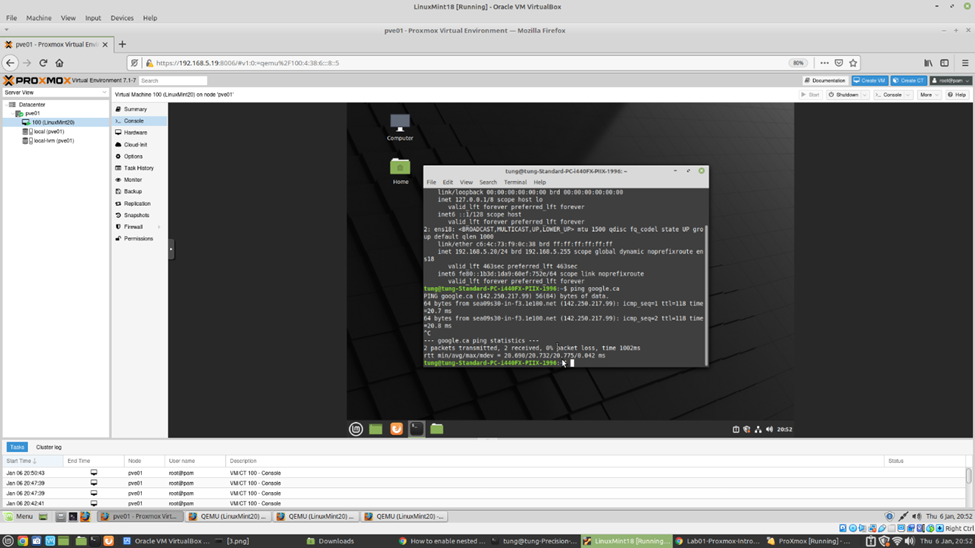
Create and install a Linux machine on Proxmox server.